Every time I feel a new season roll in, I think to myself, “It’s pie season!” Summer? Yes. Winter? Yes. Spring? Let’s have pie! Now that spring is here, we’ll start seeing plenty of strawberries, rhubarb, apricots, and cherries grace our grocery stores and farmer’s markets. All of these gorgeous offerings can benefit from a flaky, buttery crust — which is often the only thing stopping us.
Maybe you already have your favourite pie dough recipe memorized, but it’s when we get to rolling out the crust that we meet a host of problems — it keeps springing back, the dough breaks apart, the middle is completely stuck to the counter, it’s paper-thin on one side — it’s enough to make you scrape everything into a ball and roll it out again (a move worthy of the pie crust hall of shame). But if you execute a few of these strategies, you’ll nail a successful crust roll-out.
Let it rest — but not in the fridge
Many crust recipes instruct you to wrap up your freshly mixed pie dough and put it into the fridge for anywhere from 20 minutes to hours. This is a great idea if you make your pie dough in advance and need somewhere to keep it for a few days, but if you’re making pie that same day, ditch the cold. The fridge temperature solidifies the fat and makes the crust mixture more likely to crack and break if it gets too chilly. The important takeaway from all that resting-in-the-fridge hype is not the fridge part — it’s the rest time.
Your goal is to take this two-by-four-inch disc of butter and flour and convince the gluten to willingly stretch out to three times its original area. The gluten needs rest. Without it, it gets cranky and will keep pulling back despite your best moves. Once you’ve mixed your dough, wrap it and let it sit on the counter for 20-30 minutes. Then, roll away. The dough will be less likely to crack or crumble, and the gluten should be sufficiently relaxed. Unless your kitchen is sweltering, resting on the counter is the way to go.
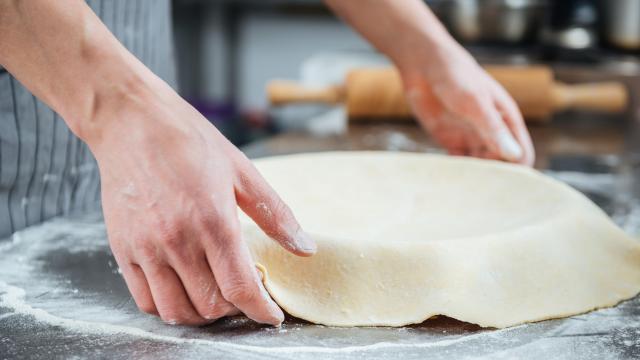
Flour the dough… and the counter… and the pin…
And your hands. You know what? Do it again for good luck. Dusting with an adequate amount of flour is the one move that will make every other step easier. It is definitely better to use too much flour than too little. Many of us have experienced rolling out a perfect circle of dough, only to lift the edge and find the entire centre has merged cells with the counter. A substantial dusting of flour under your pastry will ensure there is no chance of sticking.
The same goes for the top: Flour the surface of the crust and your pin to create a barrier while you roll. With every turn of the pin, the outer surface gets pushed out and a little more of the buttery inside becomes exposed. Those parts will either meet more flour or find a surface to stick to. It’s likely you’ll need to apply additional flour two or three times to both the top and bottom of the pie crust before you reach the desired diameter and thickness. Don’t be shy; it’s almost impossible to over-flour. Just keep a pastry brush handy so you can dust away the excess before you transfer the dough to the pie plate.
Roll out from the thick parts
If you’re facing a mound of pie dough for the first time, it’s a natural response to start flattening out the edges. After all, they’re the most malleable and exposed. Resist! Rolling out from the thinnest parts (edges) will almost surely lead to ultra-thin areas or sticky, melted butter edges. Instead, roll from the thickest parts outward. In the beginning, this will always be the centre. Think of it as a delicious pie dough reservoir to draw from. As you roll out from the centre, try not to roll off the edge of the dough. Stop just shy of the end and go back to the centre to roll out in a different direction. If you crush the edges down, you’ll notice your dough becoming extremely thin in those areas and starting to stick.
After your dough is about 90% rolled out and the centre is no longer the thickest point, you can look around for thick spots and do some precision rolling to even everything out.
Rotate your dough
Sometimes you don’t know you’re doing extra work until someone asks you why you’re doing it. I’ll be her. Why are you twisting around your body when you roll out pie dough instead of twisting the dough? My theory is that, until pie crust confidence is gained, we’re all a little bit scared of pastry — scared of ripping it, wrinkling it, ruining it. Instead of handling crust with conviction and risking a tear, we’d rather just work around it. The hard truth is, the less you command the dough, the more likely you are to tear it. So let’s build up your pie crust confidence.
Roll the dough out by placing the rolling pin in the centre and pushing forward, away from your body. Put down your pin, grab the disc of dough with both hands and give it a quarter turn. Now a thick part is in front of you and you have seamlessly spread a little more flour around underneath. Pick up your pin, roll from the centre out, and twist the dough a quarter turn again. Repeat, adjusting the turns to accommodate thick dough spots. Aside from making the rolling action easier on your spine, lifting and turning the dough allows you to regularly check for any sticky areas, gives you the opportunity to add additional flour underneath, and allows you to feel the dough for uneven thickness.
The next time you stroll into the produce section of your grocery store, allow yourself to be inspired by the juicy spring fruits tumbling in — don’t hesitate to buy a few pints and show off your big pie dough energy.
Leave a Reply
You must be logged in to post a comment.