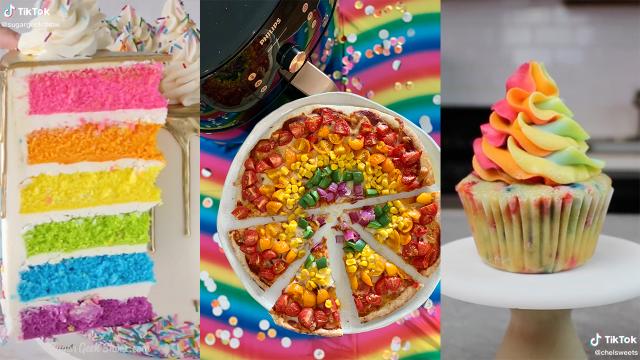
Mardi Gras season is upon us, friends. Whether that means heading out to see the parade and covering yourself in (eco-friendly) glitter or celebrating pride at home with your nearest and dearest, there’s always room to inject a little more colour into your snacks for the big event with a few rainbow recipes.
From cakes to pizzas, here is a list of 5 tasty and fun rainbow recipes to help you celebrate LGBTQ+ pride.
5 rainbow recipes for your Mardi Gras celebrations
Rainbow cake recipe
First, we’re going to take a look at one of the most popular rainbow recipes there are: the rainbow cake. We’ve referred to @sugargeekshow’s TikTok video guide here for a simple rundown of a beautiful and tasty rainbow cake.
@sugargeekshow I love how bright the layers are 😻 #rainbowcake #cakedecorating #caketutorial #cakerecipe
For this recipe, @sugargeekshow uses her white velvet cake as a base and adds food colouring to each layer to give it that rainbow look. Worth noting, she points out that she prefers using pink to red, but that’s up to you.
This rainbow cake recipe can be found in full on the Sugar Geek Show website, but the key ingredients to pull this cake together are listed out for you below.
What you’ll need:
Rainbow cake
- 680g cake flour
- 680 g granulated sugar
- 1 tsp salt
- 2 Tbsp baking powder
- 1 tsp baking soda
- 283 g egg whites room temperature
- 170 g vegetable oil
- 510 g buttermilk room temperature or slightly warm
- 340 g butter unsalted and softened
- 1 Tablespoon vanilla extract
Easy Buttercream frosting
- 227 g pasteurised egg whites
- 907 g powdered sugar
- 907 g unsalted butter softened but not melted
- 2 tsp vanilla extract
- 1/2 tsp salt
- 1 dot purple food colouring to make the buttercream white
Gold drip
- 142 g white candy melts
- 28 g chocolate candy melts
- 170 g hot water
- 1 tsp Truly mad plastics super gold dust
- 1/4 tsp everclear or vodka or lemon extract
Rainbow cupcakes
If an entire rainbow cake is a little too much work for your liking, you can always go for a simple rainbow-icing cupcake. Here’s a TikTok recipe guide from @chelsweets.
You can even buy some plain cupcakes and use this guide to help you pipe out rainbow icing on top if you’re super low on time.
@chelsweets A little rainbow to brighten up your day 🌈 #rainbow #swirl #frosting #cupcakes #chelsweets
Rainbow pizza recipe

If rainbow cakes aren’t your style, chef and Philips Kitchen ambassador Elle Vernon has pulled together a few more recipes, using our favourite kitchen appliance – you guessed it – the air fryer. Let’s start with pizza.
Preparation time: 10 mins | Cooking time: 16 mins | Makes 2 pizzas, Serves 6 (as a snack)
What you’ll need:
- 2 x 25cm round store-bought stone baked style pizza bases
- 4 Tbsp pizza sauce
- 1 cup shredded pizza blend cheese (a mix of mozzarella, cheddar and parmesan)
- 1 ½ cups red cherry tomatoes, quartered
- 1 cup yellow cherry tomatoes, quartered
- ½ cup canned corn kernels, drained
- ½ small green capsicum, finely diced
- ¼ red onion, finely diced
- 1 Tbsp extra virgin olive oil, to drizzle
- 1 Tbsp fresh basil leaves, to garnish (optional)
Directions:
- Spread pizza bases with pizza sauce. Scatter with cheese.
- Arrange vegetables in rings, starting from the outer edge of the pizza bases, working your way in towards the centre. Begin by arranging red tomatoes, followed by yellow tomatoes, corn, capsicum and finally red onion in the centre.
- Slide one pizza onto the Philips Pizza Master Accessory, and insert basket mesh on top. Place it inside the Philips XXL airfryer with Smart Sensing Technology.
- Set temperature to 180°C and time to 8 minutes, cooking until cheese has melted and pizza crust is light golden. Remove from the Airfryer, transfer to a serving board.
- Repeat step 3 and 4 with remaining pizza.
- Slice and serve drizzled with a little olive oil and a sprinkle of basil, if using. Bellissimo!
Hot tip: Reduce waste and use up vegetables you already have in your fridge. Try using a variety of different coloured capsicums, leftover roast pumpkin pieces, yellow squash, zucchini and broccoli florets.
For an extra punch of flavour, feel free to spread the base with the pizza sauce as per recipe, then swirl over a spoonful of basil pesto, or garlic dip, or even a little olive tapenade dip before sprinkling with cheese.
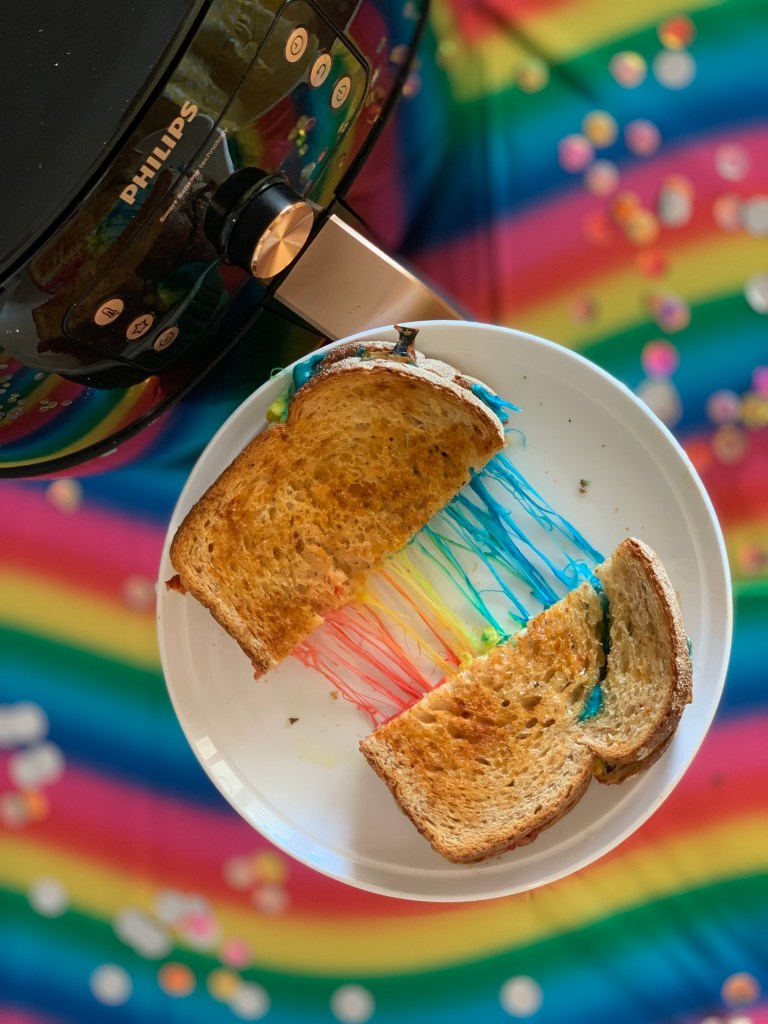
Rainbow cheese toasties
Preparation time: 5 mins | Cooking time: 8 mins | Makes 2
What you’ll need:
- ½ cup shredded mozzarella
- ½ cup shredded Colby
- Red, yellow and blue food colouring, to tint
- 4 slices bread
- 40g butter, softened
- Pinch of smoked paprika
- Pinch of dried Italian herbs
- Sea-salt flakes, to season
Directions:
- Divide cheeses between three bowls. Add a couple of drops of food colouring to each bowl to tint one red, one yellow and one blue. Mix with a fork to coat cheese in the colouring.
- Lay bread out on a clean dry surface. Spoon yellow cheese in a strip down the centre of two pieces of bread.
- Spoon blue cheese, and red cheese in strips on either side of the yellow, allowing the colours to slightly overlap. (the slightly overlapped cheeses will create the colours of orange and green once melted)
- Spread a little butter onto the remaining bread and sandwich closed.
- Spread remaining butter on top of the sandwich, sprinkle with a little paprika, Italian herbs and salt.
- Arrange sandwiches snuggly in a single layer, buttered side up, inside the basket of the Philips XXL airfryer with Smart Sensing Technology.
- Set temperature to 180°C and time to 8 minutes, and cook until bread is golden and toasted and cheese filling has melted. Slice in half to reveal the cheesy rainbow.
Hot tips: The cooking time may vary, depending on the type of bread you use. A thick cut, multigrain sourdough will take longer to toast than slices of plain white sliced bread. It’s completely safe to open the Philips Airfryer basket up during cooking to check on your creation.
You can use a couple of toothpicks to secure your sandwich closed if you’d like a little extra piece of mind that it won’t go flying during airfrying. Just be sure to remove them before you eat!
Giant funfetti cookie

Preparation time: 20 mins | Cooking time: 15 mins | Makes 1, Serves 16
What you’ll need:
- 80g unsalted butter, melted
- ½ cup brown sugar
- 1 free-range egg
- 1 cup plain flour
- ½ teaspoon baking powder
- ¼ teaspoon bicarbonate of soda
- 3 Tbsp chocolate baking bits
- 3 Tbsp Confetti sprinkles and 100’s and 1000’s, plus extra 1 Tbsp
Directions:
- Put butter and sugar into a large bowl and mix with a wooden spoon until smooth. Add egg and mix again until combined. Stir in flour, baking powder and bicarb until well combined and a soft sticky dough forms. Stir in choc bits and confetti sprinkles and 100’s and 1000’s.
- Spoon dough into the Philips XXL Baking Tray, press down to smooth the surface, using slightly damp hands. Scatter extra confetti sprinkles and 100’s and 1000’s over the top, pressing down lightly to stick into dough.
- Place baking tray into the basket of the Philips XXL airfryer with Smart Sensing Technology. Set temperature to 160°C, and time to 14 minutes, cooking until golden brown and firm to touch.
- Carefully remove baking tray from the Airfryer basket and place on a wire rack to cool to room temperature.
- Turn out cookie from the Baking Tray, loosening with a non-stick spatula to assist if necessary.
- Slice cookie into triangles, squares or rectangles to share.
Hot tips: Swap chocolate baking bits for Smarties or mini M&M’s if you’d like to add even more colour to your cookie.
Find confetti sprinkles and 100’s and 1000’s in the baking section of the supermarket. I used a Unicorn themed confetti for this cookie.
If you’re after more details about the Sydney Mardi Gras event for 2022, check out our complete guide here.
Leave a Reply
You must be logged in to post a comment.