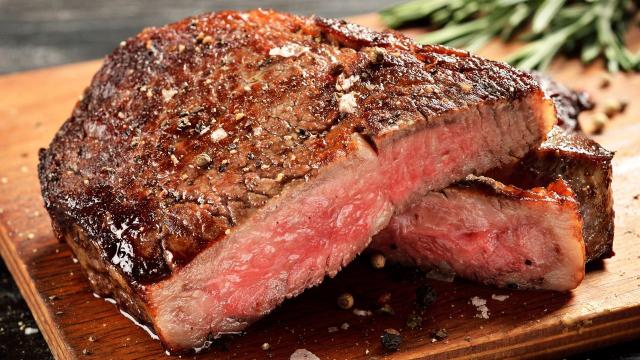
One of my favourite niche insults is, “He’s the kind of guy who always orders his steak rare, no matter the cut.” (This type of guy also considers vermouth a sign of weakness, but that’s a different discussion.) There’s nothing wrong with having a preference, and a rare steak can be a beautiful thing. But some pieces of meat, like ribeyes, need more time and heat than that, and boy, do I know a method that delivers.
The method, christened “Sous-Vide Que” by Meathead Goldwyn of AmazingRibs.com, has multiple steps that might seem like overkill, but each one is there for a reason. (Take it from me, a lazy person generally unwilling to expend extra effort without proper justification.) Their recipe for a sous-vide que ribeye starts with a dry brine, followed by a little sous-vide bath, followed by a rapid chill. Once the steak has chilled, you heat it back up with a low-temp smoke, then finally sear it to create a crust.
All that cooking sounds like a recipe for one dried-out piece of meat, but the results are just the opposite: This was the juiciest steak I’ve ever eaten.
Why dry brine?
Dry brining, which is really just salting, is the easiest, most effective way to season a steak. All you have to is salt it heavily, then place it on a wire rack set inside a rimmed baking sheet inside the fridge. The salt will draw moisture out of the steak, and that moisture will dissolve the salt, which can then make its way into the meat. Leaving the steak uncovered in the fridge also dries the surface of the steak, which will lead to a better sear. (Wet meat steams; dry meat browns.)
Why sous vide?
True ribeye fans love the cut for its marbling. When cooked to the right temperature, the intramuscular fat has time to melt, resulting in a juicy, flavorful steak. That doesn’t happen until 130℉, however — the temp commonly referred to as “medium-rare.”
If you cook your ribeye to a cool 120℉, the fat may soften slightly, but it sure won’t melt, negating the entire point of buying a ribeye (which are rarely cheap). Gently heating the steak in a low-temp oven to 15 degrees shy of its target temperature, then searing to bring it up to 130℉ — called “reverse searing” — works beautifully on lean cuts of meat like filet mignon, but falls slightly short with a ribeye. Even with this slow approach, the meat is removed the moment it hits the fat-melting temp of 130℉, which doesn’t give the marbling much time at all to melt and infuse into the meat.
With sous-vide cooking, however, you can hold the steak at a fat-melting temperature for a long time (in this case, two hours) without overcooking it or drying it out. After that, you’re ready to chill.
Why chill?
The chilling is where this method almost lost me. Cooking proteins sous-vide, then chilling and holding them until they’re ready to be served, is a common restaurant practice, but it smacks of overkill at home. But there are a few reasons to chill out.
The first is smoking. Throwing a hot-from-the-bath ribeye into a smoker or low-temp grill will overcook it. Even at 225℉, the internal temperature of the meat will continue to rise, and by the time you sear, you’ll have a well-done ribeye, which no one wants. (Well, some people might, but I don’t approve.)
Smoking a chilled ribeye at 225℉ gently brings the temperature back up while imparting smoky flavour and giving your steak an incredible colour, all without “cooking” the proteins further.
There also may be other benefits to chilling. I made two steaks while testing this method: One was smoked after chilling, and the other was simply reverse seared after chilling, without any wood chips. Both were incredible juicy. The science behind why that could be is explained in Meathead Goldwyn’s digital book “Sous Vide Que Made Easy,” which you can snag for under four bucks, and which contains a lot of useful information. Goldwyn notes that meat that is chilled before re-temping is juicier and tastier; the purged bag juices seem to get reabsorbed, but enzyme activity also comes into play. You can read more about it on Goldwyn’s website (though this article is paywalled), but one possible theory is that cooking the meat deactivates calpastatin, an inhibitory protein responsible for keeping calpain (a tenderizing enzyme) in check. Once calpastatin is deactivated by heat, calpain is free to keep on tenderizing the meat — and chilling lets it do so in a food-safe environment, before you continue on with the finishing steps.
Then there is the meal prep aspect: You can pre-cook your steaks sous-vide and chill them, then smoke and sear at a later time, without worrying about that pesky intramuscular fat. The steak is already “cooked” — and will keep in a sealed vacuum bag for at least five days in the fridge — so all you have to do is warm it up in a smoky grill and give it a final sear to build a crust. (And the crust builds quickly, thanks to the dry brine in the fridge.)
Why smoke and sear?
Smoke and meat taste good together. While you could just as easily warm your meat in low-temp oven, or on a grill without any wood chunks, smoking your steak for even 45 minutes gives it a great flavour, beautiful colour, and a thin but noticeable smoke ring. It’s an impressive piece of meat.
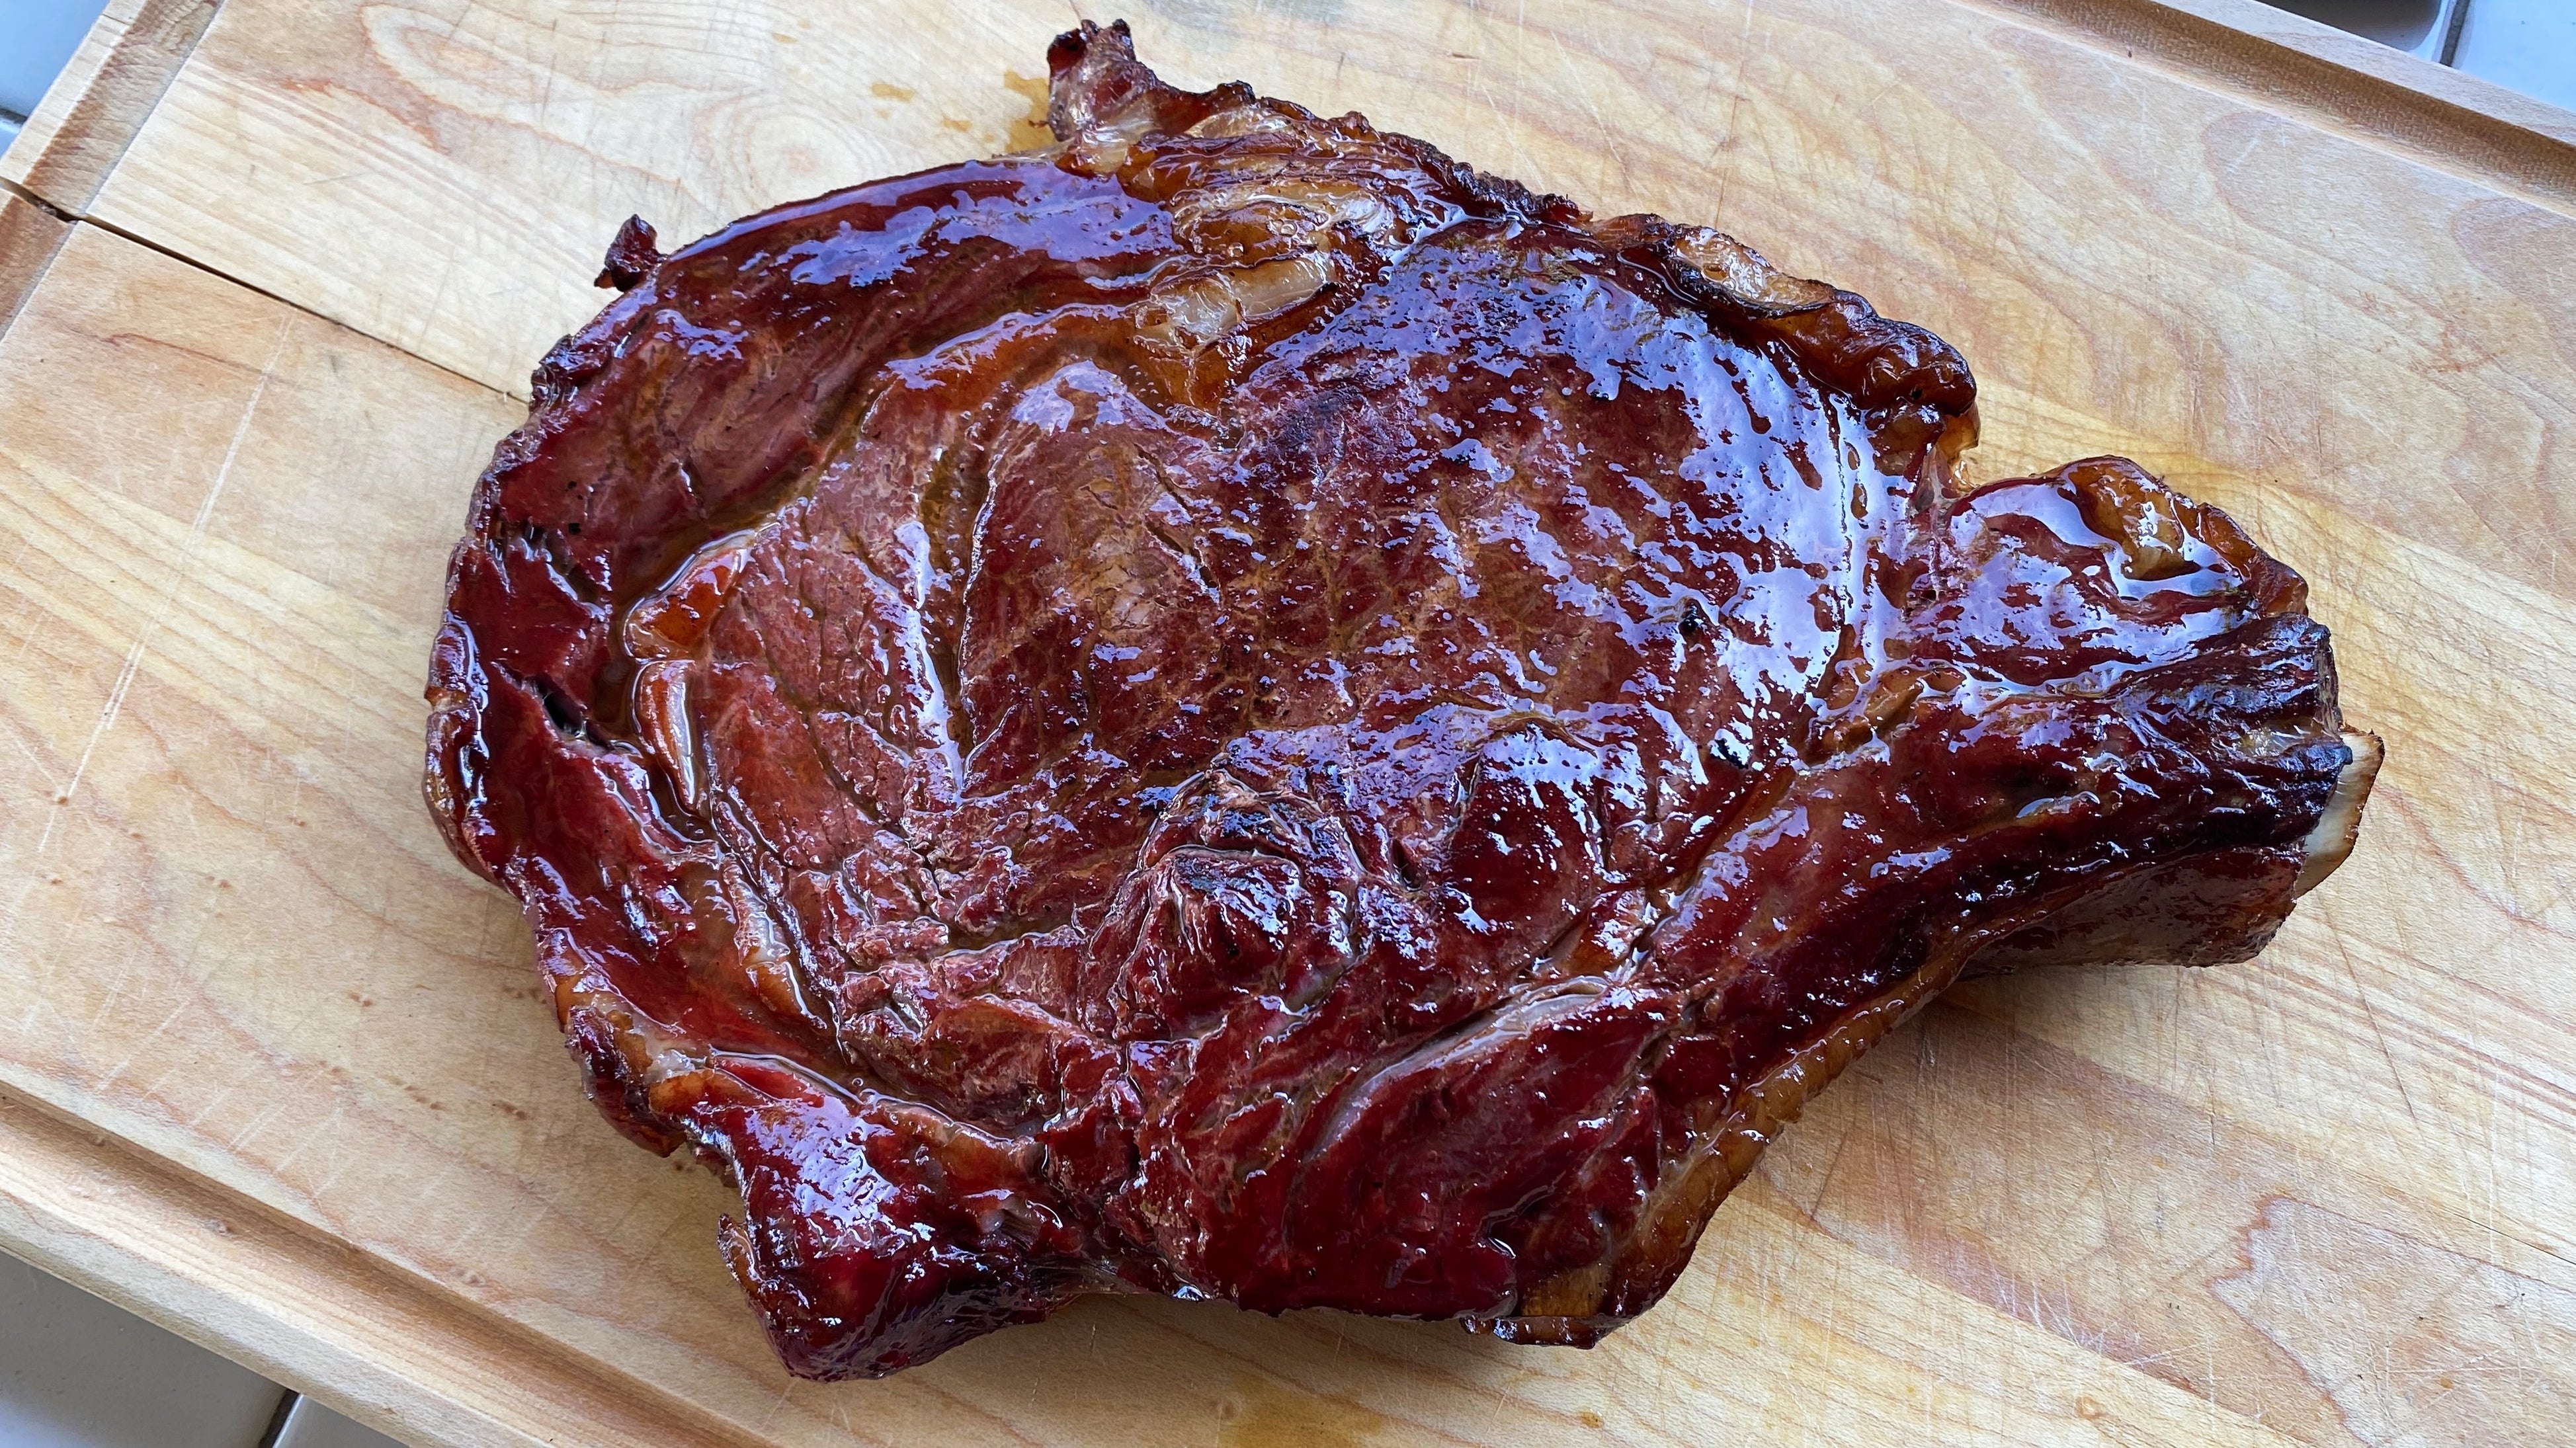
While the original recipe suggests smoking until you reach an internal temperature of 115℉, then searing to bring it up to 135℉, I dropped both of those temps down a bit. The steak is already cooked, so you really just need it to be warm, and to have a crust. I smoked my steak to a temp of 105℉, then seared it in a hot cast iron pan that had been sitting directly over the coals. (I don’t do grill marks.)
How to avoid the grey ring
I could not find a flaw with this steak if I ate it with my eyes closed. But, eyes open, gun to my head, I will admit that I wish that slight grey ring wasn’t present on some of the slices. I don’t think this is a matter of overcooking, or even searing, but over-drying — I had originally planned on dry brining my steak for 24 hours, but some shit happened, and I had to leave them in there for 48. I suspect that extra time was the source of this (small, mostly cosmetic) problem.
When I previously played around with dry ageing steaks at home (which I ultimately decided was not worth it), I noticed that steaks that had been hanging out in the fridge for an extended period of time developed a crust faster than their un-aged counterparts, but they also developed a grey ring almost immediately. There are two reasons for this: The first few millimetres of meat get depleted of water, which leads to rapid browning and cooking, but the salt also has time to break down the outer layer of proteins, partially “cooking” them. Those two things can lead to a grey ring if you’re not careful, so stick to a 24-hour dry brine for the prettiest steak possible. (Again, the 48-hour dry brine had no ill effects on the flavour or texture, so don’t stress out if you leave it in there a little longer than a day.)
Enough reading, nerds. Let’s cook.
(This recipe is for a simple charcoal setup; refer to AmazingRibs.com for instructions for gas grills. This recipe also requires an external, multi-probe thermometer, which you should have if you plan to do any serious grilling or smoking.)
Sous vide que ribeye recipe
(Lovingly adapted from AmazingRibs.com)
What you’ll need:
- 1 1 kg, ribeye (preferably bone-in)
- 1 teaspoon Morton Coarse Kosher salt (If using a different salt, adjust by mass, but avoid fine salt.)
- Ice and water for the ice bath
- 2 chunks of your favourite smoking wood
Directions:
- Salt the steak on both sides and place it on wire rack set inside a rimmed baking sheet. Place baking sheet in the fridge, uncovered, for 24 hours.
- Transfer the steak to a vacuum bag and seal it, or set the steak in a sealable freezer bag and force out the excess air with the water displacement method.
- Fill a large bucket or pot with water and attach your immersion circulator. Set the temp to 130℉. Sous vide the steaks for 2 hours. When you have about 5 minutes left in the cook time, make an ice bath. Remove the steaks at the 2-hour mark and plunge them into the ice bath to stop the cooking. Let them hang out in the ice bath for an hour, then transfer to the fridge until ready to smoke, up to 5 days.
- Fill a charcoal chimney full of charcoal and set it over a lit fuel cube. Once the charcoal has stopped smoking, and the top layer of briquettes has started to ash over, dump the coals on one side of the grill, creating as tight of a pile as you can. Clip an external digital thermometer probe to the grates (so you can monitor the internal temperature of the grill), then close the grill and adjust the air flow vents at the top and bottom of the grill to drop the temperature somewhere in between 200℉ and 250℉. (Open vents allow for more air flow and will increase the temp; closing them restricts the air flow and decreases it.)
- Once you’ve reached your target temp, stick another thermometer probe into your steak, throw your wood chunks over the coals, and set the steak on the grill grates, as far away from the coals as possible. Smoke until the steak reaches an internal temperature of 80℉, then place a lightly greased cast iron skillet over the coals, close the grill, and continue to smoke until the steak reaches an internal temperature of 105℉.
- Open up the grill, and transfer the steak to the hot cast iron pan to sear. Sear on both sides, making sure not to heat the steak over 130℉ — remove at 120℉ to be safe — then plate and serve immediately.
Leave a Reply
You must be logged in to post a comment.