So you’ve had Instagram for a while and you upload photos regularly, but nobody seems to care. No likes, no follows, and no comments. Boo. Give these tips a try, you sad instagrammer you.
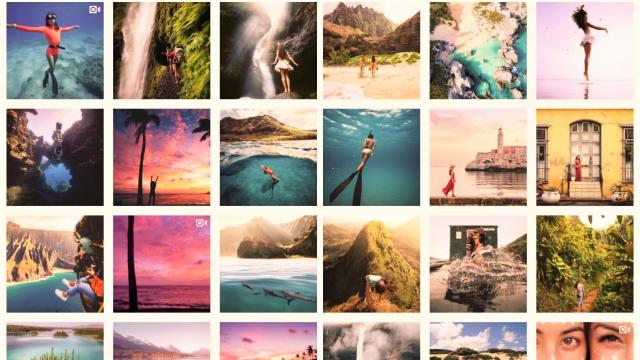
Example of an exceptional Instagram feed via Chelsea Yamase (@chelseakauai).
[referenced url=”https://www.lifehacker.com.au/2017/08/how-to-edit-your-holiday-photos-so-they-dont-totally-suck/” thumb=”https://i.kinja-img.com/gawker-media/image/upload/t_ku-large/zeyvtuassrm8ozsvvwn8.jpg” title=”How To Edit Your Holiday Photos So They Don’t Totally Suck” excerpt=”So you took a trip somewhere cool, snapped a bunch of photos, and now you have no idea what to do with them all. Don’t worry, editing your holiday photos isn’t as tough or technical as it sounds.”]
Turn That Frown, er, Phone Upside Down
Adding foreground elements is one of the easiest ways to make a photo more interesting. And according to photographer Taylor Rees (@taylorfreesolo), one of the easiest ways to add foreground elements with a smartphone is to flip it upside down and shoot your subject from the ground. Consider these two photos of my Tina desk toy:
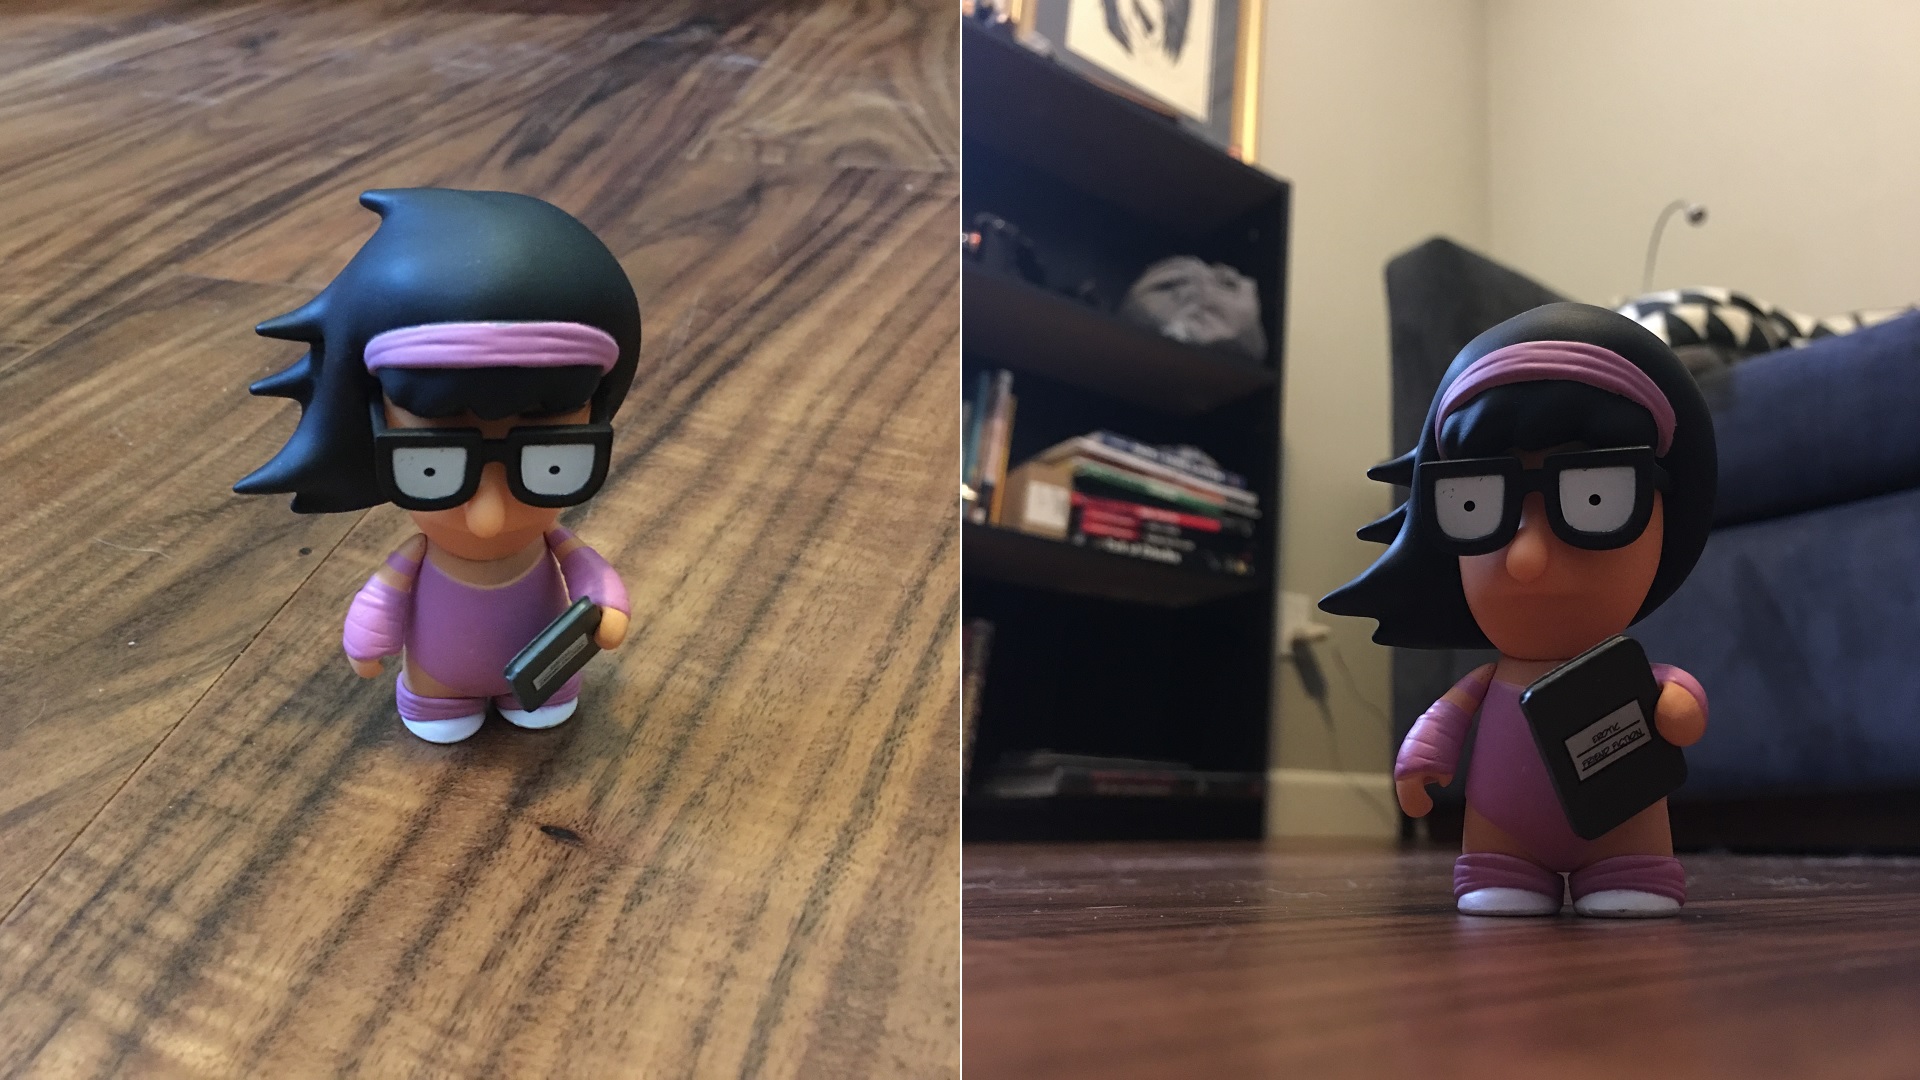
Photos by Patrick Allan.
The one shot from the ground is far more interesting to look at. You get a better look at Tina and her “erotic friend fiction” prop, there’s more depth to the photo, and the ground acts as a subtle foreground element. This works very well for things low to the ground, obviously, but it works for all kinds of other subjects as well. Try shooting from a desk, table, railing, and more.
Adjust Your Phone’s Camera Settings
For most of us, our Instagram photos are shot with a smartphone camera, so you need to know how to use it properly. Here are a few quick tips:
- Under-expose your shots: A lot of amateur photos are too bright and all the highlights are blown out (especially if you shoot in the middle of the day). Adjust your exposure and shoot things a little darker, then adjust the exposure later to brighten things up without ruining your photo.
- Turn off HDR: If your smartphone’s camera can shoot photos in high dynamic range — meaning it shoots multiple exposures and combines them into a single shot your smartphone’s camera thinks is best — consider turning it off. It can make your photos look processed and overdone.
- Don’t rely on autofocus all the time: Autofocus is fine for snapping quick in-the-moment shots, but it’s good to learn to use your smartphone camera’s manual focus features. Most of the time that just means tapping on your subject on your phone’s screen.
- Burst photos are useful: If your smartphone camera can shoot photos in a burst mode, use it. Sometimes you can’t quite capture the magic in one snap.
- Avoid flash: It’s useful sometimes, but most of the time it blows out the lighting and makes you pics look like they were shot with one of those wind up disposable cameras.
You don’t have to learn all the technical ins and outs of digital photography to take decent photos with your smartphone, you just need to get familiar with these basic things.
[referenced url=”https://www.lifehacker.com.au/2017/08/how-to-take-amazing-photos-in-art-museums-without-getting-kicked-out/” thumb=”https://i.kinja-img.com/gawker-media/image/upload/t_ku-large/wa6f8fa3fzepnn7lbdi9.jpg” title=”How To Take Amazing Photos In Art Museums Without Getting Kicked Out ” excerpt=”One of the best things about visiting art museums is being able to see work that touches and inspires you, and it makes sense that you might want to snap a photo. But many museums have rules restricting photography, and the last thing you want to do is be kicked out or damage artwork for the sake of a photo.”]
Be Selective With Your Photos
Don’t go overboard with posting Instagram photos. As I’ve mentioned before regarding vacation photos, you want to go for quality over quantity here. That means not uploading 20 photos at a time into your feed. Photographer Elisabeth Brentano (@elisabethontheroad) suggests your feed should be more like a curated gallery of photos as opposed to a place to dump random pictures people probably don’t want to see.
It can help to ask yourself what you want your feed to be about? Is there a theme you want to go for? It could be your dog, adventure, nature, you modelling, your cat, or something more abstract, like “being a mum.” It can also help to decide on a signature style. Do you like things that are bright and colourful? Or are you more into dark and moody stuff? You don’t have to be too focused if you’re not trying to be some sort of professional instagrammer, but it can still help you decide on what photos to showcase and what to keep to yourself.
Use Instagram Stories Like a Pro
If you’re not using Instagram Stories, you should probably change that. It’s a great way to show your friends what you’re up to lately, it draws in more followers, and it’s fun. The catch is that you can only post photos or videos from the last 24 hours. So, if your normal Instagram feed is like a curated gallery, Brentano says, your Stories are like a travelling exhibit.
Instagram Stories can be a big topic on its own, though, so if you’re not sure where to start, this guide from The Verge is pretty helpful. At the very least, you should know how to get around the 24-hour rule. You can download apps, like Story Uploader or MetaTrixter, or take screenshots of photos you’ve previously taken on your phone. You can also try my way, which works like this:
- Swipe the main Instagram screen to the left to open up your messages page.
- Hit the plus sign and type in your Instagram screen name.
- Tap the photo icon in the “Write a message…” section and select the old photo you want to post to Stories.
- Send it to yourself.
- Now tap the photo and hold until you get an option to save the image.
- Save it to your camera roll.
Now you have a fresh copy of the old photo with new metadata that says it’s brand new. This process even works for videos.
Don’t Overdo It With Filters
Instagram’s filters are decent, but sometimes less is more. Don’t get filter-happy and ruin a photo’s great natural lighting just because you feel like every shot needs a filter. You’re probably better off not using them at all and editing your photos in a dedicated app instead.
That said, if you’re not going to edit and you must use a filter, try to be consistent. Find a filter or two you really like and consider stick with those to help keep your feed on theme.
Frame and Crop Your Photos Just Right
When go to make a new post on Instagram, you’ll notice grid lines pop up when you move your photo around. Use them! They can help you center your subject in the middle of the frame, or easily apply the rule of thirds to really get your photo’s composition on point. The grid lines will also help you straighten out any lines you have in your photo. Lastly, if you’re going to crop your photos, try to crop each of your photos the same way. People like consistency, and it makes your feed page — or your “grid” — look nicer.
[referenced url=”https://www.lifehacker.com.au/2011/06/basics-of-photography-composition-and-technique/” thumb=”https://cache.gawkerassets.com/assets/images/17/2011/06/0000-lhns-photography-p4.jpg” title=”Basics Of Photography: Composition And Technique” excerpt=”A well-composed photograph is really a matter of opinion, but there are a few tricks that tend to result in better pictures. That’s what we’re going to take a look at today.”]
Use Your Caption Space Wisely
Photo captions on Instagram are often just as important as the photos themselves. Don’t waste that space! Photographer Melissa Vincent (@misvincent) suggests you use your captions as an opportunity to engage your audience. Whether you have thousands of followers or just a few family members and friends, pick a caption that draws their attention. Ask a question, share some interesting information, write anything that does more than describe what they’re already seeing.
Also, use hashtags. They draw more people to your feed and earn your more followers. You can even search popular hashtags and see what’s trending right now. Maybe you have a photo that lines up with one of those topics. But whatever you hashtag, don’t just load up your caption with 30 of ’em. That looks bad. Put a few important ones in your caption, then write a comment for your own photo filled with a bunch more. Just make sure all of your hashtags are relevant.
Comments