Mac: Finder isn’t the most exciting thing about OS X, but it’s the backbone for how you navigate the operating system. It’s your file browser, your search engine and your management area, but few of us really dig into everything it can do. With that in mind, here are a few tips and tricks for getting a bit more out of Finder.
Change Folder Icons
Folders are boring looking, and having a bunch of them in a row means it’s hard to tell what you’re looking for at a glance. Fortunately, it’s dead simple to just change the look of any folder:
- Select the folder whose icon you want to change and press Cmd+I to open that folder’s info panel.
- Open the image you want to use for the folder’s icon in Preview. Press Cmd+A (to select it) and then Cmd+C (to copy it).
- Back in the info panel, click on the icon in the top left corner and press Cmd+v to paste your customised icon image.
That works for folders, apps or other icons, so you can customise icons to your heart’s content.
Manage All Your Tags in One Place
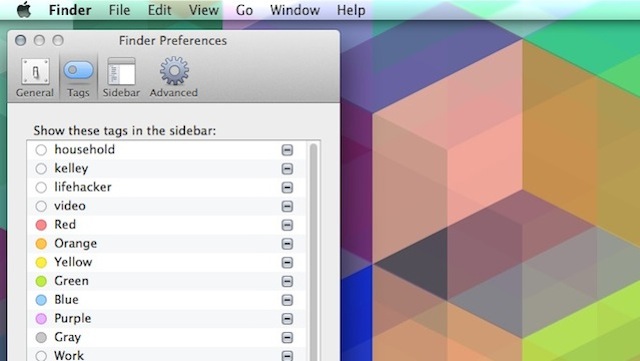
Tags are a great new feature in OS X Mavericks, but it’s not exactly transparent how you can use them. While it’s simple enough to tag any item you save at the time, or to even add a tag to older files with a right-click, managing them is hidden away. Click on Finder > Preferences, and then select “Tags”. Here you can edit tags, create favourites and reorganise them in the Sidebar. If you want to delete any of your tags, just right-click the tag and select “Delete”.
Master Using Tabs
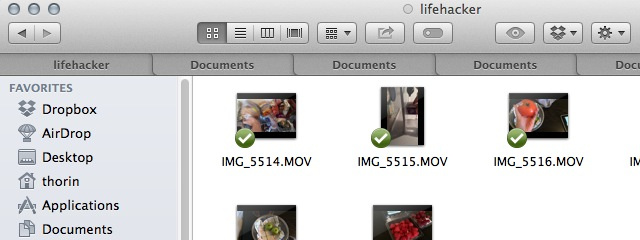
Tabs are a great new Finder feature in Mavericks. When you’re in Finder, just hit Command+T to open up a new tab, just like you would in a web browser. From there, you can bounce between open tabs with the keyboard shortcut Control+Tab. You can also merge all your open Finder windows into one tabbed window by going to Window > Merge All Windows.
Enable Text Selection in Quick Look
Quick Look (hit the Spacebar when you select a file) is a great way to quickly peek at a file without actually opening it up. The problem is that you can’t select the text of the file in Quick Look if you want to copy something. Fortunately, it’s super easy to enable this feature with a Terminal command. Open up Terminal (Applications > Utilities) and type this in:
defaults write com.apple.finder QLEnableTextSelection -bool TRUE; killall Finder
Now you can select (and copy) text from Quick Look and never have to open a MS Word file again.
Arrange Files Anyway You Want
You have a lot of different ways to sort and browse your files in Finder, but they’re not all transparent on the surface. By default, you get columns for Name, Date Modified, Size and Kind, and you can sort your files by clicking any of those columns. You can also add more columns to get more options for sorting by clicking Finder > View > Show View Options when you’re in a folder. Here you can add more options for sorting.
Likewise, you can skip sorting all together and arrange your files for a completely different view. Hit View > Arrange By, and select the method you want. Your files will get bunched together based on certain criteria.
Group Selected Files into a Folder
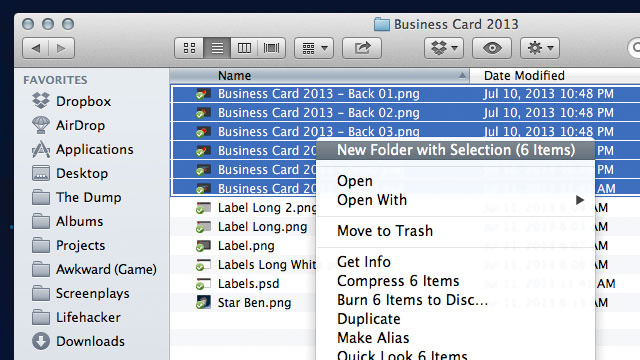
Need to throw a bunch of files into a new folder quickly? Just select all the files, right-click the list, and select “New Folder with Selection.” Finder will create a new folder with all those files already dumped inside of it.
Show the Library Folder All the Time
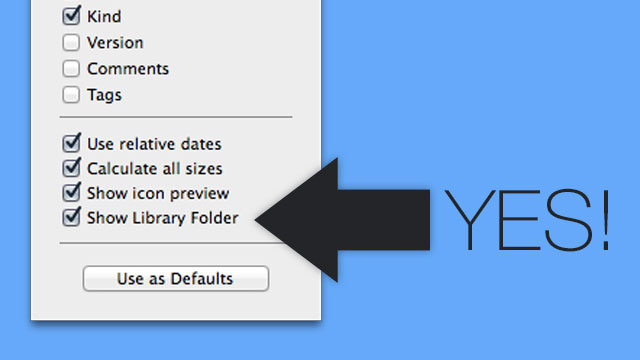
In older versions of OS X, Apple consistently hid the Library folder from people. This is fine for anyone not tinkering around with their system, but it was always a pain to enable the folder if you liked having it easily accessible. Now in Mavericks, it’s easy to show that folder all the time: just navigate to the home folder, hit Command+J, and check the box marked “Show Library Folder”.
Always Show File Extensions
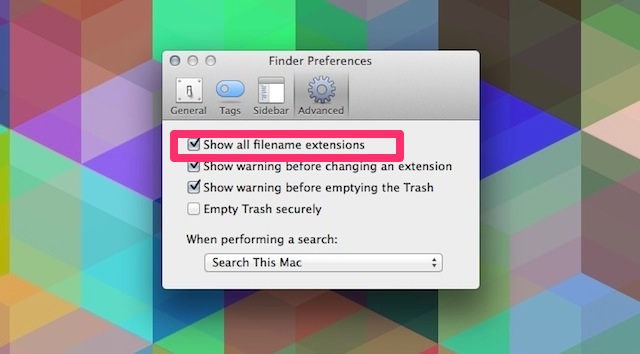
OS X doesn’t show files names by default, and in certain views that can be incredibly annoying. To enable this feature so you know the difference between your JPGs and your TIFs, head into Finder > Preferences, select the Advanced tab, and check the box labelled “Show all filename extensions.”
Show Hidden Files
Macs love hiding files from you so you don’t screw up your system on accident, but sometimes you need to dig into those secret system files to get things done. You just need to enter this into Terminal:
defaults write com.apple.finder AppleShowAllFiles true
killall Finder
Now you can see all those hidden files. If you want to reverse that, just type this into Terminal:
defaults write com.apple.finder AppleShowAllFiles false
killall Finder
Customise the Toolbar
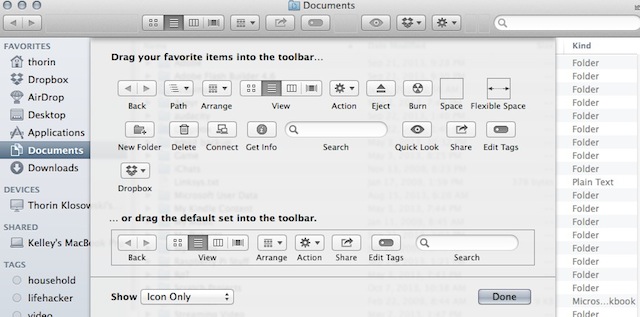
The toolbar in Finder provides buttons with access to all kinds of features, from sorting options to tag settings. Not everyone needs everything though, and if you haven’t bothered, it’s worth customising that toolbar so it’s only items you actually need. Just hit View > Customise Toolbar, and you can move buttons around or customise what’s available.
You can also drag items to the toolbar so they’re always there — that includes files, folders, and apps. In Mavericks, select the file you want, and Command+Click and drag it to the toolbar. On older versions of OS X, just click and drag the file (or app) you want to the search box in Finder.
Set Up a Default Folder
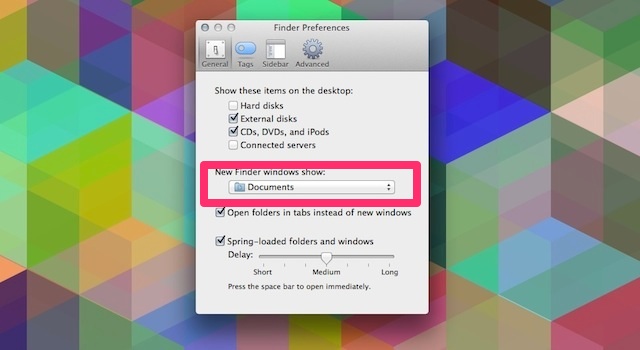
By default, Finder usually shows “All My Files” as the default folder every time you open it up. For most of us, that’s not really that useful. If you’d prefer to change it to something you access on a daily basis, head into Finder > Preferences and change the setting under “New Finder windows show” on the General tab.
Use Smart Folders
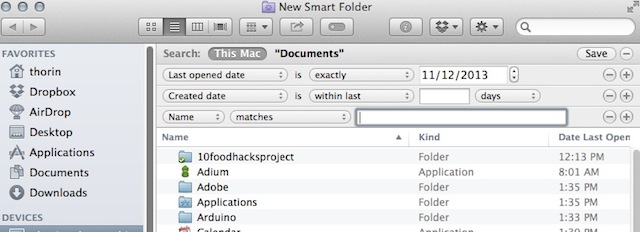
Smart Folders are one of those often underutilised tricks built into OS X that people often forget about. Basically, a smart folder is an always-updating folder that shows you saved searches based on parameters you choose. This means you can have a folder that automatically shows you new JPGs on your computer, files larger than a certain size, or just about anything else you’d want.
To create a new smart folder, just head into Finder and hit File > New Smart Folder. You’ll now see a Finder window with a (+) sign where you can add criteria. Type in the criteria you’d like, and then you can save that folder so you can always access it. You can also set it up so it searches your entire hard drive, or just specific folders.
So, with a smart folder, you can create all kinds of customised folders, from application specific folders to a folder that automatically updates with your photo stream.
Comments