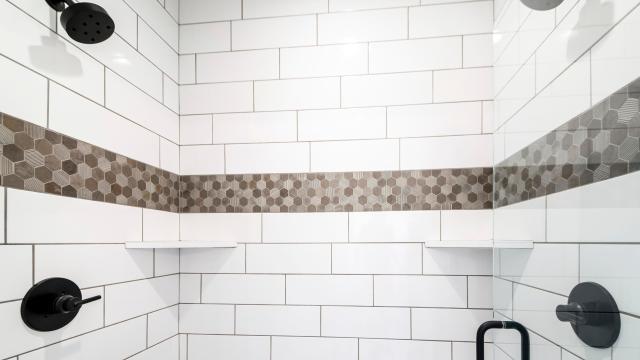
You renovate your bathroom, only to realise too late that you haven’t accounted for sufficient storage in the shower. Or you’ve inherited an existing shower that has exactly one modestly sized niche that will never be big enough to store all your necessary bottles. You might think you’re doomed to a life with one of those clunky metal “caddies,” but what you really need is more shelving. And there are two pretty easy approaches you can take that don’t require much expertise or all that much work. Here’s how to add a corner shelf to an existing shower.
The Schluter SHELF-E
If you’ve ever researched bathroom renovations, you’ve probably come across the Schluter company, which makes a range of shower-related waterproofing systems and accessories. They also offer high-quality stainless steel shelves for the shower. While some of these shelves are designed to be installed during a renovation (typically with supports hidden behind the tile, their SHELF-E series of corner shelves are designed with tabs that are inserted into the grout lines. That means they’re easy to retrofit into an existing shower. Here’s what you’ll need:
- As many shelves as you need or want (they come in a wide variety of styles and shapes)
- A grout saw (either manual or a multitool blade)
- 100% silicone caulk (clear or tinted depending on your shower’s design and your preference)
- A caulk gun
The project is pretty simple:
- Hold the shelf up to your grout line and mark where the tabs will sit.
- Use your grout saw to cut out the grout where the tabs will insert. Because these are small cuts, it’s easy enough to do this with a manual grout saw.
- Tape the tile and fill the gaps you’ve cut with silicone caulk.
- Fit the shelf into place. The tabs will hold it securely.
- Fill the gaps with caulk — both top and bottom. If the shelf sags slightly, add a support.
- Smooth caulking and remove tape.
That’s it — once the silicone sets up, you’re done, and your shelves are ready to use.
The glue job
If you’re not comfortable cutting the grout lines for the Schluter shelves, you can glue a corner shower shelf into place in about half an hour without compromising the integrity of the grout or tile. One caveat here is to not buy a “self-adhesive” shelf that purports to just stick on your wall out of the box. While that is probably fine for a short-term solution, it will likely eventually fall off the wall. Here’s what you’ll need for a more proper job:
- A “flat back” ceramic corner shelf in an appropriate style and colour for your shower. It’s important to get a “flat back” shelf so you can easily bond it to your wall.
- Some double-sided water-resistant mounting tape
- Soap scum remover
- 100% silicone caulk and a caulk gun
Installation is pretty easy:
- First, clean the wall where you’re going to be placing the shelf, using the soap scum remover. Do a good job here. If there’s scum or any other coating on your tile, you’ll compromise your bond, and your shelf will fall off, causing stubbed toes, tears, and humiliation.
- Put a strip of mounting tape on both sides of the shelf back, about an inch short on each end. Leave the backing on the exterior side for the moment.
- Test-fit the shelf. You want to ensure that it will sit flush against the wall. If it’s not quite square, you can add extra layers of tape as needed to shim it. Use a level and mark where the shelf will go.
- Add thick lines of caulk to the edges of the shelf’s back. Then remove the backing of the tape and, using the marks you made earlier, push the shelf onto the wall. The tape will grab, and the caulk will push out. Add a support if necessary to hold the shelf level until it sets up. Clean up and smooth your caulk, then wait for it to set up.
Once your caulk sets up, you’re done — and only an act of extreme violence will remove that shelf.
Leave a Reply
You must be logged in to post a comment.