macOS Mojave is in public beta now and it has a lot of cool features that might not totally change the way you use your Mac, but will speed up parts of your workflow, help keep your files organised and make you smile with customisable touches.
After hands-on testing, these are our favourite features in Mojave — both the obvious standouts and the hidden gems.
Dark mode looks great
Mojave’s flashiest feature is Dark mode (shown above), which darkens system elements like the menu bar, Dock, Finder windows, toolbars — everything’s nice and dark, which makes whatever you’re working on stand out. Colours in your images pop, articles you’re reading are easy to focus on and it’s a nice, fresh look for macOS. Find it in System Preferences > General.
Some Apple apps go a lot darker than others — like Notes, for example. Though the entire app darkens by default, you can turn the background colour of your notes white again in the preferences to make them pop, while leaving the sidebar and toolbars dark.
Add a pop of colour
When you turn on Dark mode in System Preferences > General, you can also pick an accent colour that’s used when you click a radio button, check a box, or select a file. The default is still blue, but you can change that to pink, purple, orange, red, green, yellow, or graphite.
Whatever you pick for the accent colour automatically becomes the highlight colour when you select text too, but you can choose something else for the highlighting if you’d like.
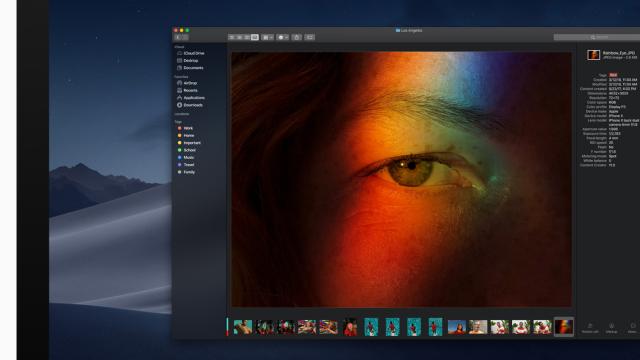
Finder is a killer photo viewer
The Finder’s new Gallery view makes browsing through folder after folder of photos a pleasant experience, and you can see all the metadata right alongside your shots: resolution, the device used to take the photo, aperture, ISO speeds, etc. If you don’t need that much detail, just hover over the metadata and click Show Less to pare it down.
Below the metadata you can find buttons to rotate the image, mark it up, or export it to PDF, tasks that used to prompt a trip to the Preview app.
Organise your Desktop with Stacks
Stacks is worth the public beta’s price of admission all by itself. (Yes, Mojave’s price of admission is zilch, but I would pay a few bucks for Stacks, that’s how great it is. And I have paid for Declutter, a utility that does much the same thing.)
If your Desktop gets cluttered up with screenshots, images and other files as you work, Stacks sorts them by kind. And it keeps sorting them as they accumulate — as you keep taking screenshots, for example, they appear atop the Screenshots stack, not as individual files on the Desktop.
Click a Stack to expand it and it stays that way until you click the Stack again to close it up.
To turn Stacks on, right-click the Desktop and choose Use Stacks. If you don’t want your Stacks sorted by kind, right-click the Desktop again, choose Group Stacks By, and pick something else.
Recently used apps in the Dock
The Dock now has a section for your recently used apps, much like the Dock Apple added to the iPad in iOS 11. We find it helpful, but if you’d rather keep your Dock static, head to System Preferences > Dock and uncheck the box labelled “Show recent applications in Dock.”
Dynamic Desktop wallpaper
You’ve always had the option of rotating Desktop images, but Mojave takes a page from the Apple TV’s video screensavers, which often come in day and night versions so the time of day on your TV’s screensaver matches the time of day in your location.
Mojave’s Dynamic Desktop wallpaper isn’t animated, but it can change based on the time of day at your location, shifting from morning light to midday, afternoon, evening and night. Just keep in mind that if you’re in Dark mode, the Dynamic wallpaper will stay dark all the time.
Sniff out 32-bit apps
Mojave is the last version of macOS that will run 32-bit apps. When you launch one, you’ll get a pop-up warning you that it won’t work in future versions of macOS. But sometimes those legacy apps are background processes and the warning will be about something vague like “LOGINserver”.
Don’t panic if you don’t know what the warning is referring to. Just open System Information (which is in your Applications/Utilities folder, or found by clicking the Apple icon and clicking About This Mac > System Report) and find Legacy Software in the sidebar.
Then you can see that LOGINserver, for example, is in a Library folder created by a Brother printer, which suddenly makes sense.
Customise the new News app
News makes its debut on macOS Mojave. The News app looks and acts just like its counterpart on iOS, only with a handy sidebar instead of a tab bar along the bottom.
If you’re interested in different news stories on different devices — maybe you want News on your Mac focused on topics and sources related to your work, while News on your iPhone follows sports and entertainment — head to System Preferences > iCloud and uncheck the box for News.
If you leave the box checked, topics, favourites and saved stories will sync between your Mac and iOS devices.
New screenshot tools
When you take a screenshot (Command-Shift–3 for the whole screen, Command-Shift–4 for a selection), the screenshot shrinks down and lingers in the bottom-left corner of the screen for about five seconds. While it’s there, you can click it to open it in a floating window with the same markup tools as you get for screenshots in iOS 11.
You can draw on the screenshot, add text, crop it, rotate it and add shapes. If you hand-draw a circle or a rectangle around something in the screenshot, Mojave automatically converts it to a nicely drawn one that you can resize as needed — like magic. You can save your screenshots from here, or click the Share button to send them to other apps.
Finder Quick Actions
But what if you take a screenshot and don’t click it right away — do you have to open that PNG file in Preview to mark it up after the fact? Heck no! Just right-click it on your Desktop and look for Quick Actions in the contextual menu.
Here, you can choose Markup, Rotate Left and Create PDF. The same options also appear in the preview pane of a Finder window when you have an image file selected.
Trim audio and video files right in the Finder
Trimming a few seconds off of a video doesn’t require a full editor — just open the video in Quick Look and press Command-T for the Trim feature. Mojave takes that up a notch by putting the Trim function right in the Finder. It’s great for cutting down 20-second iPhone videos into the 7-second masterpieces they should be.
Trim appears as an icon at the top of the window when you Quick Look a video file, and also in the preview pane of Finder windows. You can also right-click any video file and select Quick Actions > Trim. When the Trim window appears, just drag the ends of the yellow box to shave some time off the front or back of your video, and click Done to save or Revert to discard your changes.
Capture videos of your screen
We’re sure you’d never use this on anything copyrighted, but you can now capture a video of your screen by pressing Shift-Command–5. That pops up a box that you can move and resize, and a toolbar of buttons that you can click to take screenshots or videos of all or part of your screen.
Mouse over the buttons if you need a reminder of what they are, and click Options to choose where the output is saved, if you want a timer, if the cursor should appear in your video, and so on.
Ask Siri for a password
Ask Siri, “What’s my Amazon password?” and it will show you the entry for that password in your iCloud Keychain (Safari > Preferences > Passwords). Safari is good about popping them up as soon as you click a password field, but this can be handy for apps like Spotify or Kindle where you might wind up needing to cut and paste a password.
Like previous versions of macOS, Mojave requires you to unlock your password vault with the password for your user account, which means that if someone knows how to unlock your Mac, they can also get at all your passwords. But, to be fair, that’s possible on whatever version of macOS you have now, just not via Siri.
Move into the Home app
The new Home app in Mojave looks just like the Home app on the iPad, and it’s a very welcome addition for HomeKit users. Siri on the Mac can finally control HomeKit devices, though I found it was slower to trigger actions than my iPhone (or iPad, or HomePod).
The app’s Home tab holds your favourite devices and scenes, while the Rooms tab lets you swipe with two fingers on the trackpad to move between your house’s rooms. In the Automation tab, you can edit your existing animations and scenes, or program new ones. You just can’t set up new HomeKit devices from the Mac.
Continuity Camera
Sometimes a project needs an image. Apps have already been able to tap into your Mac’s camera to take a new image, but unfortunately your Mac’s camera is awkward to use and takes terrible photos. Mojave’s Continuity Camera will let you fill in empty image spots with photos from your iPhone, without you having to personally AirDrop the photos from your iPhone to your Mac before you can place them. Documents you scan with your iPhone can show up in Preview too.
To use it in Pages, for example, simply right-click your document and look for your nearby iPhone (running iOS 12) in the contextual menu. Choose Take Photo or Scan Document. When you do, your iPhone will instantly launch the camera, ready for you to point and shoot.
On the iPhone, you’ll be able to preview your image and tap Use Photo or Retake. To scan a receipt into your Notes, right-click a note’s body and choose Scan Document. The iPhone will automatically find the edges, straighten the image, save it as a PDF and attach it to the note.
Record a meeting or a lecture with Voice Memos
Another new app coming over from iOS is Voice Memos. Since it syncs to iCloud, it’s convenient for anyone who uses Voice Memos on the Mac.
It’s also quite good at isolating speech from background noise — it picked up my voice over the TV in the background while I was talking, and only started recording the background noise when I fell quiet.
Stop auto play on a per-site basis
If a site keeps annoying you with auto-play video, Mojave gives you options beyond sending angry tweets to the site’s editors and writers, who probably hate auto-play video just as much as you do. Open Safari > Preferences > Websites > Auto-Play and you can set a global preference, or allow certain sites to have different rules.
Show favicons in Safari
A favicon is a tiny representation of each site’s logo — it appears on each tab you have open, which helps you find the tab you want, especially when you suffer from Too Many Tabs syndrome. To turn them on in Mojave, visit Safari > Preferences > Tabs and check the box for “Show website icons in tabs.”
Comments