It might look easy, but taking an epic photo of the night sky in all its glory takes skill. You have to be in the right place with the right equipment, and your camera needs just the right settings. It takes some practice, but the right shot it is worth it.
Illustration by Angelica Alzona. Photo by By MrSpyDoS.
Start With the Right Equipment
Ideally, you’re working with a full frame DSLR or other interchangeable lens camera that lets you adjust its settings. This gives you more flexibility over your camera’s exposure settings so you can get just the right shot. Of course, you can take pictures of the night sky with any old camera, including your smartphone, but there’s only so much you can do with a point and shoot. Don’t get me wrong, there are some awesome point and shoot cameras, but their sensors are built with a priority for convenience over quality.
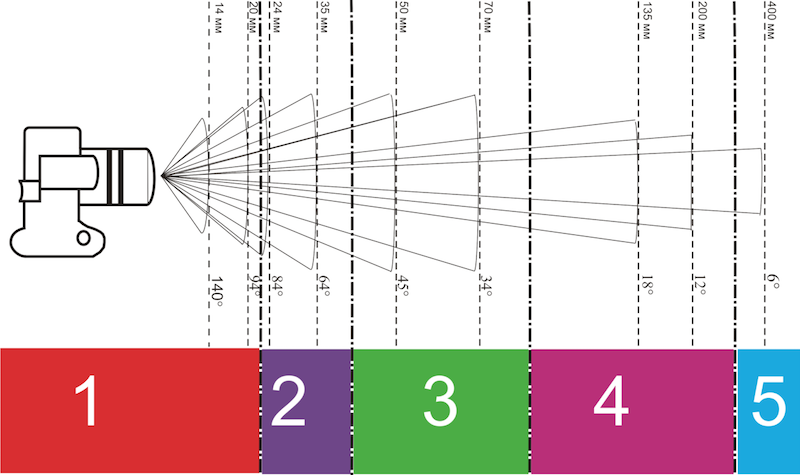
You also want an interchangeable lens camera so you can use a wide angle lens to capture the entire sky. A typical wide-angle lens usually has a focal length anywhere between 10-25mm. The graphic above shows you how the camera’s angle of view changes depending on the focal length of the lens. Wide lenses are great for shots of star trails and the milky way but if you want a close-up shot of the moon, you want the exact opposite: a telephoto lens. Most decent photos of the moon are taken with telephoto lenses with focal lengths of at least 300mm.
A tripod is crucial, too. To photograph a dark sky, you’ll need to adjust your camera’s settings to capture as much light as possible. Even a slight movement can ruin your photo because the light in the photo moves, making it blurry. A tripod ensures your camera is stable so this doesn’t happen.
For that same reason, you may want to work with a timer. A timer connects to your camera remotely so you can set it up on the tripod and get your shot without touching the camera. This way, you prevent moving your camera during the process, potentially ruining your shot. Personally, I just use the built-in timer on my camera and it works pretty well. I set it up for ten seconds, hit the shutter button, then walk away and wait.
Find the Best Environment
There are three environmental factors that can affect the quality of your photo: light pollution, weather, and sky conditions.
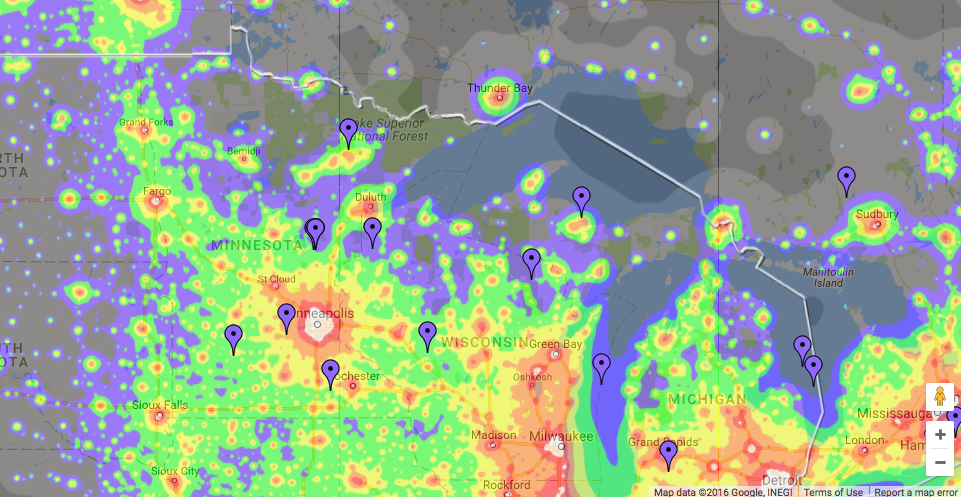
You’ll have a hard time getting decent shots if you have to contend with light pollution. Your first order of business is to get out of the city. If you live in one, photographer Ron Risman Dark Sky Finder. It shows you where light pollution is heaviest. You can get some decent photos in the green zone, but the further away you get from the colourful areas, the better your shots.
As for weather, for the clearest shots of the sky, you want as little cloud cover as possible. If you want to capture the Milky Way, for example, you shouldn’t have more than 50% cloud cover, says photographer Dave Morrow.
And then there are sky conditions. This is basically how conducive the sky is for photographing it. Risman puts it this way:
For example, as I write this article it’s 12:19 a.m. on Saturday, March 29, 2014. If my goal was to capture the Milky Way, I wouldn’t have much luck until after 2:00 a.m., since that’s when the brightest part of the Milky Way starts to rise in the east. As spring and summer progress, that time will get earlier and earlier.
You’ll also want to make sure that the moon has either already set or won’t be rising until you’re done capturing the sky. Most avid night sky photographers will wait for the days just before, during, and after a new moon.
The brightness of the moon can overexpose the milky way or stars you’re trying to capture. You can check the moonrise and moonset times at TimeandDate.com. The site tells you the percentage of the moon’s illumination, too. Of course, if you’re trying to photograph the moon, that’s another story (you should head out right at moonrise when the moon looks biggest against the horizon).
Apps like SkyView (free on iOS and Android) are useful for figuring out sky conditions, too. They use your phone’s GPS to show you what you’re looking at in the sky above you. This can help you figure out the exact location of the subject you’re trying to shoot, as well as the position of the moon if it’s not in view.
All you have to do is point your phone to the sky. So if it is a little cloudy, or you just don’t have the best view, you’ll at least know where to point your camera to get the stars or objects you want. It’s useful for determining sky conditions, but it also comes in handy if you just want to know what you’re looking at.
Pick the Right Camera Settings
If your camera gives you the option, set it to shoot RAW images rather than JPEG. Rather than compress and optimise your image the way JPEG does, when your camera is set to RAW mode, it preserves all of the detail, colour, and brightness of your original photo. This means your file will be a lot bigger, but you’ll also have more flexibility when it comes to editing.
Autofocus won’t work at night, so make sure your camera is set to manual. If your lens comes with manual focus, look through the viewfinder, find a star in the sky, and focus as best you can. Some photographers say you should just focus to infinity. You’ll see a little infinity symbol on your lens and you simply twist until the line on your focus matches up with this symbol, like in the photo above. Sometimes infinity doesn’t make for the best shot, though, so you can play around with your focus and see what works best for you.
And then there’s exposure, the setting that will probably need the most tweaking. You want to make sure your camera has just the right exposure to get the best possible shot. The exposure depends on three settings: aperture, shutter speed, and ISO. Here’s a quick rundown of each:
- Aperture: How wide your lens opens to allow light to come in. This is measured in f-stops.
- Shutter Speed: Your camera’s shutter speed determines how long your camera’s sensor will be open to let in the light. The faster the shutter opens and closes, the less light it allows.
- ISO Speed: How sensitive your camera’s sensor is to incoming light. The higher the ISO, the more sensitive it will be to light.
Your settings will vary depending on cloud coverage, nearby light, how bright the moon is, and so on. However, there are some ballpark guidelines you can start with. Here’s what Digital Photography School recommends for general photographs of the night sky:
- Aperture: f/2.8
- Shutter speed: 25 seconds
- ISO: 1600
With a 25-second shutter speed, your camera’s shutter stays open for, you guessed it, 25 seconds. This allows enough light to come in so you can actually see the stars in your photo. If you want to shoot photos of star trails, you’ll want to keep the shutter open even longer to capture the movement.
Your settings will also vary depending on what you’re shooting. For brighter objects in the sky, like the Northern Lights, Petapixel recommends an aperture between f/2.8 and f/5.6, a shutter speed between 15 seconds and 30 seconds and an ISO between 800 and 3200. In general, if your photo comes out too bright, try lowering the shutter speed or ISO. If it’s too dark, do the opposite: try increasing the shutter speed or ISO.
Remember the Looney 11 Rule
Again, the moon is a different story. Your exposure settings will be totally different. You’ll want a much higher aperture and a lower shutter speed because the moon is bright enough — you don’t need to light it up any brighter.
The Looney 11 Rule is a good rule of thumb for lunar photography. The rule calls for a f/11 aperture, but that also depends on the moon phase:
- Full moon: Shutter speed at 1/125, aperture at f/11, and ISO 250
- Quarter moon: Shutter speed at 1/60, aperture at f/11, and ISO 250
- Thin crescent moon: Shutter speed at 1/15, aperture at f/2.8, and ISO 250
Again, your actual settings will vary, but these are a good starting point. From there, you can adjust accordingly.
Create Star Trails by Stacking Images
We’ve all seen those pretty photos of time lapsed star trails. They’re not easy to recreate, but with a fair amount of time and some editing skills, you can make it happen.
The video above shows you how it’s done, but here are the basics. The photos are edited and stacked from a series of photos taken over a long period of time — hours. You set your camera to continuous shutter, which means it takes a photo every 20 or 30 seconds. You’ll need a remote to ensure the shutter stays pressed down to take those intermittent photos for a while. This way, the stars actually move, so when you stack your photos together, you get trails.
If you know Photoshop, you can stack your images there, but StarStaX is a free program for Mac, Windows, and Linux that makes this technique a little easier. Take a burst of photos with your phone, then merge them together using the program to make it look like a single, detailed, clear shot.
Comments