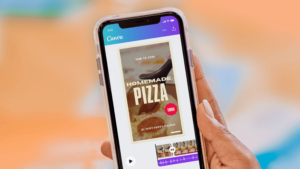
On October 12, everyone’s favourite visual communications tool, Canva, announced it would be expanding its service to include a shiny new Video Suite. As described by Canva itself, the service offers an “end-to-end video creation product that empowers everyone to design and publish professional-quality videos” across desktop and mobile.
If you’re feeling ready to kick off your TikTok career, or are just hoping to add a little colour to your home videos (which many of you are probably getting more creative with now that the iPhone 13 is here), the range of production options with Canva’s Video Suite is broad and they’re wildly easy to use.
I chatted with Rob Kawalsky, Head of Product at Canva, to gain some insight into the Video Suite and the best ways to put the product to good use. Here’s everything you need to know.
To start, what’s included in Canva’s Video Suite?
Literally, thousands of options. You could spend an age playing around with the available video templates and features. But the key features, rounded up by Canva, include:
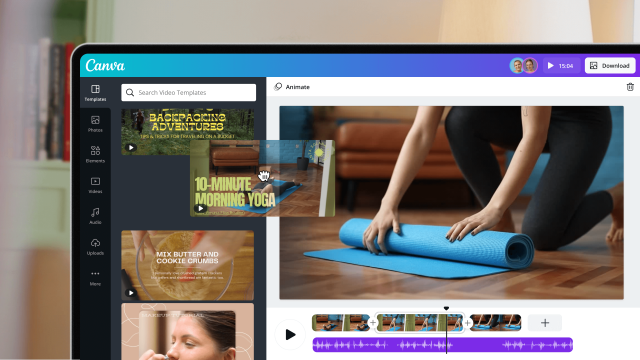
Scene-Based Editor: Canva simplifies video creation with a scene-based approach that feels familiar to building presentation slides, to eliminate the learning curve.
Single Layer Timeline on Desktop and Mobile: Scenes can easily be re-ordered, lengthened, or split using the timeline, to turn individual scenes into a story. Cinematic transitions enable a perfect flow between segments, and editing is optimized for mobile apps and browsers, removing the need for powerful hardware.
Multiple Audio Tracks: The video timeline now supports multiple audio tracks, whether uploaded to Canva or dragged from the media library, to enhance videos with music, sound effects, and narration. Canva Pro subscribers can access 27,000 royalty-free tracks through a partnership with Epidemic Sound, with thousands of new sound effects set to be available in November.
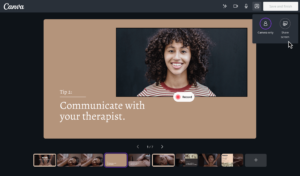
Screen and Camera Recording: Users can now record footage from a camera, screen, or Chrome tab, perfect for video messages and tutorials.
Animation Combinations: Choose from an updated selection of animations to transform text, visual elements, or full pages, in a few simple actions. Animation Combinations, set to be launched in the coming weeks, will apply context-specific animations to every element in a scene at once, for the perfect balance.
Tips for getting the most out of the service
Kawalsky explained that while Canva’s suite of tools has been designed with intuitive use in mind – it’s all meant to be really simple – there are some features that will help you along in your journey to becoming a video pro.
Here’s what he suggested:
Use the video templates: The selection of templates Canva offers is basically endless, and if you’re testing out video editing for the first time, they can act as a really great guide. Starting with a blank page is always the hardest place to work from, Kawalsky highlighted, so choosing a template you can easily edit to suit your needs will help.
The Styles feature takes the guesswork out of design: If you’ve chosen a template you’re happy with, but decide the aesthetic isn’t really you, the Styles feature will come in handy. Once you’re in the editing platform for your video template, you can find the Styles button in the menu on the left side of your screen.
Once you click Styles, you’ll see a collection of design style packages to choose from. These will include colour schemes and complementary fonts. If you’ve designed a Brand Kit, that will pop up as an option, too. Choose your preferred Style and it will update the video template accordingly.
‘See more like this’ helps with consistency: For the creative types who want to take design options into their own hands, the ‘See more like this’ function is a fun way to search for elements that work well together.
Say you find an image of an ice cream that you’re particularly fond of. If you right-click on that ice cream in the Elements library and click ‘See more like this’, Canva will bring up Magic Recommendations based on that image.
Animate anything: Once you’ve found the selection of illustrations or photos you’d like to use in your video, click the Animate button to add movement to any of the elements you’ve placed into your design.
Pop your face, or screen into the picture: As mentioned above, screen and camera recording is a new feature available with Canva’s Video Suite. Kawalsky highlighted this is particularly useful for tutorials or visual commentary if you’d like your mug to appear on screen in a break-out box.
To use this feature, go to the More button in the side menu of the editing page, then click the Videos option. Here, you’ll see a collection of available videos, along with a purple Record Yourself button. Select that and you’ll be taken to a fresh page where you can record your video using webcam or screen recording functions.
According to a recent study completed by Canva, 68% of participants shared that video is becoming increasingly important for them at work, and “53% of workplace teams have created video content in the past 18 months”.
If that sounds like you, here’s hoping these tips can help you build confidence and skills in this space.
Oh and whilst you’re here, if you don’t already have a Canva subscription, you should stop by our coupon page to nab free premium subscriptions for teachers and students, as well as up to 26% off annual subscriptions for everyone else.
Leave a Reply
You must be logged in to post a comment.