OS X Mavericks, which was released yesterday, does a few things that might get your goat. While it’s hard to complain about a free operating system, you’ll probably want to fix some of those annoyances.
Re-Enable Your Favourite Text Expander
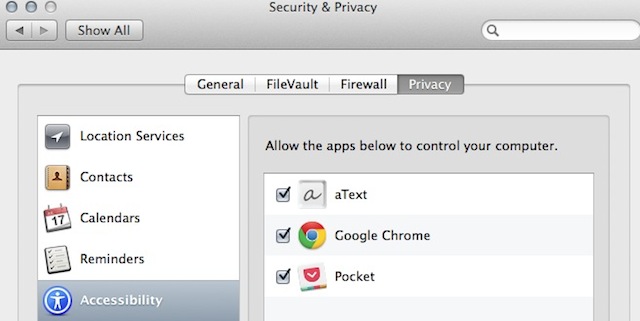
Most text expansion programs work by enabling a special accessibility option in the settings. That option was moved in OS X Mavericks, so there’s a good chance your text expander of choice has suddenly stopped working. Thankfully, the fix is relatively easy:
-
Open System Preferences.
-
Select Privacy & Security.
-
Click the Privacy Tab.
-
Select Accessibility.
-
Click the lock button and enter your password.
-
If you text expander is listed here, make sure the box next to it is checked. If not, open up your Applications folder and drag the icon to the System Preferences box.
Once your text expander is listed, you should have no problem getting it to work properly. If you’re using any similar tools that tap into Accessibility options, such as BetterTouchTool, you’ll need to do run through the same process.
Disable Notification Center on the Lock Screen
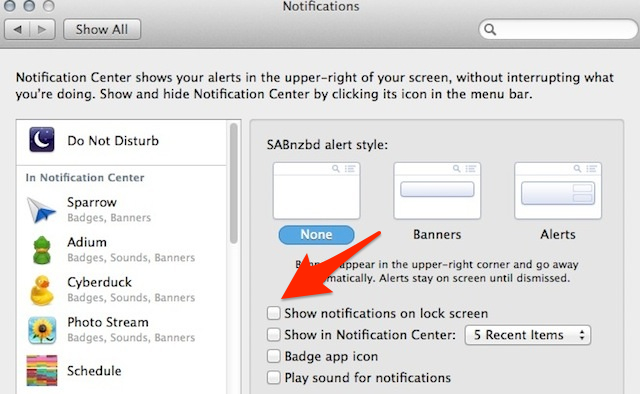
Notification Center doesn’t see a whole lot of improvement this time around, but the update does mess with your settings a little bit. If you’re not a fan of getting a million notifications, you’re going to want to pop into System Preferences > Notifications and take a look at the new options. The big one to check is “Show notifications on lock screen”. If you don’t want your emails or anything else showing when you’re computer is locked, uncheck this box.
Disable Automatic App Updates
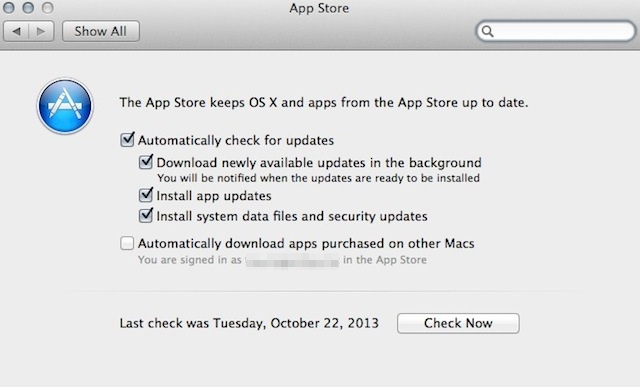
Auto updates aren’t new to OS X, but Mavericks handles them a bit differently compared to the way it was done in Mountain Lion. This time around, they happen in the background. The good news is you’re offered more control of what’s updated.
Head into System Preferences > App Store. Here you can turn off automatic updates or fine-tune how they’re handled. If you don’t like the idea of downloading every update imaginable, it’s a good idea to turn these off.
Enable Offline Dictation
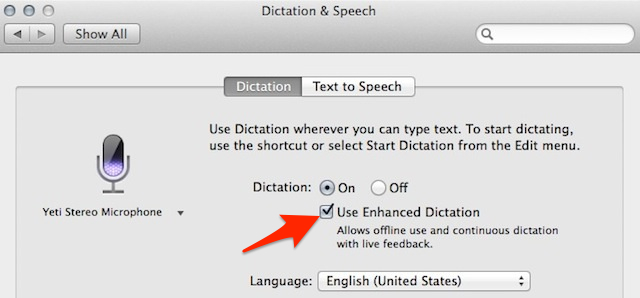
Dictation was introduced in Mountain Lion, but it required an internet connection to work. Since you can’t always be connected, Mavericks allows you to download the dictation software so you can use it offline.
Head to System Preferences > Dictation & Speech and check the “Use Enhanced Dictation” box. This enabled the ability to use dictation regardless of whether you have an internet connection or not.
Prevent App Nap On Select Apps

App Nap is the new system in Mavericks that helps save power and increase battery life. If an app’s not currently doing anything, App Nap conserves battery life by slowing the app down. In most cases, this is good when you’re working off a laptop, but if you find yourself in a special circumstance where you want to disable it on a per-app basis, you can. Just right-click an app and select “Get Info”. Then, check the box labelled “Prevent App Nap”.
Download Adobe Flash and Java Runtime
Mavericks doesn’t come packed with two pieces of software you’ll probably need at some point, Flash and Java. In fact, if you had either installed in OS X Mountain Lion, Apple went ahead and deleted it when you upgraded to Mavericks. Here’s how to install Java:
-
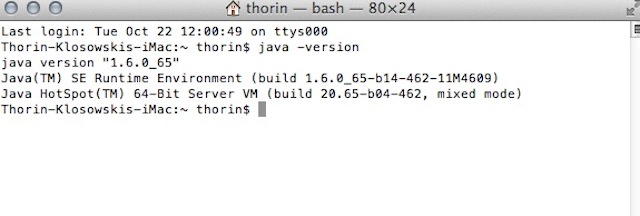
Open up Terminal (Applications > Utilities) and type:
java -version -
If Java isn’t installed, you’ll see an option to download it. If it is, you’ll see something similar to the screenshot above. Click the “More info” buttons. Find the file for Mavericks, then download and install it.
You’ll need Java for all kinds of apps, from FTP clients to Minecraft servers, so it’s not a bad idea to download it right away.
Likewise, Apple deleted that copy of Adobe Flash you’d installed before the updated. If you’re having trouble playing any Flash content, head over to Adobe and re-download the plugin again.
Check for App Updates

We’ve had good luck with app compatibility in OS X Mavericks so far, but you’ll want to make sure you update your software if you’re having trouble. You can do this either by heading to Apple logo > Software Update, or through your software’s own update system. If you want to double-check software compatibility before you make the upgrade, head over to Roaring Apps and search for your software of choice.
Comments
7 responses to “How To Fix OS X Mavericks’ Biggest Annoyances”
If you are running parallels 8, be warned it will probably cause problems for you, we are having all sorts of glitches, however If you are running Parallels 9, it will work fine for you.
Mavericks never do what they’re supposed to. Thats what makes them mavericks.
Skip Parallels and go with Fusion! 🙂
By biggest gripe is the 100Gb of SSD space that’s magically disappeared!!!! That and it screwed up iMessages (can’t log in – just spins longer than a spin class spins) and Keychain got messed up. Does anyone know where the 5.3Gb install file is located? I want to delete it.
Time for a Genius Bar appointment!
Search for it in the Applications folder!
Nada 🙁
I know it’s late, but if you’re trying to investigate what’s taking up space, Disk Inventory X is a great little program for that. Lets you use a visual representation of all the data. 🙂
Thanks Ethan! Will try it and see what I can find.
There is a great little utility I’ve been using for years called: Whatsize.
http://www.whatsizemac.com
It’s Shareware is the old sense of the term. You can use it for free for many baisc things. There is a paid version – I’m not certain exactly what the paid version adds feature-wise – but in the many years I’ve used it – I’ve never needed the extra / missing features.
You can use it to select files or directories and narrow down where there might be a size allocation issue and “fix it”. The fixing it part I usually find where on the system it is at and simply handle this in-system instead of using Whatsize to mange it as I have more control directly at the file instead of going thru the 3rd party tool.
Anyway – I know this post is old / late but may still be of some help to someone.