Google recently added Live Captions to the desktop version of Chrome. With Live Captions enabled, Chrome auto-transcribes any audio playing in the browser, even if the sound is muted.
The feature is similar to YouTube’s auto-transcription capabilities, but works for all audio played through Chrome, including videos, podcasts, and voice calls. It also works for Chrome Progressive Web Apps (PWAs) like YouTube and YouTube Music — and the feature is available available on select Android devices, too.
Live Captions is a useful accessibility feature for those with hearing impairments, or any users who want to follow along to videos and other spoken media but can’t turn up their audio. That said, at this point, its speech recognition isn’t perfect. I noticed Chrome had trouble recognising speakers with heavy accents or poor audio quality — and Live Captions are only available for English audio at launch. However, even with those limitations, Live Captions is a welcome feature that will hopefully get better as Google continues to update its precision and add support for other languages.
How to enable Live Captions on Chrome desktop
Chrome’s Live Captions setting is off by default. Turning captions on is easy, but there are a few steps to complete before you can actually use the feature.
First, make sure Chrome is up to date. Live Captions are only available on Chrome 89 (or higher). To update, open Chrome and go to Help > About Google Chrome or Settings > About Chrome. Click to install the update, if available.
With Chrome 89 installed, you can turn on Live Captions in the browser’s settings:
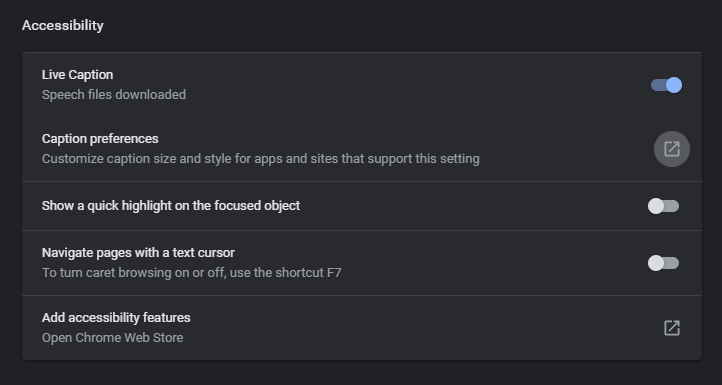
- In Chrome, go to Settings > Advanced > Accessibility.
- Enable “Live Caption.” Chrome will download the necessary speech recognition files, which only takes a few seconds. You’ll see “Speech files downloaded” under Live Caption when the feature is ready.
- Live Captions should start transcribing automatically whenever the browser detects audio. If not, click the media icon to open Chrome’s playback controls (it’s the button in the upper-right between Chrome’s browser extensions toolbar and your Google Account profile icon). Make sure “Live Caption” is toggled on.
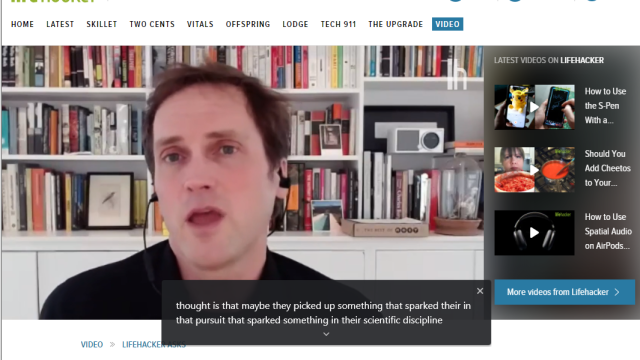
The Live Captions appear in a window near the bottom of the browser tab that is playing audio. You can adjust the size and appearance of the caption window under Settings > Advanced > Accessibility > Caption Preferences.
If you decide you don’t want Live Captions on at the moment, click the “X” to close the caption window and turn off for the current media, or toggle off the “Live Captions” option in Chrome’s media controls panel to disable them entirely.
Leave a Reply
You must be logged in to post a comment.