When you move in the real world, you usually fill out a change of address form with the post office, and boom! ” your mail appears at your new home. If only it was as easy to change your email address.
Whether you’re leaving an outdated service, moving to a new job or you want to get rid of the silly username you created in high school, here’s how to make the transition to a new email address simple and orderly.
Pick an email you’ll actually keep
First, make sure your new email address is one you’ll actually use for a long time. That might involve finally getting your own domain and associating your email address with your real name. Something like [email protected] has a lot more staying power than [email protected]. This way, you won’t deal with an email provider and you don’t have to worry about changing your email address ever again.
If this process sounds scary, don’t worry. It’s pretty easy to get your own domain name and set up an email address that you can use in a more familiar interface like Gmail (or your app of choice). Having an email address through your domain registrar might cost you a little extra each month for the privilege, but it’s a small price to pay for a custom email.
If you don’t want to spend the money on a domain, we’d recommend going with one of the big free providers like Gmail or Outlook. Basically, you want to avoid the email address you get from your school, the email address your ISP gives you or your company’s email address. Work and school emails are fine, but they might not last forever. You need something that you can always come back to.
As for your actual email address, make it as easy to remember and as “grown-up” as possible. That means avoiding cringe-worthy names like “[email protected]” or “[email protected].”
Instead, stick to some variation of your given name whenever possible. You can add something to it if it’s already taken on whatever service you choose, but don’t use something potentially embarrassing or anything that gives away too many personal details about you: your birth year, your political affiliation or your favourite sports team, for example.
Migrate your old inbox to your new one
In a lot of cases, you can migrate your old emails and contacts to your new email address pretty easily. We can’t cover how to do this with every single webmail and domain provider out there, but here’s how you’d migrate to a new account with Gmail. (The process should be pretty similar with other services.)
Migrate your email to Gmail
Once you set up a new Gmail account, you can import email and contacts into that account like so:
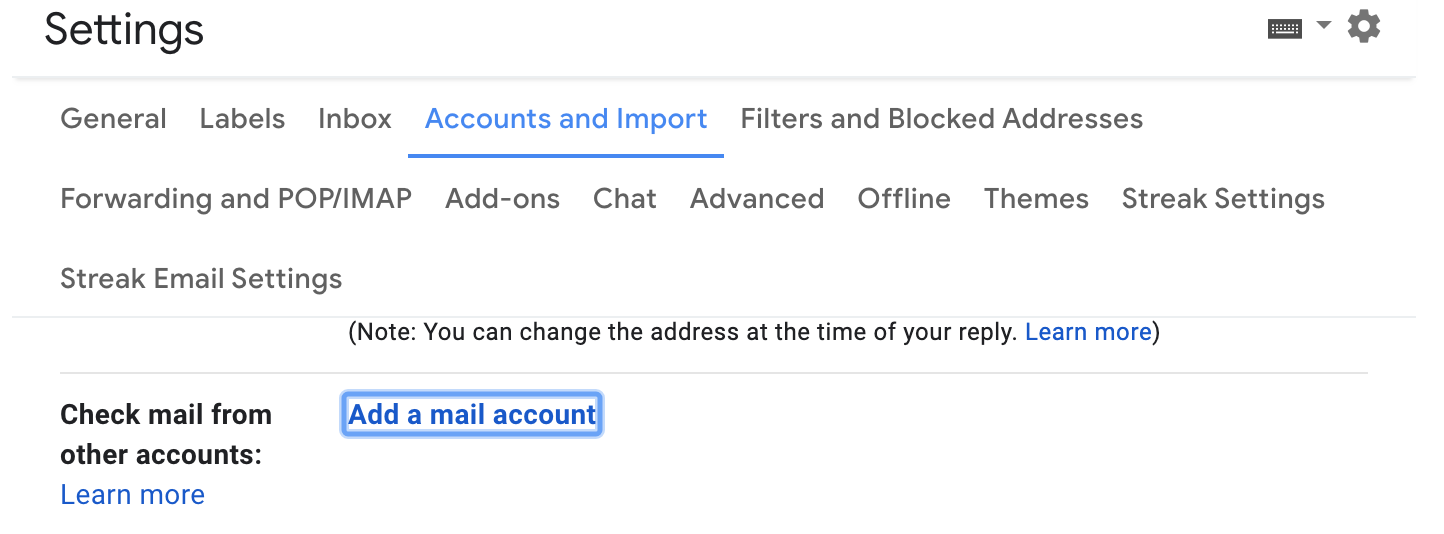
- Sign in to your Gmail account and click the gear icon, then select “Settings.”
- Open the “Accounts and import” tab.
- In the “Check mail from other accounts” section, select the “Add a mail account” option.
- Enter your old email address, click “Next,” then make a selection and hit “Next” again.
- Enter your password.
- Select the options you want (label incoming messaging, always use a secure connection, etc.).
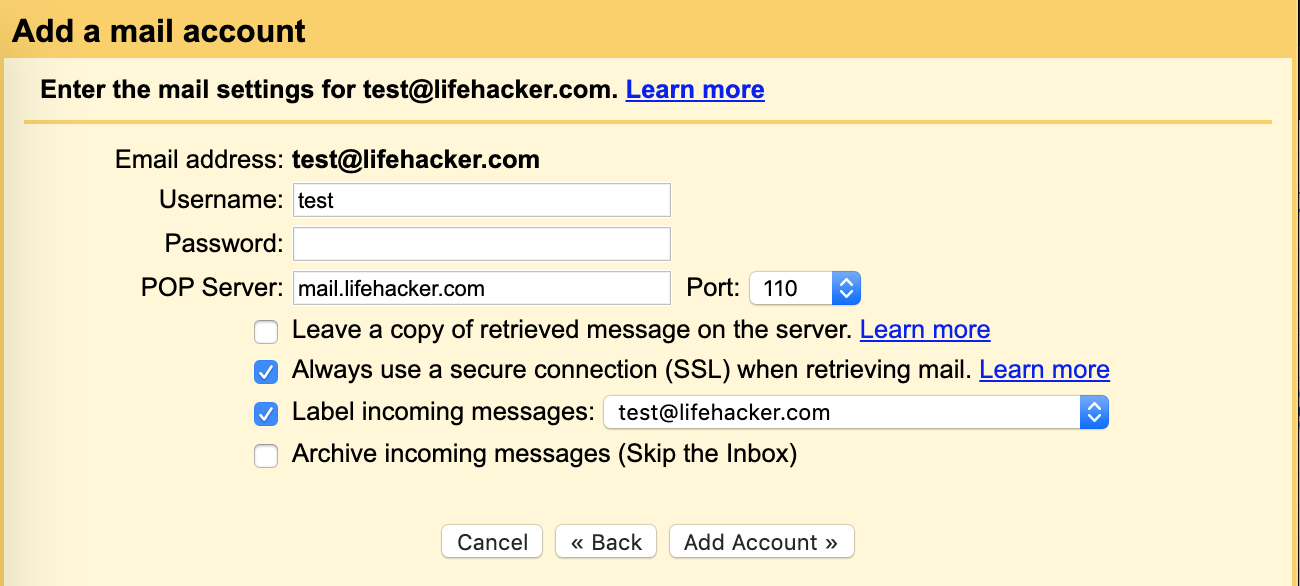
- Click “Add Account.”
All your old emails will now be pulled into your new account. You’ll also get any new emails that come through, so you don’t need to worry about email forwarding. This process can be a little slow, so if you need to get the emails still going to your old address quickly, we’d recommend setting up a forwarding system on your old email account as well (see the next section for how to do that).
Gmail also has a separate “Import mail and contacts” option that can also pull in the aforementioned data from other accounts. Consider giving this a try, too.
Keep your old email alive ” set up email forwarding
Next, it’s time to set up a system so that anything sent to your old email account gets forwarded to your new one. You’ll need to do this on your old email account (if you switched to Gmail, you already set this up in the last step). This is different for each email provider, but here’s how to set up email forwarding from Gmail and Outlook.
Set up email forwarding from your old Gmail account
If you switch from Gmail to another service, you want to forward those emails to a new account. Here’s how to do it:
- Open Gmail and click the gear icon.
- Select Settings.
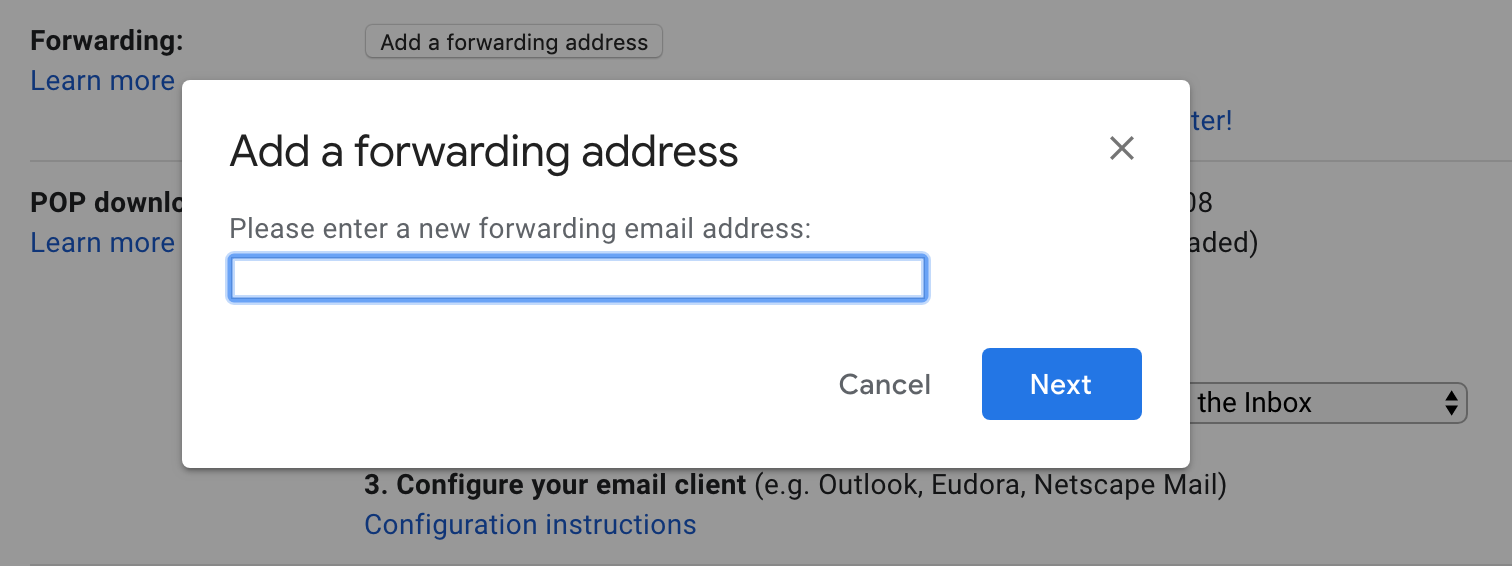
- Select the “Forwarding and POP/IMAP” tab.
- Click on “Add a forwarding address.”
- Enter your new email address.
- You’ll get a verification email at your new email address ” click the link to confirm.
Now, when someone emails you at your old Gmail address, you’ll receive that email at your new email address. If you want to receive only select forwarded emails, you can set up filter-specific email forwards so you don’t bring along any junk or spam to your new email.
Set up email forwarding from your old Outlook account

Email forwarding is easy to set up in Outlook:
- Click the gear icon and select “View all Outlook Settings.”
- Select Mail > Forwarding.
- Check the box for “Start Forwarding” and enter your new email address.
- Select “Save.”
Now, any email sent to your old Outlook address will go to your new one.
Update your email address on all your accounts
One of the biggest pains with a new email address is that you have to update your information in all your online accounts. This means you need to log in and change your email address everywhere on the web ” from Facebook to your bank. It’s tough to remember everywhere you have accounts.
This process is much easier if you use a password manager, which should give you a long list of all the sites where you have accounts. Take an afternoon to log in to each of them and update your email address. And don’t forget to update your info in your preferred password manager while you’re at it so it isn’t using your old email address for your logins.
If you don’t use a password manager, it’s a little harder to find all your accounts. The easiest way to do this is to search through your old email for phrases like “confirm your email,” “unsubscribe,” “your new account” or “welcome to.” This should provide you with a solid list of websites you have accounts at, email newsletters you’ve subscribed to and just about everything else.
Tell your friends and family
Finally, it’s time to break it to your friends and family that they need to update their address books with your new email address.
Depending on how many people you need to contact and your relationship with them, you might want to send out a few different emails to announce your big change: one for your family, one for friends and one for business associates. Send the emails from your new email address and BCC everyone else on your list so you don’t accidentally share a bunch of email addresses people might not want shared. You can say whatever you want in this note, but keep it short and to the point: “Hi everyone, this is my new email address, please update your address books and contact me here from now on. Thanks!”
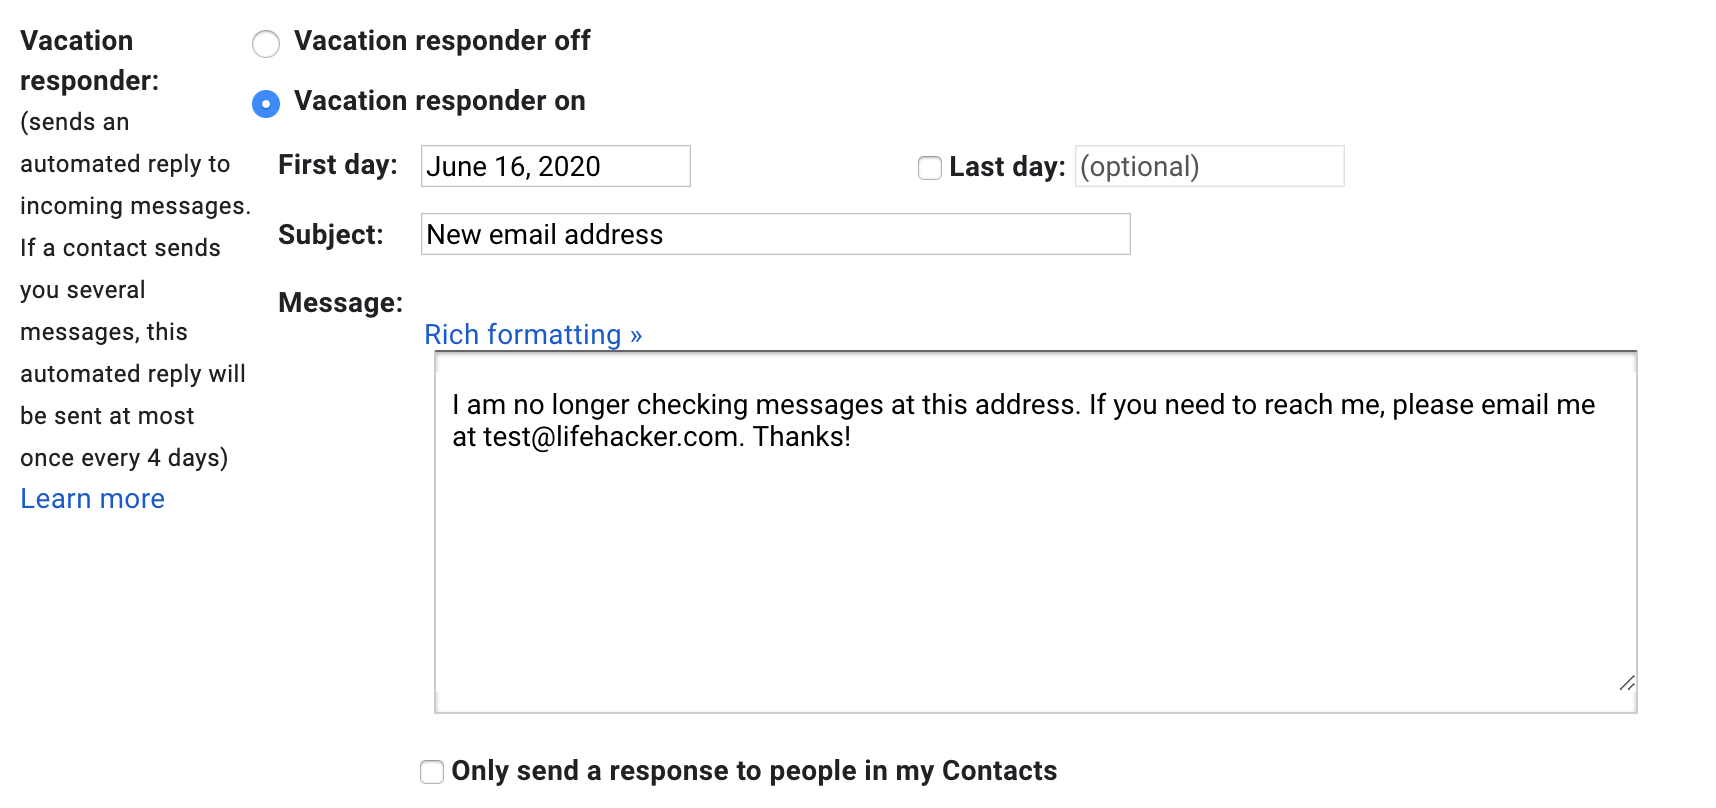
Finally, it’s time to throw an auto-responder on your old email address and let it die gracefully. Just head into your old account and create one (it’s also known as a vacation responder in some services) with a message that tells recipients about your new email address.
In some cases, you might need to follow up on your change-of-address email to make sure your initial note didn’t end up in someone’s spam or junk folder, but you should now be well on your way to ditching that old email address and moving on to something you’ll actually want to keep for a long while.
This article was originally published in December 2013 and updated in October 2019 and again on June 16, 2020 by Emily Long. Our updates include the following: added screenshots and a new lead image.
Comments