By October, I am no longer precious about preservation. By that time of year I am just throwing shit in jars. End-of-season harvesting is exhausting, and I am ready to settle into the new season, where I get to enjoy the literal fruits of my labour and have friends ooh and ahh over my wall of colourful jarred goods.
By spring, my supply of tomatoes and pickles starts to dwindle, and navigating the almost-empty cabinets feels like a game of Jar Jenga. Suddenly, grape leaves and raspberries and strawberries ready for canning, and the excitement starts all over again.
Why you’ll fall in love with canning
Canning is a muscle, one that has been flexed and passed down from generation to generation, with a helpful assist from local extension offices and master food preservationists. But that’s not how I started. I had to learn from Martha, cookbooks, and the internet, and it gives me tremendous joy to help other people learn how to can their own foods.
Whether you grow your own or buy produce to preserve, canning not only legitimately saves money and reduces waste, but results in better tasting and fresher canned food than the stuff you can buy, and it’s tailored to your tastes. It also teaches self-sufficiency, and whether you mean for it to or not, the food-packed jars become their own form of currency. I’m always surprised how effective a jar of jam is as a bribe or thank you (same difference). A jar of my salsa is how I grease the wheels of the guy I get all my grape leaves from. A jar of preserved grape leaves is, in turn, how I thank the friend who brings me mushrooms they hunted. Those mushrooms go into mushroom ketchup, which is all my electrician wants in exchange for small jobs.
If this bartering system appeals to you, or you simply want to prolong the flavour of summer, it’s time to start canning. Here’s what you’ll need to get started.
Choose the right canning system for you
Your biggest expense is going to be acquiring something in which to process your jars. Once you fill your jars with food, you need to process them at a certain pressure and temperature, for a specific amount of time, depending on the size of the jar, what’s in it, and your current elevation. Sounds complicated, but it’s usually pretty simple.
You can skip open-kettle canning
If you learned to can via your grandmother or someone European, you likely learned some open-kettle techniques. Vernacular aside, this means you heat up the food and the jar separately, and then pour very hot food into the very hot jars, put a hot lid on them, turn them upside down and let the heat create a vacuum seal on the jar. I mention open-kettle because you’ll see it often in recipes and should understand it, but there are a variety of issues with this process. While the upshot is you don’t need any special processing equipment, it also means that you’re not cooking the finished jar under the pressure it needs to become fully sterilized. For that reason, the USDA is adamantly against open-kettle canning.
When to use a water bath
Acid foods (with a pH of 4.6 or lower) can be effectively water bathed to process them, with the blessing of the FDA and the fine folks at Ball Canning, which is where safe recipes come from. Cold or hot food is put into jars of the same temperature. Those jars are closed with lids, and are placed into a large pot, on a rack, and covered with water. The lid goes on the pot, then you boil the water, and from the moment it starts boiling, time it. This works for foods like salsa, jam and pickles, but does not work for canning meat; that requires a pressure canner (PC).
Try electric if you’re anxious
In the past few years, some electric canners have appeared on the market. These allow you to put a few jars in at a time, press a button, and let the canner take it from there. Think of it like an automated water bath. The downsides are that they only process a few jars at a time, take up counter space like any other appliance, and tend to be expensive. The upside is that if you are really nervous about canning, this is a reasonable first step.
Try sous-vide canning for delicate foods
As one might imagine, subjecting pickles and similar, delicate foods to all that heat and pressure has an effect on the quality of it. In very recent years, we’ve taken what we know about pasteurization and applied it to the processing of jars. You can use a sous-vide immersion circulator to process acid foods at a lower temperature for a longer time to ensure you reach that ideal temperature.
When to pressure can
A pressure canner is just like a pressure cooker. You lock a very heavy lid onto the pot, and use a pressure gauge and a weight to ensure that the right amount of pressure and correct temperature is reached for your foods. The jars go in the same way as a water bath, and you can use your pressure canner as a pressure cooker when it’s not in service for preservation. There are a few different brands, with All American and Presto being the two most popular. They come in all kinds of sizes, based mostly on how many jars they hold since, unlike a water bath, you can stack jars in a pressure canner as long as they have metal plates between them (these plates will come with the canner). Additionally, since you can achieve much higher temperatures with more accuracy, you can safely can meat and fish.
Even if you own a pressure canner, you’re likely to continue using other methods for foods that have a pH of 4.6 or lower, such as produce that is naturally acidic, or has been pickled with vinegar or treated with citric acid. (This chart is helpful.) I can process chicken stock in my pressure canner, but I still sous vide my pickles. I water bath my tomatoes, but since it’s hard to damage jam, it goes into the PC, since I can get so many jars in at once. The point is, it’s important to understand the different needs of your food and what options exist.
How to source jars cheaply
Your grocery store likely has jars for sale. Depending on where you are in the country, they could be on an end-cap or buried near the seasonal stuff or baking goods. If you’ve never noticed them before, hardware stores are another likely outlet for new jars. The thing is, you don’t have to buy new jars; in fact they are an ideal buy on the secondhand market, but to understand that, let’s do some jar maths.
Flats of new jars are generally going to run you $21 or so. Depending on size, you’re getting 6-12 jars, complete with lids and rings. The jars are all reusable. The rings are reusable until they rust, and common metal lids are never reusable. They are one use. (Grandma may say otherwise, but Ball and the FDA are pretty solid on their stance.) Going off a common pint or quart, that puts the value around $1-$1.50 per jar. Since those lids and rings need replacements, the commonly held value of a glass jar with neither rings nor lids is about 50 cents. With inflation, you could go as high as 75 cents. There’s nothing special about new jars; wash an old jar and it’s good as new. Scouring secondhand sites for people getting rid of a bunch of jars, being sold around that price point, is the best way to get started canning. Just purchase lids and rings separately in bulk, since you’ll need to do so for canning anyways.
The two main players in this space, Ball and Kerr, are now owned by the same company, and the difference is negligible. However, during the pandemic there was a shortage, and some new brands emerged in both jars and lids, and most canners I know don’t think highly of them. The reason trust is critical here is that in processing your foods, you’re doing a lot of work, and to have a seal fail at the end results in a lot of wasted food, time and energy.
A small note on lids: there are now reusable plastic lids produced by Tattler, which have two parts, the lid and a rubber gasket. They’re a little more complicated to can with, since you have to pull jars out of the hot water to twist the lid on tighter after processing. For beginners, I recommend starting with metal lids.
Jars come in all shapes, sizes and colours
In terms of what kinds of jars to get, this will be determined by what you’re putting in them, where you’re going to process them (hot processing or freezer) and how you eat.
Common jars start as small as four ounces, which I’ve decided is perfect for jams, jellies, preserves, tomato paste and some pickles. You are likely to finish what’s in the jar quickly, meaning it does not go bad in the fridge, and I don’t have a fridge full of jars. (Narrator: She does anyways, so will you). As a single person, I put canned tomatoes in pint or half pints, but a family would put them in quarts, since you use more at one time for more people. Jars go all the way up to half-gallons, which are great for juice.
Pint-and-a-half jars are narrow, tall jars specifically for carrots, asparagus and grape leaves, because of their height. A squat half-pint is ideal for mustards and ketchups. Otherwise, the jar you choose is mostly about personal choice and usage.
While jars now come in a wealth of novelty colours, these have zero effect on your canning, and tend to cost more than clear jars.
Neck width matters
All jars come in two stock neck widths: regular and wide mouth. These are interchangeable between brands, and are well known within canning. A regular width can has shoulders, as the mouth is smaller than the width of the jar. A wide mouth jar is the same width as a pint jar. The funnels made for canning fit either size, and choosing a size is based on what you’re putting in it and where it’s going. You cannot freeze in regular mouth jars, because of those shoulders.
Only certain sized wide mouth jars, which allow room for expansion, are ok for the freezer, and it will say so on the box. However, the shoulders of a regular mouth jar make it easier to keep pickles under brine, for instance, but it’s easier to place pickles in the jar with a wide mouth. Your house will be full of both sizes, even though most people start to lean towards one style or the other as a preference. Recipes almost never call for one or the other.
Utensils are helpful but not essential
Standard canning kits have been on the market for a long time, and come with three main items: a set of jar lifters, a magnetic stick to hold onto jar lids coming out of a sterilization bath, and a funnel. Your funnel is very helpful, as it not only keeps your jar rims clean, but also tells you precisely where to stop filling your jars.
A jar lifter has two sides–one has rubberised grips to go around your jars, and the other has easy to grip handles to hold onto. These lifters hold the jars really well, making it easier to pull hot jars out of the water.
The magnetic stick is no longer really important, because we no longer have to heat our jar lids as we once did, according to Ball. Since the FDA has also declared that jars processed for over 10 minutes are also sterilized, it reinforces that clean lids are fine; they don’t need to be heated. Even if you decide to keep doing so, I’d recommend a less awkward way is to put them in a lid holder.
Some kits come with other things you won’t need, like sticks to push food down (use a chopstick or clean knife) or tongs (you already have those in your kitchen) or a jar tightener (you’ll only need it if you have arthritis, and the cheap one that comes with the kit isn’t the best choice).
You can buy the lifters and funnels separately, so a kit isn’t needed.
Obviously, you’ll need bowls and measuring spoons and knives for processing, but I assume you already have that in your kitchen. Sometimes, you may need more specialised equipment, like a food mill or grater, but wait until you encounter a recipe with the need before buying.
Preservatives are good, actually
It should come as no surprise that when preserving, you need preservatives. This is how you’ll learn that the word “preservative” is not bad, it’s scientific. The major preservatives you’ll work with are sugar and salt. You have absolutely no idea how much sugar is in jam and jelly, but you’ll soon find out. When starting, it’s ideal to follow recipes, but in the future, you can try varying the sugar through maple syrup, molasses, brown sugar and sugar replacements like Stevia.
When we talk about salt in preservation, we are talking about canning salt. It’s not table salt, it’s not iodized, and it comes in the big green boxes at the store labelled “canning salt.” If you can’t find it, other non-iodized salt is fine.
You’ll also use citric acid an awful lot. It comes in a small pelleted form, and you don’t use much — less than a teaspoon — but that’s usually all you need to preserve and stabilise foods that don’t have a natural pH of 4.6 or lower, which is the ideal for water bath canning.
You’ll see calls for pectin when working on jams; this is the additive that allows jams to gel. There are a variety of them out there, from Sure-jell, which is basically a gelatin, to real apple pectin. I recommend the real stuff for the best mouth feel.
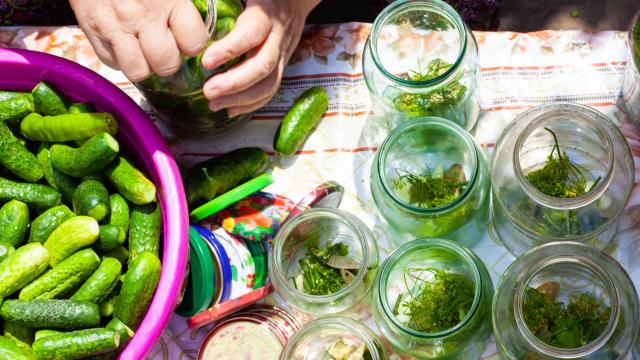
Pickle Crisp, which is just calcium chloride, are small white pellets that help keep your food crunchy. Whether fermenting or processing foods like asparagus, cucumbers, carrots, etc., the texture of the food is affected by the heat or fermentation, and the calcium helps to keep it crisp. Older recipes often utilise naturally occurring tannins by placing a grape leaf or oak leaf into your jars. I do both, adding a grape leaf and Pickle Crisp, because I’ll do anything for a crisp cuke.
While recipes will call for various specialised equipment or ingredients occasionally, the above list gets you well on your way for most canning situations. The strawberries are ripe, the peas are ripe — get out there and start building a canning library of your own.
Leave a Reply
You must be logged in to post a comment.