Loofahs are great for exfoliating the skin, and though one of them is my regular shower companion, I had no idea what they are. I assumed the coarse tubes were either natural sponges from the sea, or perhaps manufactured in a factory somehow. But it turns out they are actually a plant from the gourd family, and you can grow them right in your backyard.
Their scientific name is Luffa aegyptiaca, and their outside resembles a cucumber. On the inside, you’ll find an edible squash-like flesh that, when over-ripened, hardens into those familiar, exfoliating mesh tubes. Who knew: All this time we’ve been paying $US5.99 ($8) a pop for store-bought loofahs when we could’ve just been picking them from the vine ourselves. Here’s what you need to know to grow an unlimited supply of scrubbing loofahs.
Prep your seeds
Loofah (or luffa) seeds can be found at your local gardening shop or ordered online (Amazon’s got ‘em — mind-blowing, I know). As with any planting process, you want to give them the best shot at germinating. Savvy Gardening recommends soaking the seeds in a bowl of water for 24 hours before planting. (For even better results, use a heating pad to help the germination process.)
Plant in warm environments
The loofah plant grows similarly to summer squash, requiring anywhere from 150 to 200 consecutive warm days to grow and ripen. So if you live in places that see a lot of nice sunny days, you’re in a prime location for loofah growth. For those who live in cooler regions, you’ll want to first plant the seeds in pots inside your home, then replant them outside just before the summer begins. This is one of the trickiest parts of the growing process, according to DIY site The Art of Doing Stuff; they suggest using paper plant pots indoors so you can plant outdoors without removing them from the pots, “[reducing] the risk of transplant shock, which Luffa plants are prone to.” Planting outdoors six to eight weeks before the start of summer will give you the best chance of a healthy transplant.
Loofah plants can grow up to 9m high, so once you’re ready to plant outside, you’ll need something sturdy for the plant vines to grasp onto, like a chain link fence. Make sure your plant is in a spot with a lot of direct sun, otherwise the loofahs may not mature. Savvy Gardening notes, “[i]t’s important to … encourage fast, consistent growth by maintaining soil moisture and feeding the plants regularly.”
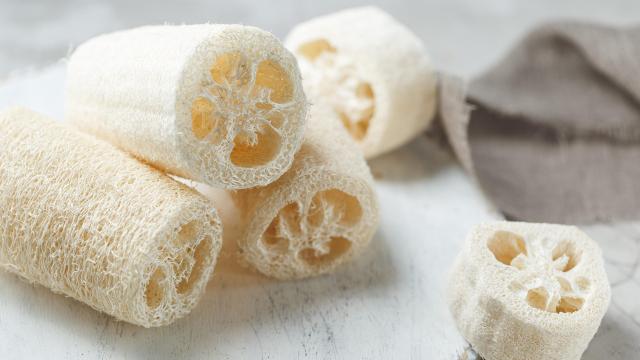
Be patient, and let the loofah turn brown
To achieve the desired fibrous loofah texture, the plants will need to ripen beyond their edible phase. The vibrant green colour of the outer skin should have faded into a deep brown before picking. You can test whether your loofah is ready for harvesting by shaking them on the vine; according to the gardening site The Spruce, if you hear the seeds rattling inside, the fibres have fully dried and hardened. (Remember, this process can take anywhere from 150 to 200 days, so be patient.)
Peel and dry
Now that the plant has hardened, you’ll want to pick off the outside skin to reveal the fibrous rod underneath. You can do this by cracking the skin at the bottom end (opposite the stem) and using your fingers to peel it off. Squeeze the gourd to create cracks that will make for easier peeling. You can also soak the plant in water to remove the skin off while wet, but this will increase the subsequent drying time required before the loofah will be ready to use.
Once you have successfully removed all of the skin, knock out any remaining seeds (hold onto a few for the next time you want to plant new loofahs) and clean out any unwanted particles with soapy water. Set the loofah in the sun to dry for a full 24 hours, turning occasionally until it has dried completely. After the loofah is fully dried, it’s immediately ready for use.
Congratulations. You just made your own loofah.
Leave a Reply
You must be logged in to post a comment.