
The problem with investing in smart, connected devices like Wi-Fi colour-changing light bulbs, internet-enabled power strips and wearables like Fitbits is that you need a dozen apps for them all. Stringify is an iPhone app (Android is on the way) that links all of it together. Imagine it: One app to manage them all, one app to automate them. Here’s how to set it up.
How Stringify Works
If all of this talk of “automation” sounds familiar, that’s because Stringify is similar to another service we love, If This Then That. Think of Stringify as a more customisable version of IFTTT, more like, If This, This, This and This, Then That and That. Its purpose is twofold: Manage smart appliances and internet-connected devices, and automate them to do whatever you want them to do.
Stringify supports a ton of different services and physical devices, all of which you can find on the app’s download page. You may recognise the Fitbit, Philips Hue light bulbs, Nest devices and Netatmo devices, as well as digital services like Google Drive, RSS feeds, Reddit, Slack and plenty of others. Personally, I tested Stringify with an Amazon Echo, LIFX light bulbs, an Automatic car adaptor, Misfit flash link and a Quirky Pivot Power Genius power strip (this is for US outlets, but you could use any smart power strip). The bigger variety of connected devices you own, the more useful Stringify will be to you.
Every device is capable of one of two things in Stringify: A trigger or an action. A trigger is a rule that starts the automation process. An action is, well, what happens after the trigger. You can set up Stringify so multiple parameters trigger an action, or so multiple actions get triggered. It’s really up to you, and if that sounds super simple, it’s because it is.
For example, you can set it up so when you arrive at home after 5:00PM, your Wi-Fi-enabled light turns on, your thermostat kicks in and a connected power strip triggers your electric kettle to boil water for an afternoon tea. It’s a little absurd, sure, but it makes automating all those silly connected devices you have a lot easier, and surprisingly fun. No programming rules for each of them in their own native apps or tools. I’ll run through some more examples of what you can do with Stringify at the end of this post, but let’s go through setting up your first “flow”.
Step One: Connect All Your Devices to Stringify
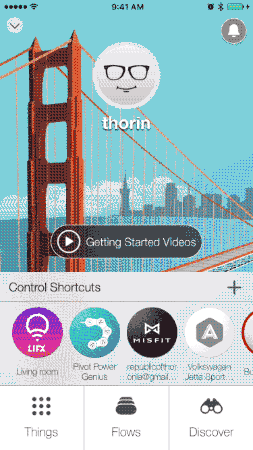
Let’s start with the most tedious, awful part of using any app like this: Approving and setting up your devices. First up, download the Stringify app and create an account. Next, you need to authenticate every device you have. This means you have to login to your account on every service or connected device you want to have access to in Stringify. If you have a lot of them, this can take a while, so settle in, pull up your password manager and get to it.
- Tap the Things tab.
- Tap New.
- Search through the list for the device or service you’d like to add. When you find it, tap it.
- Tap Connect (you can also tap “available triggers & actions” to see what Stringify is capable of controlling on the device before you set it up).
- If you’re connected a device, you’ll get forwarded along to the authentication page. Type in your username and password for your device or service to authenticate it.
Now, your device or service is in Stringify. Go ahead and repeat this process for everything you want to connect.
Step Two: Create Your First “Flow”
Once all your devices are set up, it’s time to create your first “flow”. A flow is Stringify’s set of automation rules. Again, think, “If this and this, then that and that.”
Let’s create a sample flow that shuts off my TV if I don’t meet my activity goal by a certain point in the day. The rules are simple: If I’m at home, and I haven’t reached my daily activity goal by 6:00PM, then turn off the TV’s outlet. It’s harsh, I know, but you have to do what you have to do to get motivated to exercise, right?
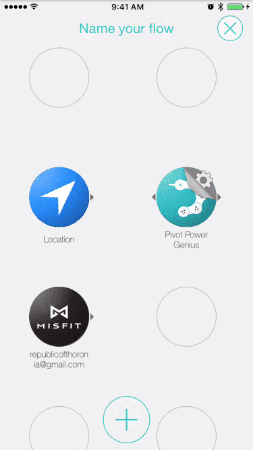
- From Stringify’s main screen, tap Flows > New. Here, you’re greeted by the main flow design screen, called the canvas. Tap the “+” to add some devices.
- In the Select Things menu, tap all the devices or parameters you want to include in your flow, then tap “Add” when you’re done. For my example, I’m using Location (as in, my physical location via GPS on my phone), the Misfit Flash Link fitness tracker and the Pivot Power Genius power strip.
- All the items you added are now in a panel at the bottom of the screen. Tap, hold and drag to move them into the circles on the canvas in a rough order of how you’ll use them. Put the triggers on the left, actions on the right. In my case, I have the Location and Misfit in one column, and the power supply in the second.
Once your canvas is all set up, you’ll need to configure each parameter.
Step Three: Set Up Your Triggers and Actions
After you drag each item to the canvas, you’ll notice a spinning gear icon. This means that some type of parameter needs to be set before you can use the item. Remember, each item can only do one of two things: Trigger something or perform an action. For example, if you’re using a location trigger, you need to pick what location triggers the action. Here’s how to set up a parameter:
- Tap one of your icons with the spinning gear icon. In this example let’s tap the Pivot icon to set up the action in our flow.
- Tap the trigger or action you want to enable. For the Pivot, I set it to “turn outlet 1 off”, because that’s where the TV’s plugged in.
- Repeat this process for all the items you have on your canvas.
Returning to my example, I have it set up like this:
- Location: If I am at a location (home).
- Misfit: If Daily goal not achieved by 6:00PM.
- Pivot Power Genius: Turn outlet 1 off (TV)
You can play around with a lot of different parameters here, so take your time when you’re setting these up so you can learn exactly what each of your devices is capable of.
Step Four: Link Everything Together and Turn Everything On
Once all your parameters are set for all the devices or services in your flow, it’s time to link everything together. To link a trigger to an action, simply drag your finger from a trigger to an action.
Things get a little more complicated when you have multiple triggers or multiple actions. For instance, in our example, we want two parameters met before the action happens: I need to be at home and I need to miss my activity goal. To do this, drag your finger from one trigger (in our example this is the Location trigger) to the action (the Pivot) and let go. If it connects successfully, you’ll see a yellow link icon appear. If not, the link icon is red, which means there’s a conflict somewhere. If all is good, then drag your finger from the second trigger (in our example the Misfit) to the link icon that just appeared. This links to the two triggers together. You can repeat this basic process to link any actions or triggers together.
When you’re done creating all your links, tap the box at the top to name your flow, then tap the Enable Flow box to enable it. Congratulations! You just completed your first flow.
Some Additional Examples Of Useful Flows
OK, so we’ve gone through the process of creating a simple flow with a very basic set of parameters. But, just like IFTTT, what you can do with it is really only limited by your imagination. Stringify has a ton of ideas listed on their web site to get your brainstorm juices flowing, but here are a few of my personal favourites.
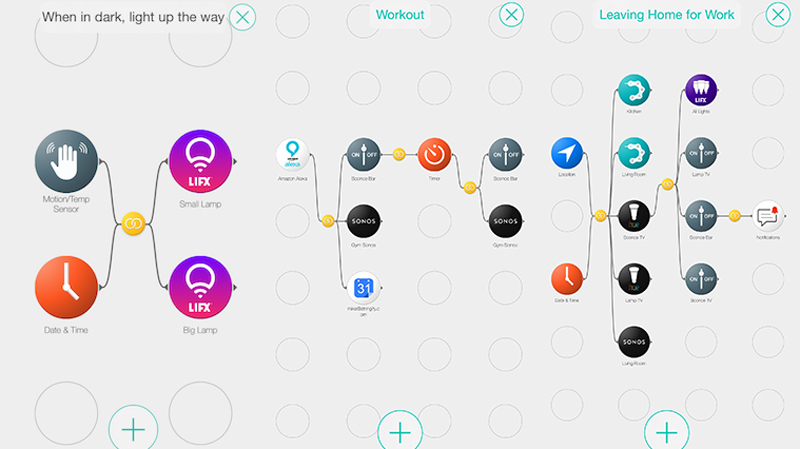
- When in the dark, light up the way: This sets a supported motion detector to look for movement at night. When it senses something, your lights turn on at reduced brightness. This is great for those late night wanderings to the bathroom or out to the living room to check if you locked the door, where you don’t want to get blinded by turning on a light at full brightness.
- “Workout:” This uses Amazon’s Alexa as a trigger, so when you say, “Alexa, tell Stringify to run Workout,” your home gym lights up, music starts playing and your workout is logged in Google calendar. Then, a timer is set for an hour. When that hour’s up, everything turns back off.
- Leaving home for work: This is one of the craziest (but still useful) ones I’ve seen. It’s set so when it’s between 7:00AM and 8:00AM on a weekday and you leave the house, all of the outlets turn off, two different brands of lights turn off, any music gets paused and a set of dimmer switches turn off. When that’s all done, you get a notification that tells you your “house is turned off”.
- Easy wake up: This flow is good for tea drinkers. When it’s 5:45AM on a weekday, a supported light bulb fades on slowly, and the Pivot Power Genius outlet that’s connected to an electric kettle starts boiling water for your morning cup.
There are, of course, countless other variations here, and some of these may even work for other purposes if you shift the time or swap out specific devices. Take your time, play around with various settings and experiment with different actions. You never know, you may actually find the perfect “smart home” combination of actions for the gadgets you already own.
Comments
One response to “How To Build A Smart, Connected Home With Stringify”
Looks great, now I just need to spend a couple of hundred dollars on the hardware 🙁