If you want the nostalgia of an old-school NES with the quality and ease of an HDTV, an emulator can take you far. If you want a perfect NES experience, you’ll want to go with the Nestopia UE core in RetroArch.
RetroArch (with Nestopia UE Core)
Platform: Windows/Mac/Linux
Price: Free
Download Page
Features
- Plays games from the Nintendo Entertainment System and the Famicom Disk System in the form of ROMs
- Play games with nearly any USB gamepad and customise the button layout
- Save and load your state anywhere in the game
- Rewind the game in real time
- Adjust a myriad of video settings, including shaders that add old-school effects or smoothing to your graphics
- Record a video of your playthroughs, or record your button presses to a BSV file
- Play online with friends using Netplay
How to Set It Up
RetroArch is a little more complicated than “Install, File > Open”, so here’s a quick primer on how to set it up with Nestopia UE:
- Download the latest version of RetroArch from its download page. It comes as a 7z file so you’ll need 7-Zip installed to extract it.
- Open the 7z archive and extract the files wherever you want (I recommend C:Program FilesRetroArch).
- Double-click on the RetroArch exe to start it up. You can navigate the interface with the arrow keys, press X to select, or Z to go back. It also supports a number of USB gamepads out of the box.
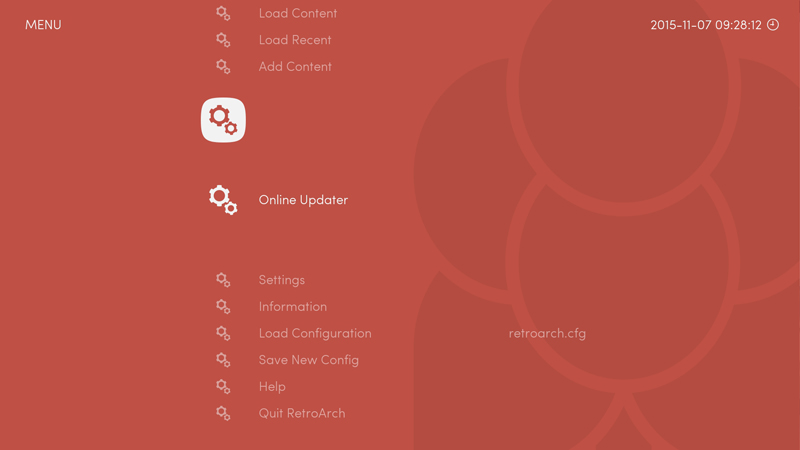
- To load an emulator in RetroArch, you’ll need to install that emulator’s “core”. Head to Online Updater > Core Updater and scroll down to “NES / Famicom (Nestopia UE)”. Select it to install the Nestopia UE core.
- Return to the main menu, and to go Load Content > Select File and Detect Core. Select a ROM file from your hard drive to start playing.
You can also tweak numerous video, audio, and gamepad settings, but this will get you up and running.
Where It Excels
RetroArch’s biggest advantage is its sheer number of settings. This can be overwhelming for some users, but it allows you to create a near-perfect NES emulation experience, which other emulators cannot do. With the right settings you can have pixel-perfect graphics with cool shaders to bring back that old CRT look and minimise input lag (a serious problem with many emulators). I highly recommend taking the time to set up RetroArch as described in this forum post for NES — it will give you a near perfect experience.
Where It Falls Short
RetroArch is complicated as heck, and it has almost no documentation to speak of (don’t worry, we’re working on a guide of our own). Installing cores and tweaking settings is really confusing if you aren’t familiar with RetroArch, and since there aren’t a lot of guides on it, you’ll do a lot of googling to figure it out, espeically if you use it for more than one emulator. But it’s the only emulator we’ve found that can eliminate nasty screen tearing and play with as little input lag as possible, which means it’s the best choice around for NES gaming.
The Competition
Nestopia and Nestopia UE are downloadable as separate emulators, and they’re decent if you don’t want to go through the hassle of setting up RetroArch. However, they have one glaring problem: you have to make a Sophie’s choice between horribly slow input lag (with vsync on), or nasty screen tearing (with vsync off). RetroArch has something else going on under the hood that eliminates this issue, so you can play with vsync on without the lag. If you don’t mind the screen tearing, I recommend Nestopia with vsync off.
The popular FCEUX has a lot of features, most of which are available in RetroArch. FCEUX allows you to tweak the emulation speed to make it faster or slower, though, which is a nice addition. It’s a bit easier to use than RetroArch, but it comes with a very inaccurate colour pallette by default, and has an issue with audio crackling when vsync is on. Because of this, we prefer the other emulators on this list. RetroArch has an FCEUmm core that works just about as well as the Nestopia UE core, albeit with the same incorrect colours as FCEUX. (You can fix the colours with a .pal file, but Nestopia’s colours are accurate out of the box.)
Jnes doesn’t have a ton of features, but it’s probably the easiest to get up and running out of the box. It doesn’t have horrible input lag with vsync on, and it has a one-click option for accurate colours (though it isn’t turned on by default), so you can get a decent experience pretty quickly, as long as you don’t need or want any other advanced features.
There are a ton of other NES emulators out there (seriously, way more than you’d expect), but these are the most popular, and the vast majority of people should be easily covered by either Jnes or RetroArch.
Lifehacker’s App Directory recommends the best applications and tools across multiple platforms.
Comments