As you emerge from your home this spring and assess your outdoor space, you might find that your old concrete patio could use a little sprucing up. If you’d like a little patio refresh on a small budget, you might consider painting on a stencilled pattern. All you need is a few materials, a couple of helpful tips, and a little time and patience. Here’s how to stencil a pattern onto your concrete patio.
How to prepare a concrete patio to be stencilled
For this project, you’ll need:
- A large format stencil
- A large stencil brush
- A paint roller
- Exterior concrete paint in a base colour and a stencil colour
- Clear sealer
- Painter’s tape
- A large container of water and a sponge to clean your stencil
There are lots of stencil options, and although the conventional approach is to go with a faux tile pattern, you can do this refresh with any pattern you like.
Now you can start prepping the concrete for paint. Use a strong spray from a hose or a power washer to remove any moss, dirt, or other loose debris. If your patio hasn’t been cleaned in some time, you can also try dissolving dish soap in water and using a stiff bristle broom or brush to scrub stubborn dirt from the surface. Check the concrete for cracks and use a crack repair kit to seal up small cracks and chips.
Once your surface is clean and smooth, use your roller and your base colour to paint the patio surface using an exterior deck paint. Depending on what colour you choose as a base and how much of a change it is from your original colour, it might take two coats to get an even colour. Once your whole surface is painted, allow your base coat to dry overnight.
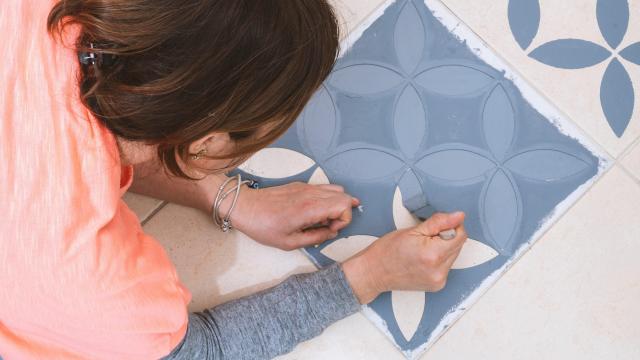
How to paint a stencil on concrete
The next step is the fun part: Starting in a corner, preferably the one farthest from the door, place your stencil along the edge of the concrete and tape it in place with your painter’s tape. Fill in your pattern using downward thrusts in a dabbing motion with your stencil brush. This helps avoid bleed-through at the edges of the stencil pattern. If you haven’t used a stencil brush before, or if you just need a refresh on your brush skills, practice on a piece of smooth cardboard to get an idea of how your brush and stencil will work.
Repeat your pattern across one edge of your patio for your first row. This will give you a good foundation to lay out the rest of your pattern. To estimate layout, you can cut out a piece of cardboard or paper the same size as your stencil and use it to estimate stencil placement. If your stencil surface doesn’t fit into corners or edges, you can tape off the section of the stencil you’re not using with your tape so you don’t paint other surfaces accidentally.
Some tricks to make stenciling easier
Stenciling a floor can take a while, but there are some things you can do to make the process go more smoothly. First, keeping dried bits of paint from building up along the edges of your stencil pattern will make your pattern look more crisp — use a bucket or tray of water and a large sponge to wipe excess paint off the stencil periodically to prevent it. You should also rinse out your stencil brush every so often, but be sure to dry your tools thoroughly after cleaning them so you don’t accidentally thin your paint.
If you do end up with small imperfections or mistakes in your pattern, you can use your base colour and a tiny paint brush to touch it up once the stencil layer is dry.
After your pattern is complete, the last step is to use a clear coat sealer as a top coat to keep your pattern from wearing away with foot traffic or weather. You should allow your surface to dry thoroughly before placing furniture or walking on your patio.
Leave a Reply
You must be logged in to post a comment.