Outdoor space is always a good thing in a home. No matter how nice your interiors are, human beings are animals, and as such, we are meant to roam free with the wind in our hair. While typical suburban homes often have a sizeable backyard, and some rural homes come with plenty of acreage to enjoy, the more urban your environment, the less likely you’ve got access to an expansive outdoor space. You might not have any outdoor space at all.
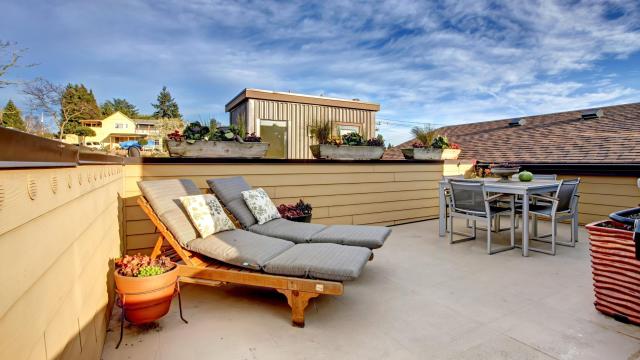
If that’s the case — or if you just want a nice bit of private outdoor space to enjoy — consider your roof. Roof decks can be great additions to your home, adding extra space to sunbathe, do yoga, host cocktails, or start a planter garden (or all of the above). The benefits of a roof deck go beyond just gaining some usable space — they can also be very private and peaceful, and they can increase the value of your home.
You might think that installing a roof deck is an expensive project requiring expert contractors, but depending on the type of roof you’re working with, it doesn’t have to be. Here’s how you can add a DIY roof deck to your home without going broke — or stressing yourself out.
Do your due diligence
If you want to avoid being forced to actually read the fine print of your homeowner’s insurance policy, there’s some due diligence you need to do before embarking on a DIY roof deck project:
- Hire an engineer. Most flat roofs are definitely not engineered to handle the load of a roof deck along with several people standing on it. Your first step should be hiring a pro to inspect your roof to determine if it’s capable of handling the loads, or if it can be augmented to handle them. And don’t assume that an existing deck means you’re ok unless you know for a fact that the previous owner did their due diligence.
- Check the material. Flat roofs can be made with different materials. Ideally, you want a rubber roof with a smooth surface — a roof with gravel means your deck will push the gravel down into the membrane, potentially puncturing it and ruining your waterproofing. And if your roof is covered with terracotta tiles or something similarly brittle, you most like won’t be able to pull this off at all.
- Check your codes. Finally, roof decks may run into all manner of local building codes, HOA rules, and other regulations. Check on this thoroughly before you’re forced to remove a brand-new deck.
- Delivery. Building a roof deck requires you to bring a lot of very heavy and awkwardly-sized material up to the roof. Check to see if your hardware supplier can deliver your materials via crane, dropping them right on the roof for you. Unless you’re that weirdo who thinks carrying a hundred pieces of wood up three flights of stairs is just wholesome exercise.
Consider the type of roof
Saying you have a “flat roof” isn’t very specific — or accurate. All flat roofs have a pitch, which is why the water drains off of them. The pitch is typically subtle, but it’ll be there, so you’ll need to determine the pitch of your roof so you can factor it into your deck construction.
The ideal roof for a DIY deck is one with an existing railing or parapet walls. These are the “half” walls that run around the perimeter of the roof. If the roof you’re eyeing for a deck is one of these, you may not have to install railings (which are not only a good idea but almost certainly required by code) and you can easily drop a “floating” deck into place (see below). If your roof isn’t bordered by parapet walls, you’ll need to factor in the installation of a railing around the edge.
You can DIY a deck on a non-flat roof, and it’s not that difficult — but it’s a little more challenging and a lot less safe. You do you, but most folks will be much happier and safer on a flat roof.
Consider the type of deck
Once you’ve selected your spot, assuming you’ve got parapet walls or railings installed, there are a couple of different approaches to a DIY roof deck.
- Mats, tiles, turf. The easiest thing to do is to just purchase some rubber mats or plastic tiles that snap together and drop them into place, or cut a piece of outdoor carpet or artificial grass to fit. This sort of deck can be completed in under an hour and gives you a nice surface to walk on without any construction necessary.
- Floating deck. A step up from rubber mats is to build an actual deck. This will involve lumber and other materials but isn’t difficult. You’ll need sleepers — these are typically 2-by-6 pieces of pressure-treated wood that are laid flat on the roof. Placing some pieces of rubber or other roofing material under them is a good idea, and you will likely need to adjust them for the roof pitch by either ripping (cutting) them down at the appropriate angle or building up the material under them gradually so they are level. You’ll need to lay the sleepers 16 inches apart on centre, and make sure they run parallel with the slope of your roof — otherwise, they’ll block water drainage, and you’ll have a big problem.
- Pedestal deck system. An alternative to wood sleepers is a pedestal deck system like those made by Bison Innovative Products. Depending on the size of your roof, this option can be a bit more expensive, but the adjustable nature of the pedestals makes it easier to get a level roof. Instead of sleepers, depending on the system, you’ll attach pressure-treated framing wood to the pedestals or pre-fabricated decking modules. For deck boards, your cheapest option is pressure-treated boards, which you can find at any big-box hardware store or lumber yard. Pressure-treated wood will last you anywhere from 10 to 20 years, depending on the weather conditions, and is easy to cut and install. Alternatively, you can use composite decking like Trex. This material is a mixture of wood and plastic and basically will never rot, making it a more expensive but much longer-lasting material that’s generally as easy to use as wood.
If you have a deep, flat roof with high parapet walls, the deck’s weight is probably all you need to hold it in place — no need to penetrate the waterproofing or attach the deck. If your roof doesn’t have parapet walls or you’re concerned about holding your floating deck in place (or if building code requires it), you’ll need to anchor your sleepers to the roof by penetrating the membrane and then sealing over the screws with a polyurethane caulking (note: not latex or silicone caulking), or by attaching a header to the house and attaching your sleepers to that.
This might sound complicated, but it’s a one- or two-day job, depending on your roof — and then a decade or more of enjoying a fabulous outdoor space and feeling literally superior to your neighbours.
Leave a Reply
You must be logged in to post a comment.