Back when we were allowed to freely visit other people in their homes, you may have noticed that some had what was seemingly an area of knickknacks or other pieces of “decor” grouped together that somehow…worked. It didn’t look like some random junk taking up space, or the clearance aisle of a Home Goods — it looked casual, yet intentional. That was a vignette, and you can absolutely make one too, probably using things that are already in your home. Here’s what to do.
What exactly is a vignette?
In interior design, a vignette is just a grouping of deliberately arranged objects on places like end tables, coffee tables, shelves or mantles. In an article for Doornob.com, Dawn Hammon explains vignettes like this:
Mostly, vignettes draw the eye, creating interesting focal points within a space. And while they can make for a great way to proudly put your prized possessions on display, vignettes can just as easily turn into overcluttered eyesores.
Here’s how to make a vignette that strikes a balance between looking natural — but not some tchotchkes just plopped on a shelf — while not appearing staged.
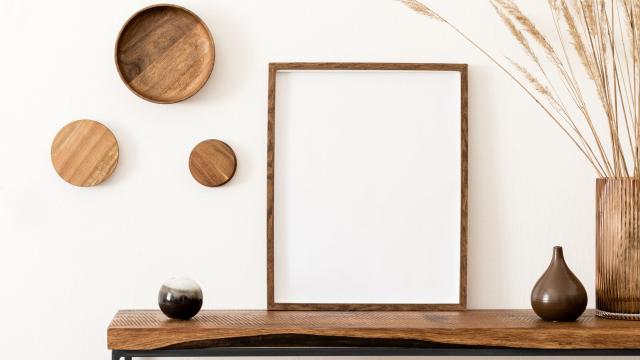
How to create vignettes that tie a room together
This take a little more thought than opening your closet or going up to your attic, finding some stuff, and then arranging it. Here are six areas that Hammon suggests focusing on when putting together a vignette:
- StyleWhile your vignette could have a theme, it doesn’t have to. The goal is finding items that complement each other in some way. “If you collect historic artifacts, putting them all on a shelf together can get overwhelming quick,” Hammon writes. “Instead, try placing all the pieces from particular eras together in smaller groups. If you only have a few pieces, couple them with framed artwork, historical information, or tapestries.”
- SpacingIt also matters how you place the items in the vignettes: Hammon says they should be adequately spaced to avoid blocking one object with another. “If you have too many items for one area, create two vignettes instead,” she notes.
- HeightMake the vignette more interesting to the eye by using objects of varying heights, so it looks more like a skyline than a display of the same items at a store. “Even if the entire collection is made up of seashells, you can still put them in vases of various sizes, with taller ones in the back and loose shells in the front,” Hammon writes. “If your items truly are all the same size, consider adding risers to the back row to at least create multiple tiers.”
- TextureHaving multiple textures throughout a room — including in a vignette — also draws the eyes in. So feel free to mix glass, fabric, wood, metal, foliage, etc.
- ColourWe’re not talking about it in an early 2000s “pop of colour” type of way, but more like paying attention to colour and background when arranging a vignette. As Hammon points out, white figurines against a white background isn’t going to add much to your space.
- PersonaliseIf you have stuff you’ve kept over the years because it means something, or you just like the way it looks, incorporate those into the vignette. That’ll also ensure it is a reflection of you and your interests — and not a case of walking into an IKEA and recreating one of their staged rooms item-for-item.
Leave a Reply
You must be logged in to post a comment.