
This article is about how to hide porn on your computer. The delicate souls among you can replace the word “porn” with “important files” and the same basic methods still apply. For everyone else, real talk: It’s not very difficult to hide porn files on your PC, with the caveat that you’ll never be able to keep them away from someone who is truly dedicated to finding out what’s stored on your machine.
If that’s your scenario, maybe keep all your secret stuff on a USB-connected drive instead, and hide that somewhere where nobody will find it. Otherwise, there are two general approaches for hiding data on your system: Keep people out of your PC in the first place, or hide the data so anyone using your PC can’t read it (or find it). We’ll cover both approaches in this guide.
[referenced id=”1034342″ url=”https://www.lifehacker.com.au/2020/10/how-can-i-find-out-if-my-partner-is-interacting-with-cam-girls/” thumb=”https://www.gizmodo.com.au/wp-content/uploads/sites/4/2020/10/24/x4nfo8snatzoqbcq0fcs-300×169.jpg” title=”How Can I Find Out if My Partner is Interacting With Cam Girls?” excerpt=”I normally don’t like to wade into other peoples’ business, especially when it relates to their consumption of adult material on the web. As long as your hobbies aren’t illegal, super-creepy, or otherwise hurting other people, you’re free to do as you like.”]
How to lock down your PC so nobody gets in to view your files
In theory, having a very strong authentication system in place for logging into your PC could allow you to be a lot lazier with your file concealment. If nobody can get into your system, it stands to reason that you could leave any “important” files sitting right there in a folder on your desktop, for all you care. This isn’t the most comprehensive way to hide files on your PC, obviously, but it splits the difference between convenience and concealment.
The first line of defence is having a strong password for your desktop or laptop PC — one that you don’t use anywhere else, and one that you’re willing to change on a semi-regular basis if you live in a shared space with other people. While it’s unlikely that another person in your home or apartment will ever guess or otherwise extract said password, using the same login for years only multiplies the possibility.
I would not use a convenient PIN code to log into your Windows PC. While it makes it a lot easier to type in a few numbers instead of 20 characters, that’s just asking for someone to figure out your login. Similarly, I wouldn’t use Windows 10’s dynamic lock feature, which opens up your system whenever a Bluetooth-paired device is in range. No, no, no. Even a picture password makes me go a bit, “Hmmmmm,” like Henry Cavill’s Geralt of Rivia.
Go with a long, annoyingly complicated password. Or, better yet, set up Windows Hello-based authentication that uses your face or your fingerprint to log in. You can also try Windows 10’s security key option, which requires you to plug in a USB device while you’re typing in your password or a PIN.
This should be all you need to keep people out of your PC, but I still wouldn’t recommend leaving your porn strewn all around your desktop. You won’t have to go to incredible lengths to hide it if you’ve really locked down your system, but you should still assume that someone, someday, will be able to see what’s on your desktop.
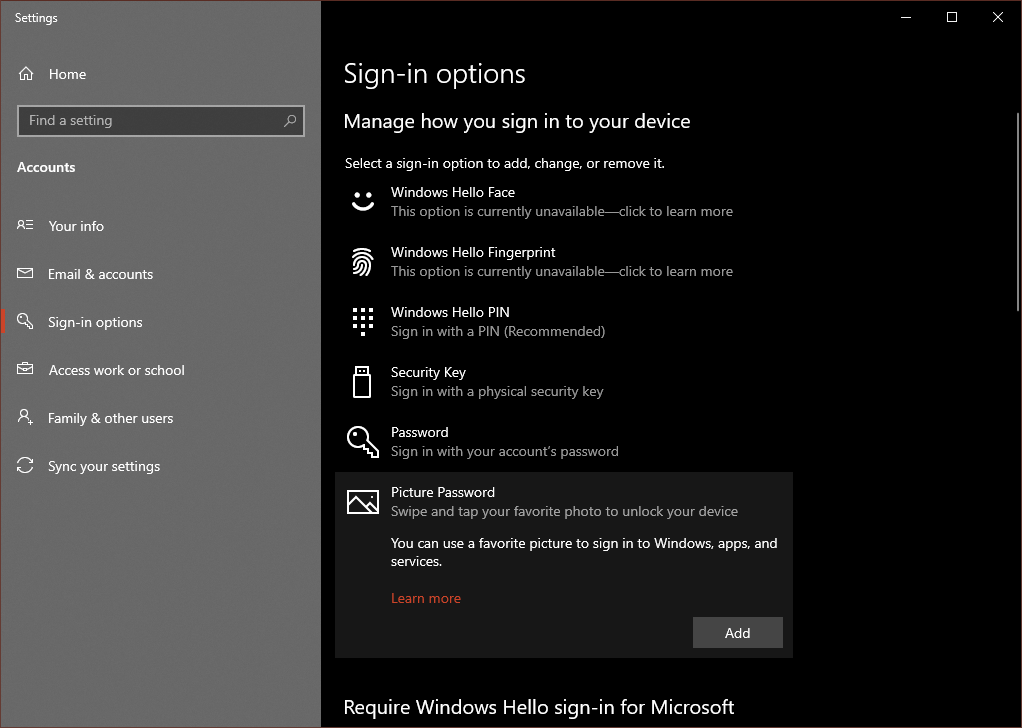
That reminds me. Make sure you’ve set Windows 10 to require authentication when it wakes up from sleep (via Settings > Accounts > Sign-in options), and make sure you’ve enabled “On resume, display logon screen” within your screen saver settings:
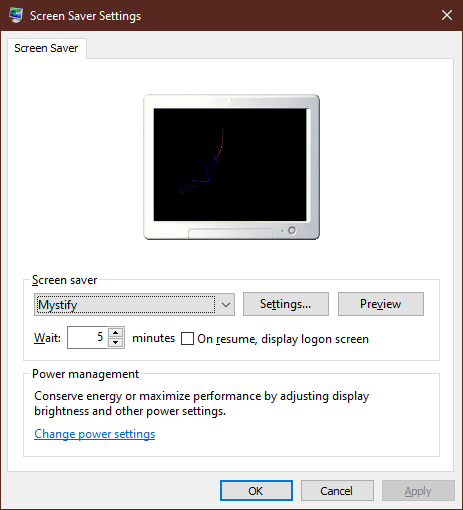
That way, someone will be prompted to log into your system if they mess with it while you’re away after you’ve already logged in. You don’t have to go to these somewhat-extreme lengths if you’re diligent about locking your system when you step away to do something else (Windows Key + L!), but all it takes is one forgetful moment to inadvertently expose your secret life.
How to hide files on your PC
If you don’t want to go with a super-strong login setup (or can’t, if you’re merely one of many accounts on a shared PC), you should at least take a moment to come up with a pretty good plan for hiding your files on your PC.
Before I begin, I’ll note that this technique isn’t foolproof. You’ll have to cover your tracks well, and all it takes is one audit of your storage space for someone to go, “Hmm, I wonder why this random folder is eating up a terabyte of space.” (That’s assuming that you have a lot to hide; stashing away a reasonable amount of files on your PC will be much easier.)
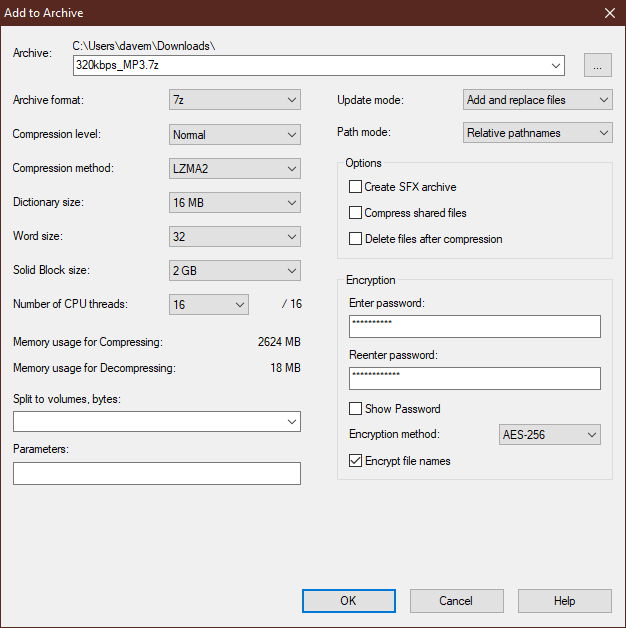
The first and easiest way to hide files on your PC is to simply zip them up using a free tool like 7-Zip. You’ll supply an encryption password as part of the archive-creation process (and select the option to encrypt the names of your files, too). Then, you can either hang on to that .ZIP file as-is, or you can rename it something completely unassuming: Steam.bak, let’s say, if you’re a gamer. If anyone asks, it’s a backup of some of your games.
If you’re too lazy to unzip your files each and every time you want to view them, you have another option. Find an obscure folder on your hard drive and make it even more obscure. Maybe add some official sounding nested folders to a random Windows folder, like C:WindowsIdentityCRLproductionusertmp , or bury a folder in your Program Files folders. You can even give them weird names.
Ultimately, you might create a folder structure that looks like this:
C:WindowsIdentityCRLproductionsystemloginshellbackup~..
That’s a bit extreme, but it’s just an example. Dump whatever files you’re looking to hide on your system within that last folder, and either remember that you hid them all inside your Windows “IdentityCRL” folder, or just email yourself the address so you don’t lose it.
Then, right-click on one of the root folders within File Explorer and select Properties. Check the box to mark the folder and the files it contains as “hidden,” which means they’ll only be findable in File Explorer if someone enables the “Hidden items” box in File Explorer’s View menu. Similarly, click on Advanced, and uncheck “Allow files in this folder to have contents indexed in addition to file properties.”
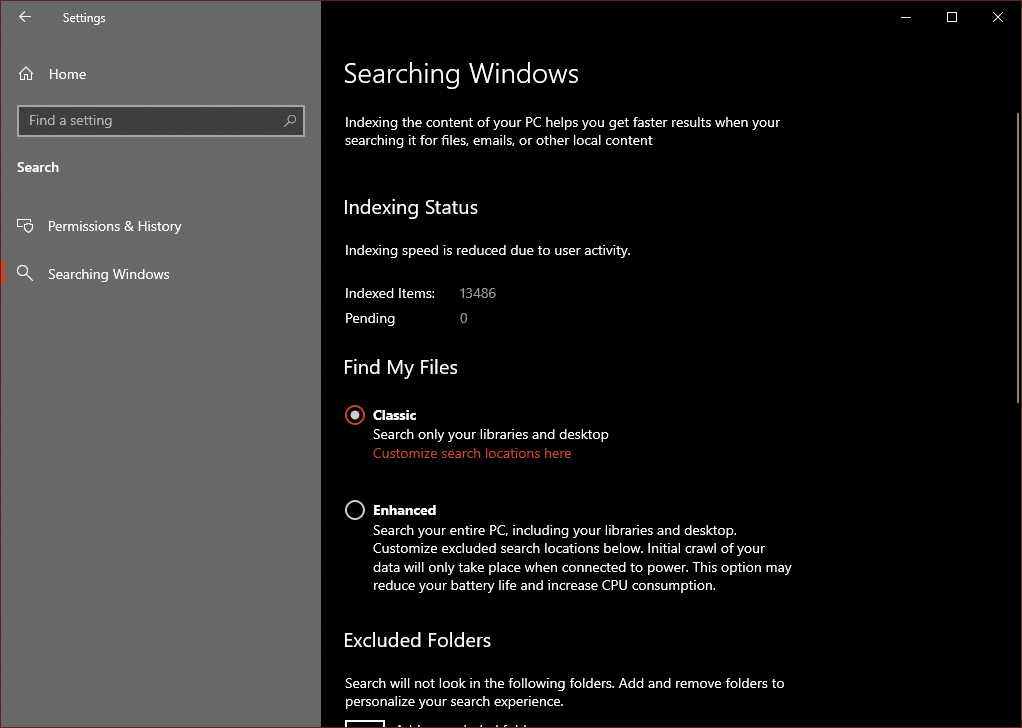
Finally, you’ll want to pull up Windows 10’s search settings (via Settings > Search > Searching Windows in the sidebar), and make sure you system is using Classic search, not Enhanced. Then, click on the “Customise search locations here” link to make sure your hidden folder isn’t being pulled into Windows’ indexing, lest your files potentially appear if someone types in any part of their name or extension via the Start Menu’s search function. You could also add a parent folder (like “c:Windows”) to the exclusion list, if you don’t think that will cause someone to get too curious.
That’s a lot of work, isn’t it? You could also use an app like VeraCrypt to create encrypted “containers” on your hard drive that will be impossible for someone to access (or potentially even find). It’s a much easier solution than dealing with the nuances of hiding files out in the “open” within a buried Windows folder, but it does require you to jump through a few additional hoops, and might feel less convenient than simply clicking a “hidden files” box in File Explorer to expose your stash. Ot’s your decision.
Don’t forget about “recent items”
Assuming you’ve hidden all your files, there’s one more track-covering step you can’t forget about: your recent lists. Windows 10, as well as many of the apps you use to view your content, will highlight files you’ve recently opened in a variety of potentially damning ways.
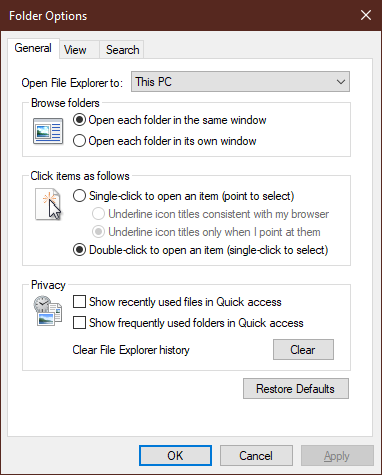
For example, you’ll want to disable the “Show recently opened items…” option in Settings > Personalisation > Start, as well as anything else that might give you away — possibly your “most used” apps, too. This will ensure that files you view don’t end up in any “jump lists” that pop up when you right-click icons in your taskbar. Similarly, launch File Explorer, click on the View tab, and click on Options. Uncheck the options to “Show recently used files in Quick Access,” as well as “Show frequently used folders in Quick Access.” And while you’re there, clear your File Explorer history.
Done? Not quite! These are just some of the steps you’ll need to make sure your… activities… don’t blatantly appear in Windows 10. Whatever apps you use for viewing content of all kinds might also have their own “Recent items” history that can give you away, were someone to open said app and view that list.
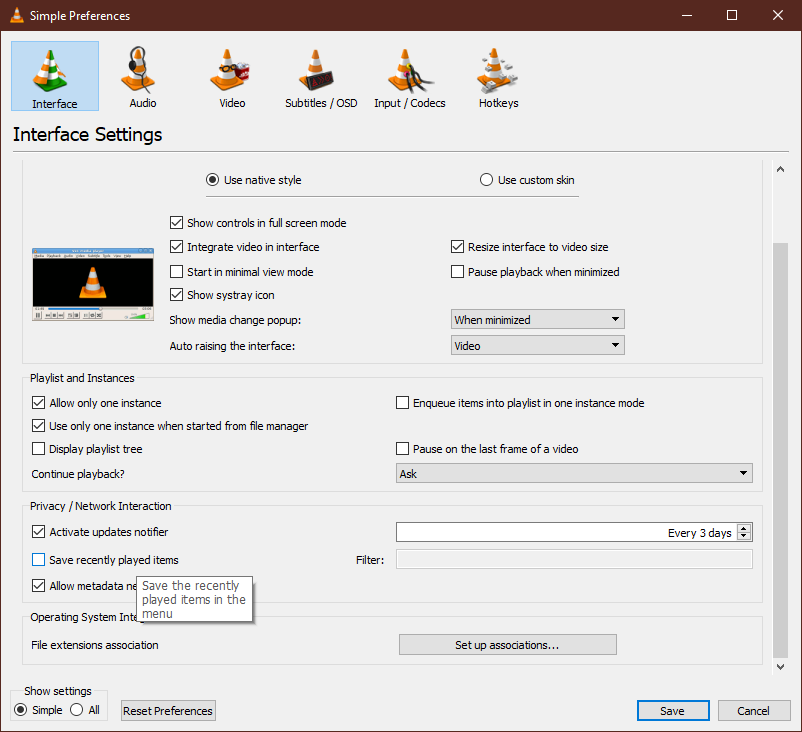
You’ll have to root through your apps’ settings to see if there’s a way to disable these kinds of lists. There should be. For example, here’s where you’d find it in VLC:
This is all a lot of work, I know, and it only takes one slip-up for you to be found out. Short of recommending that you only view your porn in a sandbox or on a virtual machine — which you could also do! — hiding stuff on a system that’s shared by multiple people is always a bit of a cat-and-mouse game. If you’re lucky, your roommates/family/loved ones are all luddites, and not suspiciously minded network admins.
Leave a Reply
You must be logged in to post a comment.