Don’t let its fancy reputation fool you: risotto is an unbeatable trash meal. No matter what bits and bobs you have floating around your fridge, there’s a solid chance they’d taste pretty good buried in broth-soaked, cheesy rice. Risotto is infinitely adjustable, just fancy enough to feel special, and with the help of your pressure cooker, all but impossible to mess up.
The ingredient list for a basic, traditional risotto is simple and finite ” Arborio rice, butter and/or olive oil, shallots, white wine, chicken or veal stock, and lots of grated parmesan ” but nowhere near as ironclad as you’d think.
Any short or medium-grain white rice can stand in for Arborio, and regular old yellow onions work just as well. The wine is also optional: I use (and love) cheap beer, but if you don’t drink at all, use water spiked with lemon juice or apple cider vinegar.
Homemade stock is great, but so is the stuff in a carton, and anything from pecorino to aged sharp cheddar is a perfectly acceptable substitute for expensive, real-deal parmesan. Basically, everything about risotto is negotiable, up to and including the cooking method.
If you’ve ever spent an evening dutifully stirring ladleful after ladleful of hot homemade chicken stock into a pot of rice, you know that risotto is a labour of love ” but it doesn’t have to be. Any pressure cooker cuts the actual labour required in half, but multi-cookers with preset programs basically let you make perfect risotto with the press of a button. Here’s how to do it.
Foolproof Pressure Cooker Risotto
The measurements here are vague because they almost don’t matter ” that’s how forgiving this recipe is. Anything from cabbage to sausage to potatoes to frozen peas can be the star of a risotto, so use whatever’s in your fridge. Two cups is a good ballpark amount for most add-ins, but feel free to up the quantity on ingredients that shrink significantly as they cook.
As for the rice-to-stock ratio, one cup of white rice will absorb up to four cups of stock, but use less for a thicker final result. The only hard part is keeping the pan from scorching, but as long as you have a mise en place and adjust the heat as needed, you’ll be golden.
You can expect three generous main course-sized portions from this recipe as written. Double or triple everything to feed a crowd ” just keep the contents below the maximum fill line.
Ingredients:
-
2-4 tablespoons butter, olive oil, or a mix
-
2 or more cups finely diced vegetables, meat, or a mix
-
1 medium onion or 2 shallots, finely diced
-
1 cup medium or short-grain white rice
-
1 cup light beer, dry white wine, lemon water, or diluted apple cider vinegar (3:1, water to vinegar)
-
2-4 cups chicken or vegetable stock
-
1 tablespoon miso paste or Dijon mustard (optional)
-
1/2 cup (or more) grated hard cheese, like pecorino, parmesan, or aged Gouda
-
Salt and pepper, to taste
-
Chopped herbs, to finish (optional)
Instructions:
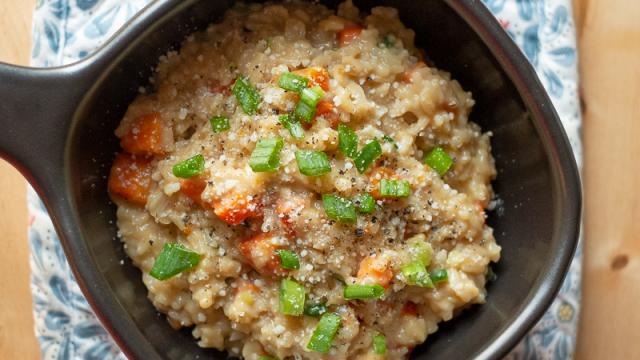
First, select and prepare your featured ingredients. I chose carrots and scallions. Ideally you’ll get a few pieces in each bite, so keep that in mind while prepping. Slice leafy vegetables into ribbons, and go for a quarter-inch dice on ingredients that don’t lose much volume when cooked. High-shrinkage ingredients can be chopped more roughly. Collect everything in separate bowls as you go.
Next, brown these ingredients one by one, starting with the one that takes the longest to cook. A cold pan is best for fatty meats, so if you’re using sausage, pancetta or bacon, add those to the pressure cooker insert before you turn it on ” and cook everything else in the rendered fat.
Otherwise, set your pressure cooker to the “Normal” Sauté setting (or equivalent mode) and add two tablespoons of butter and/or olive oil. Add your star ingredients one at a time and cook, stirring frequently, until tender and nicely browned. Keep an eye on the colour of the fond that develops on the bottom of the pot, and adjust the Sauté setting to “Less” ” or turn the cooker off entirely for a minute ” if you notice any scorching. As each ingredient finishes cooking, place it back in its bowl and reserve for later.
At this point, you’ll have either a pot full of rendered fat or one that’s dry as a bone. Drain off excess fat or add some more as needed, then dump in the onions and cook until translucent, scraping up any browned bits as best you can. This will take about five minutes. (Again, reduce the heat or turn the cooker all the way off if you notice any scorching.) When the onions are soft, add the rice and stir until translucent at the edges. Finally, deglaze the pan with the beer or wine, scrape up any lingering browned bits, and cook until nearly all of the liquid has absorbed.
Congratulations! You can stop stirring. Well, almost: pour in the stock, add the miso paste or mustard (if using), give everything a quick stir to combine, and lock the lid in place. Push the “Rice” (or equivalent) button and walk away.
When the cook time has elapsed, let the pressure release naturally for about five minutes, then manually release the rest. Remove the lid and stir in the cheese and all the ingredients you browned earlier. Taste and adjust the seasoning as needed. Between the salted butter, well-seasoned homemade stock, miso paste, and pecorino, mine didn’t need any salt at all.
Scoop into bowls, garnish as desired, and dig in.
There’s a lot to love about this technique, but its customisability is up there for me ” and I’m not just talking about the add-ins. Any whole grain you’d cook in a pressure cooker can easily become perfectly-cooked risotto.
I’ve used the Multigrain function on mine to make fabulous black rice and farro risotto, and apart from using more stock and selecting the appropriate cooking program, the process is exactly the same. Sure, it’s technically not “real” risotto, but when breaking with tradition tastes this good, it’s hard to go back to the old ways.
Comments