Darkness is the enemy of photography, but — being a horror fan — I wanted to learn how to shoot photos in spooky places with very low light. I reached out to an expert and here’s what I learned.
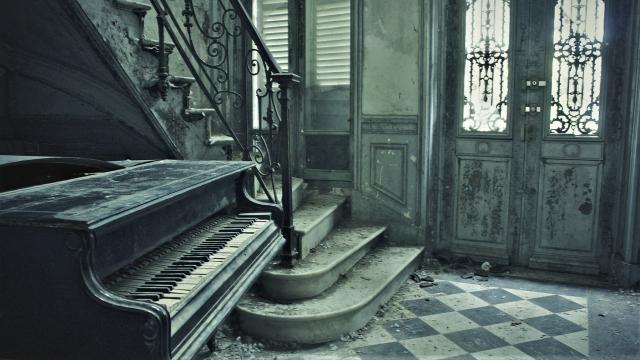
Photo by The Dark Veil.
[referenced url=”https://www.lifehacker.com.au/2017/08/how-to-edit-your-holiday-photos-so-they-dont-totally-suck/” thumb=”https://i.kinja-img.com/gawker-media/image/upload/t_ku-large/zeyvtuassrm8ozsvvwn8.jpg” title=”How To Edit Your Holiday Photos So They Don’t Totally Suck” excerpt=”So you took a trip somewhere cool, snapped a bunch of photos, and now you have no idea what to do with them all. Don’t worry, editing your holiday photos isn’t as tough or technical as it sounds.”]
Use a Lens With a Very Wide Aperture
When shooting in low light gear is important — especially your lenses. Renan Ozturk, a professional photographer and filmmaker, says you need a lens that’s really fast. What does he mean by that? Well, he’s referring to a lens’s f-number or how wide its aperture is.
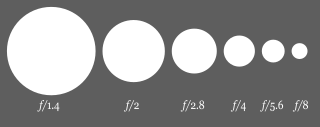
via Wikipedia.
Light travels through a lens’s aperture to get to the image sensor in your camera. A larger aperture is able to let in more light, thus making it easier to capture images in dark places. As you can see in the diagram above, the smaller the number is the bigger the maximum aperture is.
You need to have a lens that is at least f/4 or lower, but something faster than f/2.8 is ideal, says Ozturk. Something in the f/1.4 to f/1.8 range is perfect. You can probably grab a decent 50mm or 35mm lens at f/1.8 for fairly cheap ($200).
Crank Up the ISO
The next thing you need to do is turn up your camera’s ISO, which is a measurement of how sensitive the camera’s image sensor is. The higher the number the more sensitive to light your camera’s image sensor will be. Adjust it manually and be sure to lock it in — don’t let your camera do it with auto features.
Don’t crank it up all the way, though. Ozturk suggests you’re better off not going above 1600 or 3200 unless you have a specialised camera. Otherwise all your low-light or night stuff will come out really grainy. If you can get to know your camera better, says Ozturk, you’ll get a feel for when the ISO is too high. You’ll see the image turn all pixellated and noisy, or “hamburger” as he calls it.
Now, about those specialised cameras… If you’re going to be shooting a lot of low-light stuff, you might want to invest in a camera that can handle it better. Like the Sony a7S II. Ozturk calls it a “low-light phenomenon of a camera”. It sees even more than the human eye can see and you can shoot usable images at 10000 ISO. It basically allows you to roam around at night without a tripod and get away with things you could never get away with before.
It has fewer megapixels, so it’s not as high-res as other cameras at the same price point ($3000-$4000), but the pixels themselves can gather more light. Ozturk used one to shoot video and stills for Under an Arctic Sky, a documentary about surfing under the Northern Lights during the winter in Iceland and it looks incredible.
Reduce the Shutter Speed
OK, so you’re letting in more light, and you’ve made your camera’s image sensor more sensitive to that light. Now you need to give your camera time to capture that light as best it can. You do that by decreasing the shutter speed and taking long exposure shots.
Head into your camera’s settings an adjust the exposure time manually. Again, don’t let your camera’s auto features make this decision for you. Ozturk says if it’s super, super dark, he might go with a five-second exposure. If you’re shooting a moon or something somewhat lit up, though, a two-second exposure would probably do the trick.
[referenced url=”https://www.lifehacker.com.au/2017/08/how-to-take-better-photos-at-popular-tourist-spots/” thumb=”https://i.kinja-img.com/gawker-media/image/upload/t_ku-large/i33buouhpsitslzogxha.jpg” title=”How To Take Better Photos At Popular Tourist Spots” excerpt=”You’re on holiday, and you have your camera out at a well-known tourist spot where everyone and their mother has snapped the same pic over and over. How do you make each click of the shutter count?”]
Don’t Use Autofocus — Focus Manually
Photo by Connel Soutar.
Ozturk always goes into manual modes when shooting in low-light and you should do the same. Camera autofocus technology has gotten really good, but it still gets easily confused in low-light, so don’t even both.
Have a Still Subject
Because you need to take such long exposure shots, everything must be perfectly still. Any kind of motion, be it your subject or your camera, is bad. If you’re shooting a person, Ozturk says they need to be willing to stand perfectly still for you for as long as possible. This comes at the cost of not shooting things in the moment, but that’s the trade off in the land of darkness.
Find a Light Source and Determine the Best Angle
According to Ozturk, shooting in low light is just as much about being creative as it is about having the technical know-how. That means positioning everything just right so you’re able to see what you want to see and avoid drawing attention to any distractions in your frame.
If there is any environment light around, use it to your advantage. Even small lighting adjustments can make a huge difference when you go to edit it later. Take the time to move your subject around, rotate around the subject in search of the best angle, and look around your environment for anything that give you that special edge.
And if you can, watch out for shiny objects as they can really mess with your shot in low light.
If You Have to Use Flash, Diffuse It
Photo by el-toro.
Flash is usually best avoided, as it can wash things out pretty badly when you’re shooting in a dark place, but it’s still an option. Ozturk says use it when you need it — even the on-camera stuff is fine — but try to diffuse it if you can. A plastic shopping bag is a great option. It’s better to get some light on the subject and edit it later rather than not having enough light to work with.
[referenced url=”https://www.lifehacker.com.au/2016/11/why-a-plastic-bag-is-a-photographers-best-friend/” thumb=”https://img.youtube.com/vi/MrVDe68OJwQ/0.jpg” title=”Why A Plastic Bag Is A Photographer’s Best Friend” excerpt=”Video. Whether you’re a pro or an amateur, pack a plastic bag in your bag with your camera the next time you go out to take pictures. This video features five great reasons why you should, including the old rain protection trick and a beautiful soft, weathered effect for your photos.”]
Use a Tripod and an External Shutter Button
As previously mentioned, motion is bad in low light photography. It’s especially bad if you, the photographer, are moving at all. So, Ozturk says you need to use a tripod to keep the camera perfectly still. Not only that, he recommends you go one more step and use an external shutter button.
Think about it: when you to press the shutter button for a long exposure you’re nudging the camera and introducing motion. Even the smallest of bumps can ruin a shot.
If you don’t have an external shutter button, at least set your shots for a one-second delay so your camera doesn’t snap the pic until you’re not touching it anymore. And if you don’t have a tripod either, keep your elbows together while you shoot, not wide, and don’t lean over. You’ll be able to hold the camera still for longer.
Zoom With Your Feet
You’re better off using a prime lens, or a lens with a fixed focal length, than a zoom lens in dark places. But the trade-off is you can’t zoom in on your subject at all. So, do what the pros call “zooming with your feet.” Get closer to your subject and don’t rely on zooms, especially if it’s any kind of digital zoom.
Shoot in RAW Colour
Ozturk says it’s always best to shoot in RAW if you’ve got the space on your memory card. You get higher resolution images with more metadata to manipulate when you go to edit, which is especially important when you’re shooting in low-light. Also, while shooting in black and white looks great in low light, shoot in colour instead — then transform it into black and white later if you want it.
It’s always better to have more data to work with just in case you’d rather keep it in colour. Hopefully these low-light photography tips help you, because I can’t wait to try them out myself!
Comments
One response to “How To Take Better Photos In Dark Places”
“Crank Up the ISO
The next thing you need to do is turn up your camera’s ISO, which is a measurement of how sensitive the camera’s image sensor is. The higher the number the more sensitive to light your camera’s image sensor will be. ”
Well this is just BS! Nothing can change the sensitivity of the sensor – it is what it is what it is, as manufactured at the factory. ISO for a digital camera is a measure of bit shifting all the pixel values, that is multiplying the values to make them brighter. So eventually too much ISO makes the brighter pixels saturate at white, and the low noisey pixels get raised in value and start to become visible. It doesn’t become “grainy” – that’s old film jargon for the larger grained film emulsion used in higher speed films – nothing to do with digital!!
Raising the ISO also reduces the dynamic range in images – fewer discrete colours to represent the real world.
Bottom line is that only aperture, F number and exposure time affect how much light is collected by the sensor. Use the lowest ISO you can for the highest Dynamic Range and lowest noise.
A very common mistake due to techno-jargon from the age of film being carried over into the age of Digital.
If you have an external flash – even just an LED torch – aim it at a wall BEHIND the camera.
The wall acts as an extra large diffuser.
With a decent flash, you can also reduce the amount of flash to give a better balance with natural light sources. Possible with a torch, but harder to maintain good control [especially if you have a remote shutter release in one hand]