If you’re on the most recent version of Windows 10, you might have noticed that you can’t create guest accounts like you used to. Here’s a workaround to fix that problem.
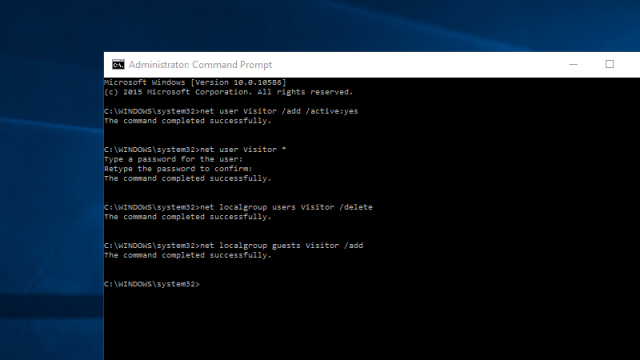
For reasons unknown, Microsoft quietly removed the ability to create guest accounts in Windows 10 around the middle of last year. Guest level permission systems still work, but the option in Control Panel to create new guest accounts is gone. Fortunately, you can add your own with a few simple commands. To do so, open a command prompt as an administrator and perform the following steps:
-
Enter
net user Visitor /add /active:yesto create a new account. You can replace “Visitor” with whatever name you wish, but be sure to change it for every command on this list. “Guest” is reserved by the Windows system. -
Enter
net user Visitor *to create a password for the account. - Press Enter twice to create a blank password.
-
Enter
net localgroup users Visitor /deleteto remove Visitor from the regular Users group. -
Enter
net localgroup guests Visitor /addto add Visitor to the guests user group.
And now you have a brand new guest account! This account will have the same privileges as the old guest accounts. Hopefully Microsoft will bring back a proper interface for this option in the future.
Super User via Laptop Mag
Comments
One response to “How To Create A Guest Account On The Latest Version Of Windows 10”
Yes, can microsoft bring back some of the more advanced management interfaces that seem to have disappeared in Windows 10.
Notice you cannot edit a WiFi Profile unless you are connected to it? Why would I need to edit it if I am connected to it??