
VPN subscriptions cost money, and they often require a bit of research just to figure out if they’re legit. If you have an old Mac sitting around, you can make use of it by turning it into the simplest DIY VPN around, perfect for browsing safely on public Wi-Fi or grab files from your home computer on-the-go.
Animation by Nick Criscuolo.
What You’ll Get
A VPN, for those who don’t know, stands for Virtual Private Network. A VPN is a group of computers networked together over a public network, usually the internet. Your office may use VPNs so you can access your work computer from home, but they’re also useful for staying secure on public Wi-Fi at a coffee shop or hotel.
When you’re done with this project, you’ll have your own personal VPN that’s accessible from any computer, on or off of your home network. Your VPN will be able to act as a secure means to browse the web and connect to your home network from anywhere, so you can access your files no matter where you are in the world. You’ll be able to do all this using a $31 bit of software that works on any Mac.
Plus, it’s dead simple. Rolling your own VPN usually means going through the head-scratching OpenVPN setup, but OS X Server simplifies the process dramatically — you won’t even have to get into the command line. If you have an old Mac sitting around collecting dust and $31 to spend on the software, you can get this VPN running in no time at all.
What You’ll Need
- OS X Server ($30.99)
- A spare Mac (Any Mac will work, but an old, cheap Mac Mini can usually be found for around $200 on eBay if you don’t have one. Just make sure it meets the minimum requirements for OS X El Capitan)
- An Ethernet cable, router (we recommend a regular router as opposed to a router/modem combo), and an internet connection
Step One: Plug Everything In and Download OS X Server
You’ll want a hard-wired connection between your Mac and your router for the fastest and most reliable connection possible, so before you do anything else, plug your Mac into your router with an Ethernet cable.
After that, head to the Mac App Store on your old Mac and update to OS X El Capitan, if you haven’t already. Then, grab a copy of OS X Server from the App Store. OS X Server is just an app, not a full-fledged operating system, so installation should be a one-click affair.
If your Mac doesn’t allow for El Capitan, you may still be able to download OS X Server here, but we haven’t tested these instructions with every version of OS X, so they may be slightly different. Basically, your mileage may vary.
Step Two: Sign Up for a Dynamic DNS Address
Next, you’ll need to get your old Mac a public DNS address to access your server from afar. You could use your home’s IP address (e.g. 12.345.678.9), but chances are your ISP changes that IP address periodically, which makes a domain name (jimsVPN.crabdance.com) an infinitely better option — it’s easy to remember, and it’s always the same.
If you have your own web site, there’s a good chance your domain provider offers dynamic DNS for free; otherwise, you’ll need to sign up for a service. We recommend FreeDNS because it’s free, but you have other options.
- Sign up for an account on FreeDNS and validate your email address.
- Click on Dynamic DNS.
- Click Add.
- Type in a subdomain name (this can be anything you want, though for simplicity’s sake you might want to stick to something like jimssecretVPN) and click a domain name that you want (again this can be any of them).
- Click Save.
- Make a note of your domain name (it will be something like jimssecretVPN.crabdance.com).
You now have a permanent address for your VPN, so you can dial into it from any computer on any network around the world.
Step Three: Set Up Port Forwarding on Your Router
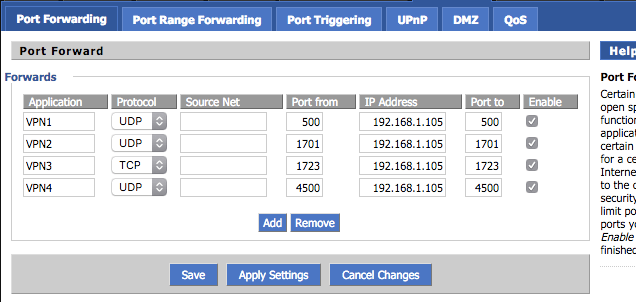
Before you can set up your VPN on OS X Server, you’ll need to set your router to allow incoming connections on the right ports. To do this, you’ll enable port forwarding. This is the most complicated part, because the process varies from router to router. We’ve cover covered how to set up port forwarding in-depth here, but let’s take a general overview of the process:
-
Go to your router’s admin page from your web browser. This is usually something like
192.168.1.1. If you’re not sure what yours is, you can usually find information on a sticker on your router (if it’s not there, refer to your router’s manual or search for it on Google). - Find the DHCP or Static Leases section. Before we do anything, you’ll need to give your Mac a DHCP reservation (sometimes called Static Lease), so its local IP address doesn’t change. This process varies from router to router, but we outline how to do it here. If your router doesn’t have this option, you can give your Mac a static IP address instead. Make note of the Mac’s new IP address, since you’ll need it below.
- Now, find the port forwarding section. Depending on your router and firmware, it’s usually located under its own tab, Firewall, NAT, or Virtual Servers.
- This is where you’ll enable port forwarding. On the port forwarding page, you’ll typically find a place to enter in information like Port From, Protocol, IP Address, and Port to. OS X Server’s VPN needs four ports open to work: UDP 500, UDP 1701, TCP 1723, and UDP 4500. Add those four ports, as shown in the example screenshot above. Save your settings when finished.
With that, your home VPN server is now open to the internet at large so you can access it from anywhere. Let’s get the rest working.
Step Four: Set Up Your Server
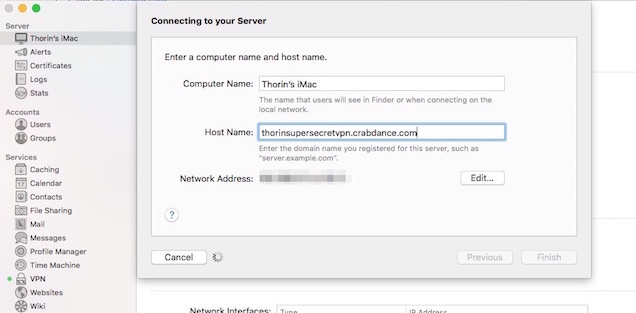
Remember that Dynamic DNS account we set up earlier? Now you need to enable it on your Mac, so you can connect to it when you’re away from home:
- Launch OS X Server on your old Mac.
- Click the your computer’s name from the left menu.
- Click “Edit Host Name…” and click Next when prompted.
- Click Internet and click Next.
- Under Host Name, type in the domain name you registered it step two, then click Finish.
- When prompted, click Set Up DNS and let it automatically start and configure DNS. You shouldn’t need to change any of these settings.
That’s it for the server portion. OS X Server’s automatic configurations should work for most people.
Step Five: Start Your VPN
Now it’s time to finally get that VPN up and running. This part’s pretty simple:
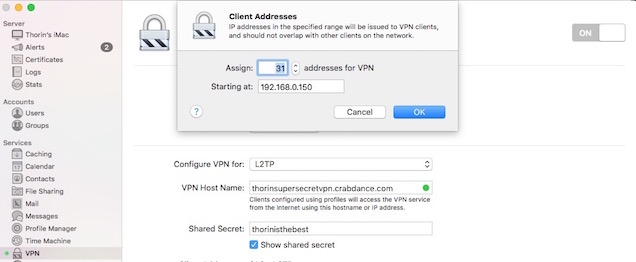
- Click the VPN section on the sidebar in OS X Server.
- The default settings should have populated the bulk of what you need, but if not, make sure your VPN Host Name is the same as the host name you entered in step four.
- Create a “Shared Secret” password. Make a password you’ll remember here, you’ll need to enter it in on any device you try to connect from.
-
Find the “Client Addresses” section and click “Edit Addresses.” These are the IP addresses your server will dole out to computers that connect to the VPN. By default, it should already have your network’s IP address entered in (something like
192.168.1.xx). Set the last three digits to something high, like 100, so it reads192.168.1.100(or whatever your network is). This will prevent any issues with VPN connections interfering with other connections on your network. - Switch the VPN to “On.”
After about 10-20 seconds, the status should switch to Available at [Your Host Name]. That means you’re all set and ready to go.
How to Access Your VPN from Other Devices
Now that your VPN is up and running, you’ll need to set up your other computers and mobile devices to route their traffic through it. Remember that a VPN will slow down your internet connection, so only use it when you need to — like when you’re on an unsecured public network, or when you need to access files from your home network.
You need to set up each of your devices separately. Regardless of where you’re connecting from, your account information is always the same. Your username is the username you use to log into your Mac, and the password is your Mac’s login password. You also have the “Shared Secret,” which is a second password you set up in step five. This process varies pretty wildly per device, but here are the basics:
Windows 10
- Click Start > Settings.
- Open Network & Internet.
- Click on VPN.
- Click Add a VPN Connection.
- Fill out the form with your VPN’s information, including the public IP address you set up in step one, your password, account, and shared secret. Click Save when you’re done.
- Select the VPN you created and click Connect.
Mac
- Open System Preferences > Network.
- Click the + sign.
- Select VPN, then pick L2TP.
- Enter in your server address and account name, then click Authentication Settings.
- Enter in your password and shared secret, then click OK.
- Click Connect.
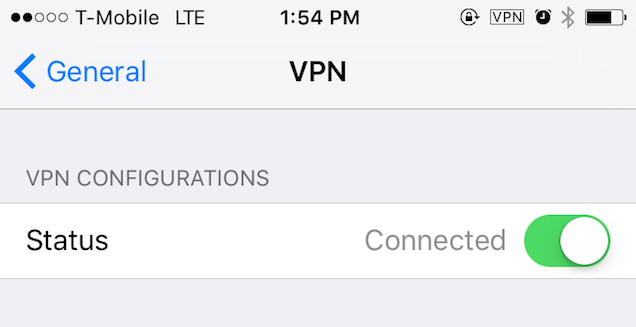
iOS
- Tap Settings > General > VPN.
- Tap Add VPN Configuration.
- Enter in all your account information, including type (L2TP), server, account, shared secret and password.
- Tap Save.
- Set the status to On.
Android
- Tap Settings > Wireless and network settings > VPN Settings.
- Select Basic VPN and then Add VPN.
- Select Add L2TP/IPSec PSK VPN.
- Enter in your server address, account information, shared secret, and password.
Congratulations! Your VPN is up and running, and all your devices are securely routing their traffic through it. You can always check the status of your VPN in OS X Server under the VPN tab or on the overview tab under your computer’s name.
Comments
3 responses to “Turn An Old Mac Into A Cheap VPN With OS X Server”
… Or you could set up a VPN endpoint on your router and save yourself all the hassle.
Is that so? @Thorin, any difference between the two?
Also, any advantages of having a VPN for a regular user (and not a super user) like me?
A [commercial] VPN will typically give you international access, and help you bypass the new Australian laws trying to filter content [ie. bittorent].
This VPN is free, but limits you to providing stuff from home.
Mac server is [probably] easier to set up, but you could [probably] get by with a Raspberry Pi and an external drive.