Spreadsheets can get messy. Cleaning a sheet of blank rows or columns sounds straightforward enough, but it can be time-consuming if you do it manually. This method gets the job done in just a few clicks, even on huge spreadsheets.
First, highlight the area of your spreadsheet where the blank rows are. Include the row just above the first blank row and the row just below the final blank row in your selection.
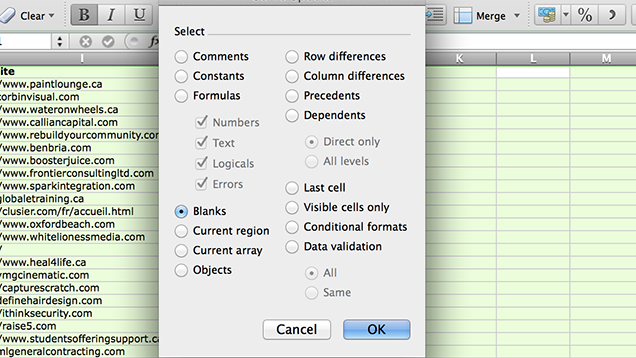
If you’re running Excel 2013, navigate to the “Home” tab, then the “Editing” section, and click “Find & Select”. Click “Go To Special…” on the drop-down menu and select “Blanks”. Click “OK”. Now, only the blank cells should be highlighted. Click the “Home” tab again, navigate to the “Cells” section, and click “Delete Sheet Rows” from the drop-down menu. You can repeat a similar process to remove blank columns from your spreadsheet.
Even if you’re not running Excel 2013, a quick Google search for “Find and Select” in your version of Excel will turn up a keyboard shortcut that will do the same for you. For example, on Mac Office 2011, the hotkey shortcut is Ctrl+G.
How to Quickly and Easily Delete Blank Rows and Columns in Excel 2013 [How-To Geek]
Comments
2 responses to “Delete Blank Rows And Columns In Excel With A Few Clicks”
Thanks, never knew this.
Is there a way to also do the reverse? That is, select a column of values and insert a blank row between each selected cell with a value?
This is also a good way to quickly fill in blank cells in a sheet.
Select the blank cells as mentioned, type “=”, press Up and hit CTRL+Enter to fill all of the blank cells with the value above it (or whichever direction you wanted to grab the data from).