
Your TV, Blu-ray player and DVR all come with remote controls, but if you use a PC to run your media centre, nothing comes in the box. Fortunately, if you have an Android phone, you can control just about everything on your PC.
Getting Started: Download Unified Remote
The cornerstone of this guide is Unified Remote. The full version of the app (which is required for some of the functions we’ll go over) costs $3.75, but for what it does, the price is very reasonable. At the moment, only Android is supported, though you can sign up for an iOS beta here. The server application only runs on Windows and will need to be installed on any PC you want to control.
To establish a connection, install the app on your phone, the server on your PC, and connect both to the same Wi-Fi network. The Android app can then scan your network for any active servers. Select the PC you want to control. That selection will stay as the default until you change it.
Control Apps With Pre-Made Remotes
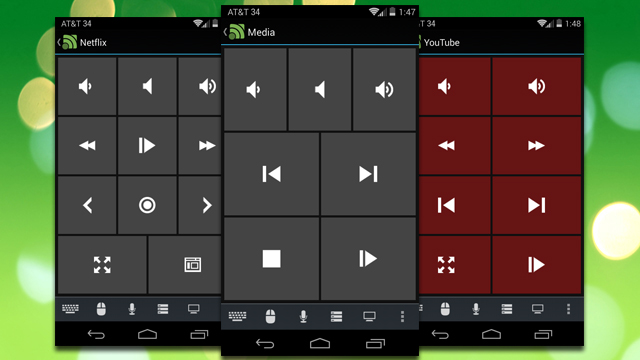
Out of the box, both the free and the paid versions of Unified Remote offer a selection of pre-built custom remote controls. The basics are covered here like a virtual keyboard, mouse and system volume controls. However, a few others provide custom controls for certain apps and sites. Here are a few of the most common remotes and the functions they provide:
- YouTube – Play, pause, next and last playlist track, and volume.
- VLC – Play, pause, volume, next and last video, video scrubbing.
- Spotify – Play, pause, next and last track, and volume.
- Spotify Advanced (Paid) – Playlist control, search, volume, shuffle, and repeat.
- Pandora (Paid) – Play, pause, volume, thumbs up and down.
- XBMC (Paid) – Navigation control, play, pause, volume, media file navigation.
There are plenty others that offer some form of control for a variety of other apps including Boxee, Chrome, Firefox, iTunes, MediaMonkey, PowerPoint and even Winamp. For most things you’ll need, these can already be a breath of fresh air — muting your HTPC over Wi-Fi feels like magic — but for the tinkerers, we can go deeper.
Create Custom Widgets
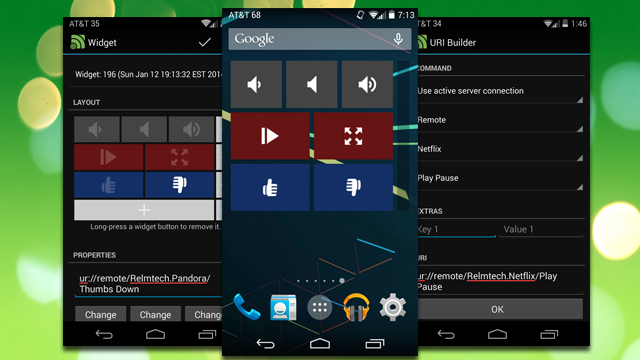
In addition to the stock remotes, you can create custom widgets with compilations of your most commonly-used actions. To begin setting it up, open up the widget selection menu on your phone and drag one to the home screen. You can choose from one of the preset configurations, but any of them will allow you to add or remove rows and columns of buttons as you see fit.
Each button is highly configurable. You can choose from a variety of colours or symbols and all of that is up to your personal preferences. However, the fun part is in choosing the action each button will take. While creating a widget, tap the button you want to configure, then select “Change Action”. On the next screen, there’s a drop down labelled “Select Target”. There are three categories of targets you can choose from:
- Remote: This is where you can choose any of the buttons associated with any of the premade remotes. You can create a widget that controls your system volume, skips tracks on Spotify, and thumbs up or down Pandora songs.
- Device: These functions run actions on the device you’re using, which will probably only be useful for advanced users.
- Server: If you have more than one PC connected to the network, you can use this action to assign a specific server to a button.
Most of the action will happen under the Remote section. Every function that’s built into the regular remotes can be accessed here, which means you can use a single widget to create a super remote of all your most frequently used tasks.
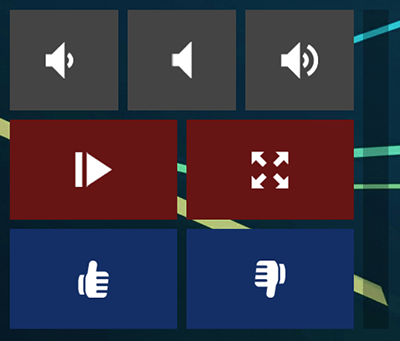
So, let’s say we want to create a widget with system volume controls and thumbs-up/thumbs-down buttons for Pandora. To create this widget, follow these steps:
- Create a 3×3 widget on an empty home screen.
- In the layout section, long-press one button in each of the two bottom rows. Your widget should now have one row with three buttons and two rows with two buttons.
-
Tap the first button in the first row and select “Change Action”.
- Choose “Remote” under “Select Target”.
- Choose “Media” under “Select Remote”.
- Choose “Volume Down” under “Select Action”.
- Tap “OK”.
- Tap “Change icon” and “Change color” to give the button a symbol and colour of your choice.
-
Repeat steps 3 and 4 for each of the remaining buttons (from left-to-right), using the following Remote actions:
- Remote > Media > Volume Mute.
- Remote > Media > Volume Up
- Remote > Pandora > Thumbs Up
- Remote > Pandora > Thumbs Down
- Once you’ve finished configuring each button, tap the checkmark in the action bar. (Optionally, you can deselect “Show ‘edit’ button in widget layout if you don’t want to change the widget later and prefer to give yourself some more space.)
When you’re finished, the widget should look like the one above.
Expand Your Options with Infrared, NFC and Tasker
Pressing buttons isn’t everything. There are a number of features that are a bit beyond the scope of this article, but we can point you in the right direction. Here are some of the more useful expanded functions that can be integrated to custom remotes and widgets:
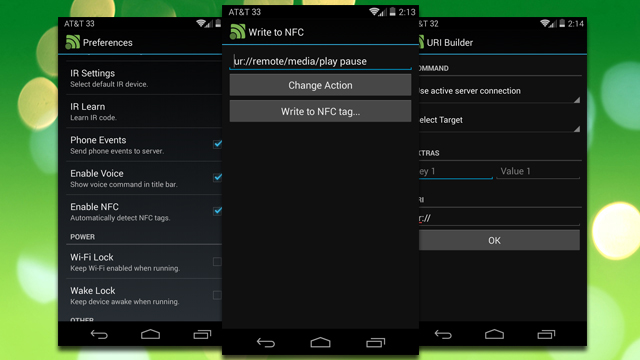
- NFC Tags: You can program certain Unified Remote actions to NFC tags that will activate when you tap your phone on them. With these, you can activate different servers with tags in each room, or launch Pandora or Spotify when you walk into the room.
- IR Actions: While most Android devices don’t contain an IR blaster, a few select handsets do. If you own a device like the HTC One, you can use it to control devices like your TV. Unified Remote will go through a learning tool that will test IR codes with your particular device, so you’ll need to be in front of your TV.
- Tasker: Tasker is one of Lifehacker’s favourite automation tools. You can assign specific Unified Remote actions to Tasker tasks, which means you can create even more elaborate automation. So, for example, you could set up your computer to begin playing music as soon as you arrive home and turn it off when you leave.
In most cases, Unified Remote has dedicated functions that can do most of what you need. However, for the bits in between, you can still use the Basic Input remote to use regular mouse and keyboard controls.
Comments
7 responses to “How To Control Anything On Your PC With Your Android Phone”
It’s a remote for a PC? Why not use VNC? I don’t get it…
Because on a small screen, VNC can be finnicky …
Really? No problems here using RealVNC…works perfectly – 100% control, zero configuration.
no zoom issues? no problems with having to scroll across a 1920*1200 display while using a HTC Wildfire or something else tiny?
1. Unified remote offers a better UI for simple tasks like pause or volume changes
2. You don’t actually have to choose between the two. you can run both this AND vnc.
I find a keyboard works well too.
i’ve been using the paid version for a while now and it is really nice. when they implement connectivity with linux, it will be perfect as i am waiting on the ability to connect to my xbmcbuntu machine.
would also like to test this out with an networked IR module that can sit in the lounge as my current devices (S2 and Nexus 7) are all lacking an IR blaster.