If you’re a gamer, you know the pain of a cluttered Steam library. Whether you’ve spent a lot of money during Steam Sales or you just really love video games, here are some tips to keep your library neatly organised so you can find what you want to play right away.
Steam gurus will be familiar with some or all of these methods, but those folks who are just now building up their libraries may find them useful. It may not look it, but Steam has a number of organisational tools right there under the hood — you just need to know how to access them. Here are some things to try.
Master Steam Filters and Categories
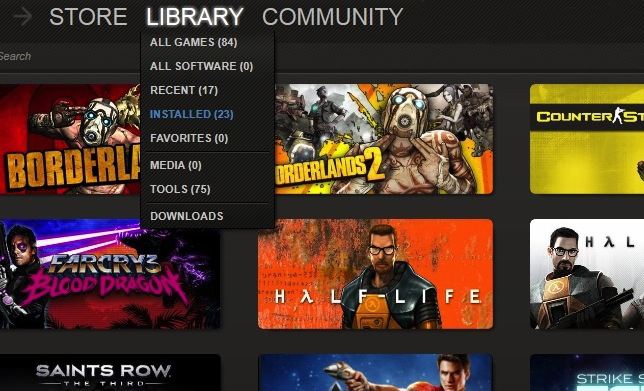
Did you know Steam has built- in categories and filters that let you see only the games you have installed (as opposed to everything you own), or only what you’ve played recently? Open up your Steam library, and click the “Library” tab at the top of the window. You’ll see a drop-down menu that lists the default categories: All games, all software (stuff you may have bought through Steam that aren’t games,) recent, installed, favorites, media, tools and downloads.
By default, media and tools are hidden from all views, and downloads are on another screen. The “Installed” option can be a quick way to whittle down your list to what you’re currently playing, though you can also use the “Favorites” list for a more custom approach. To add a game to the “Favorites” category, just right-click its title or tile in your library and select “Add to Favorites”.
Favorites are easy, but you can also create your own custom categories as well. Think about the categories you’d like to use for organisation. Some people like to organise by genre (first-person shooter, platformers, RPGs, MMOs) and others like to organise with categories that are personally meaningful (demos, finished games, games in-progress, endless games, to replay). If you’d like some ideas, check out this thread at Rock Paper Shotgun, this thread at Giant Bomb or this thread at StackExchange for suggestions. Everyone does things a little differently, but there are some great category ideas there, especially if you’re the type who’d like to keep RPG (Action) away from RPG (Sandbox), for example.
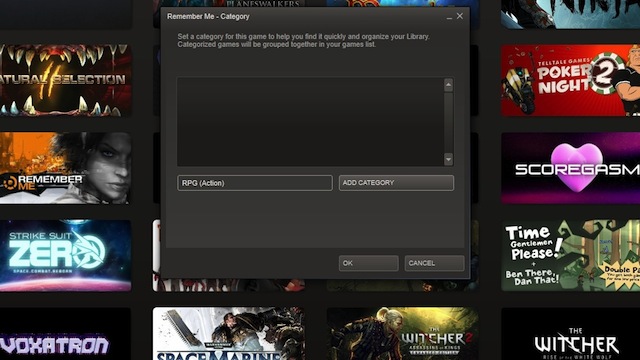
Once you have an idea what you’d like your categories to look like, start organising. Right-click any game tile or title in your library and select “Add to Category”. You’ll be prompted to add the game to one of your existing categories if you have some, but if you’re starting from scratch, you won’t see any. Type in the name of your first category, click “Add Category” and then click OK. Your game will be in your new category, and your new category will be viewable in the sidebar (sadly, only in detail view and not from the Library drop-down).
One thing to keep in mind though: Steam only allows a game to exist in one category at a time, so if you have a game in your favourites, it overrules all of your other categories. If you add a game to one category, then try to add it again to another, it’ll be removed from the first one.
Automate Categories with Depressurizer
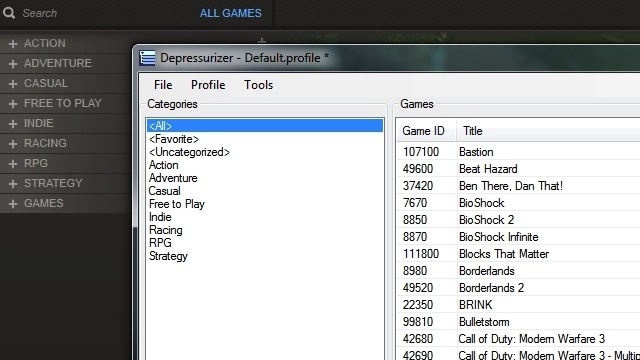
This is great if you only have a few games, or your library is easy to manage (or you’re an organisational freak like me), but if your library is huge and you have hundreds of games in it, you might need a little help. Depressurizer is a free Windows utility we’ve covered before that automates the process. It generates categories for you by genre (using the categories in the Steam Store), then adds the games in your library to those categories without you having to lift a finger.
It can be a little quirky, and you may not agree with Depressurizer’s choice of categories, so be ready to do a little legwork when it’s finished. It’s not really Depressurizer’s fault though; the app uses the same categories that Steam does in a game’s description to organise it. Still, you may have to move a few games around manually when you’re done running the app.
Master Steam’s Built-In Views
Categories are great ways to organise your library, but when’s the last time you played with Steam’s built-in views and settings? Personally, I like to keep my games in Steam’s Grid View, just because I enjoy seeing the game art for each title in my library (even if that means I have to scroll forever to find what I want to play — but that’s what categories are for!). But you actually have three options:
- Detail View puts your game titles in the sidebar on the left, and clicking any one of them brings up a detail page on the right, including buttons to install or play the game. You’ll also see aggregated headlines related to the game, friends who play the game, your achievements, and links to the game’s store page, forums, groups and so on.
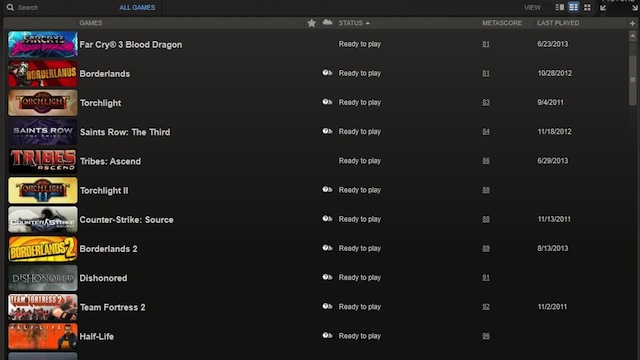
- List View gives you a single pane list-view of your games, organised alphabetically (by default) with an art thumbnail next to each name. You also get categories for status (installed/downloading/ready to play/shortcut/etc), favourites, the game’s metascore and when you last played the game. Click any column header to sort your library by it.
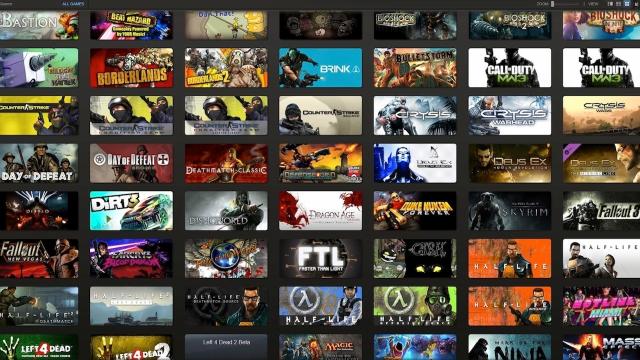
- Grid View is a simple grid with tiles for each game arranged in a grid inside your Steam window. Grid view also gives you a zoom slider you can use to make the tiles bigger (upside: you see the art better, downside: you get fewer games on-screen) or smaller as you see fit. If you don’t like the art for a game (or it doesn’t have art on the tile), just right-click it and select “Set Custom Image”. Download whatever image you want to use for the tile from the web, and use it!
Most people probably know about the views already, but you may not have actually tried playing with them. For years I stuck in detail view, just because it was the default and it worked just fine. It wasn’t until I spent a little time fiddling with grid view that I really came to enjoy it, even at the expense of having to scroll to browse. It feels more like browsing game boxes or an arcade selector than a straight text list. All the views obey the filters and categories we mentioned earlier.
Start Using Search
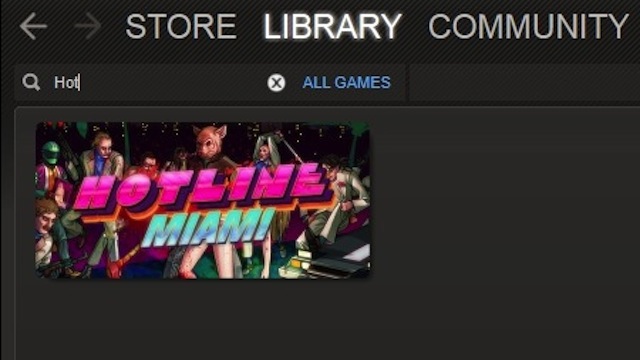
You probably don’t browse Windows’ Start menu when you want to run a program — you press the Windows key and start typing. So why wouldn’t you do the same thing for Steam? If you’re not browsing and you know exactly what you want to play, get familiar with Steam’s built-in instant search. If you haven’t seen it or used it, it’s hiding right underneath the big “Store, library, community, etc” tabs at the top of the window. If you know exactly what you want to play, start typing and the view will filter down to games that match as you type. The search bar also obeys filters — by default it searches all games, installed or not. Click the blue “all games” to change it to “installed”, or any of your other categories. Whatever you prefer.
Of course, you can just do this through Windows too. Just click the Start Button or press the Windows key and start typing the name of the game you want to play. It will work the same way without even bringing up Steam, but I like the option to browse and play something different if I feel like it. Still, if you know what you want to play as soon as you sit down, it’s the fastest option.
Add Non-Steam Games to Steam to Build a Single Game Launcher
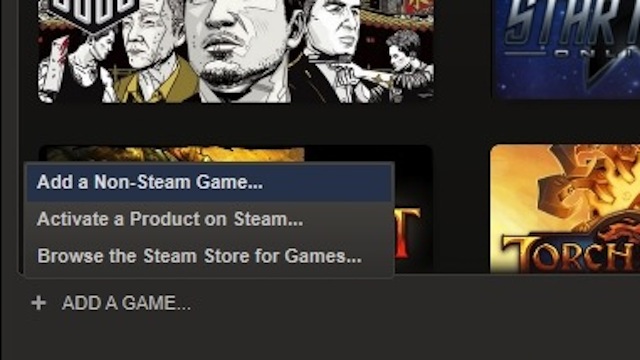
Finally, it may seem counterproductive to getting your Steam library in order, but consider adding your non-Steam games to Steam as shortcuts. This way you can add everything you have installed to your categories and favourite views, including games that live outside of Steam. You can organise them the same way you’d organise your Steam games, add them to favourites, give them custom art, or use search to filter for them instantly if you know what you want to play. Personally, I like to add my non-steam games to Steam because Steam is usually running anyway, keeping my games up to date, and I can use it as a single “launcher” for all of my games (the ones that don’t have to be launched through other launchers that don’t play nicely with Steam, that is).
To add a Non-Steam game, just click the “Add a Game” button and choose “Add a Non-Steam Game”. If you own a game that’s on Steam but wasn’t bought through Steam, you can choose “Activate a Product on Steam” instead, so you can download and install it without the discs, get updates through Steam and so on. It’s also great for reliving classic PC games from your past.
I only have a couple of hundred games in my library, so I may not have that much to organise compared to a lot of PC gamers. Even so, hopefully some of these tips will either reintroduce you to Steam features you already knew about, show off a few you didn’t know existed, and help you keep your library organised so you can find something new to play.
Comments
7 responses to “How To Keep Your Overflowing Steam Library Neatly Organised”
I can honestly say I’ve never felt steam was cluttered, it’s all alphabetical so it’s easy to scroll down and find what your looking for.
You what would be really cool?
A simple drag and drop function! C’mon geniuses at STEAM, just make it so I can drag a game to a category folder…rather than right mouse click, select genre, click ok, etc, etc.
Yeah, when LH first posted about the steam depressuriser earlier this year, I decided to sort everything into categories. A month later I was sick of it, and just wanted to remove the categories; however, steam doesn’t allow that. In order to remove a category, you have to go through each game individually and remove it. Only once the category is empty is it deleted.
Hmmm, Ive never had a problem with alphabetised lists. But thats just me.
I only use one custom tag currently: Probably Won’t Play Again.
This includes completed games, games with completed story that I won’t ever 100%, and bad games that I quit and will never finish.
I find that the recently played category has far too long a memory to be useful, out of my 300 odd steam games, it claims I’ve played more than a hundred of them recently. I think it’s less ‘recent’ and more ‘this year’
I use the following categories:
“Non-Steam” just to cover the odd game I play and want to use the Steam chat in-game.
“Currently Playing” which only has a few games in it at the time.
“Completed” which is self explanatory.
The rest are in the default category which is one big goody-bag and kept minimised to keep the left pane small.