Good news: I’m not sick anymore. Bad news: I’m going to be sick to my stomach when they invariably kill off my favourite bad guy, Thanos the thick-chinned, in this week’s Avengers: Endgame. Ah well. All great things must end, I suppose.
If memory serves — to borrow a phrase from the old Japanese Iron Chef show — you should be able to burn subtitles into your video file using the popular (and open-source) tool HandBrake.
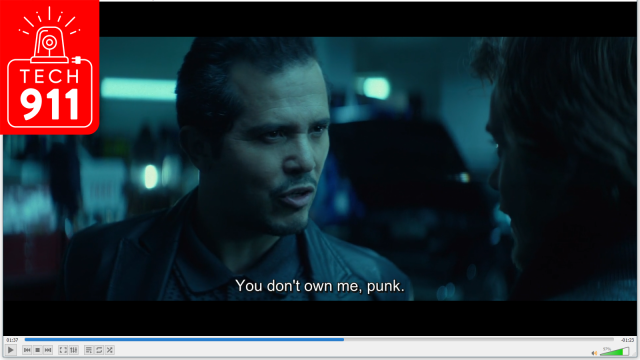
Once you’ve downloaded and installed it, pull up a video using the application. I’m using a copy of John Wick I downloaded off the internet for this example, because someone already created a subtitles (.SRT) file for it. (I am too lazy to do that myself for a regular ol’ video; forgive me, Lionsgate.)
To burn subtitles into your video, click on the (appropriately named) “Subtitles” tab in Handbrake, click on Import SRT (assuming you have one), and check the “Burn In” box, which will ensure your subtitles are hard-coded on top of your movie.
Ta-da!
As for the second part of your question — kicking up the video’s playback speed — I was initially at a bit of a loss. (I’d normally just do what you do: boosting the speed in my software player, VLC, instead of changing the raw video).
However, I did some stumbling around, and I think the tool you’re actually looking for is Axiom, a helpful GUI for the FFmpeg encoder. Handbrake also uses FFmpeg, so the two programs are… similar in execution, just wildly different in their interfaces.
Download and run Axiom — no installation needed — and click on Input to find and load your movie file. On the Subtitles tab, switch the Codec to “Burn” and use the tiny plus icon to find and select your .SRT file.
From there, click on the “Video” tab, and scroll down a bit until you see the “Speed” setting. Set that to whatever you want, though I actually recommend first going to the “Filters” tab. Here’s why. You’re going to (obviously) want your sped-up video to have synchronised audio, and the setting for adjusting the speed of the the latter is actually the “Tempo” option in the Filters tab. The slider is fussy — at least, it only let me go up or down three increments at a time — and it corresponds to a per cent. In other words, setting it to “50″ means you’re slowing your audio speed in half; setting it to “150″ means you’re increasing it by 50%, et cetera.
Remember what you set there (let’s say “140,” for the sake of example) and head back to the Video tab. Now, adjust the speed to match—140, for my example, which required me to select “Custom” from the drop-down menu and input it manually.
You can (and should) fiddle with the other settings in Axiom to make sure you’re getting the right video and audio quality for your encode (as well, the correct output format). What I love about Axiom, though, is its preview capabilities. Hit that button, and you’ll be able to see if your settings give you exactly the kind of video you’re expecting. (Specifically, it’s incredibly useful to double-check that your video and audio syncs up.)
For what it’s worth, you might want to save a copy of your unmodified movies elsewhere, in case Plex — the Roku version — ever incorporates a speed-adjustment feature.
Comments
2 responses to “How To Burn Subtitles And Speed Up Movies”
I’m not going to the trouble of testing it, but I’d be equal parts surprised and amazed if changing the playback speed of a video and burning a subtitle file at the same time kept them in sync.
Dude, I’ve got some bad news for you…