Homemade canning and pickling is a lot of fun, but you know what sucks? Standing over a pot of boiling water in an already-swampy kitchen for hours to sanitise and seal slippery glass jars. No thank you. I switched to freezer pickles years ago and haven’t looked back since. If you’ve got some available freezer space, this is a great technique to have in your arsenal.
Photo: Stacy Spensley
Pickling aims to preserve the texture and flavour of fresh produce, and high-heat canning tends to ruin both. Freezing pickles in their brine does a lot of the same work as canning, but without the heat. How? As with many of the world’s miracles, it comes down to the unique chemical properties of water — in this case, its ability to expand as it freezes.
When the water in the pickles and the brine freezes and crystallizes, it rearranges and breaks down the fibres in the pickles, softening them slightly. This step is physically impossible to overdo because once the pickles are frozen, that’s that — they don’t get any more frozen. It’s therefore extremely difficult to make mushy, overdone freezer pickles.
Better yet, since heat isn’t involved and the “cooking” process happens in a mostly anaerobic environment, the vegetables won’t oxidize and turn grey. Shelf-stable they’re not, but freezer pickles have a way of turning out beautifully crisp and colourful, and for that reason I prefer them to traditionally canned pickles.
Now that I’ve hopefully sold you on them, here’s how you make freezer pickles. This method works on any vegetable or fruit and is infinitely customisable — you can even make freezer jam if you’re so inclined.
Make and cool the brine
Use any brine recipe you like for this step, just make it first so it has plenty of time to cool before proceeding. The freezer does all the “cooking” here, so pouring boiling brine over the vegetables is totally unnecessary. Plus, hot brine makes for discolored, mushy pickles.
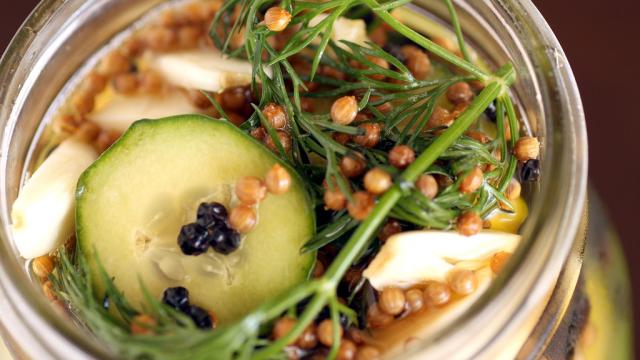
My go-to brine recipe changes to suit whatever I’m pickling because I’m difficult like that, but generally, I use a ratio of 1.5 parts vinegar to 1 part water (measured by volume), which I heat to a bare simmer and season to taste with salt and/or sugar. My taste calls for 2-3 tablespoons of salt and up to ¼ cup of sugar per 2 ½ cups of liquid. Once I’m happy with the overall balance of salt, sweetness, and acidity, I add any other flavoring agents — turmeric, coriander, mustard, and celery seed for bread & butter pickles; fresh dill, black pepper, and garlic for garlic dills, smashed ginger for beets, etc. — then cover the pot and let it steep as it cools. Meanwhile, prepare the veggies.
Prepare and pack the vegetables
This is the most crucial step; to get it right, consider the water content of your future-pickles.
For fibrous, less-watery produce like beets, carrots, cauliflower, radishes, and the like, just thinly slice and pack into pickling vessels along with any onions or garlic you’re using to flavour them. (Speaking of pickling vessels, may I suggest a plastic soup container?) Green beans and asparagus are the exceptions to this guideline: they should be briefly blanched so they don’t lose their colour.
For cucumbers, zucchini, onions, green tomatoes, or anything else with a lot of water to give up, macerate them first: slice vegetables to the desired thickness — ¼ or ½ an inch is generally a safe bet — and pile them into a colander with onions and/or garlic if using. Sprinkle with a teaspoon of salt per pound of vegetables and let macerate for 1-2 hours. Rinse off any remaining salt, squeeze out excess water, and pack into vessels.
Freeze, thaw, and eat
When the brine has cooled, pour over the packed vegetables, leaving a full inch of space at the top. Put on the lids and freeze until completely solid. They will keep in the freezer for a year or more.
Thaw the pickles in the fridge for 24 hours before serving. Once thawed, they keep in the fridge basically forever, though the crispiness will decline after 1-2 months. My confession: I once found an 18-month old jar of homemade garlic dills in the back of my fridge and ate them anyway. They were potent, and I’m still alive. In fact, they may have extended my life.
Comments