Microsoft Word is easily the biggest, most popular word processing program available, but it does a lot more than just edit text and TPS reports. If you’ve been telling yourself that you’ll finally learn Word’s ins and outs, now’s the time to actually learn how to edit styles and add a table of contents.
Get Up and Running with Word Quickly
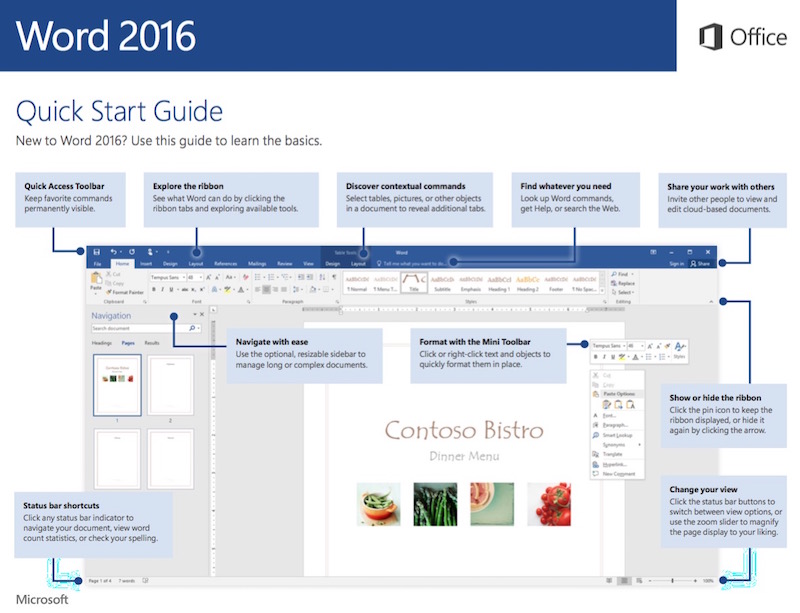
Of all of the Microsoft Office programs, Microsoft Word is probably the simplest from a user interface perspective. If you’ve ever used a word processing program in your life, you’ll recognise the menus for opening and creating files in the top left corner. The larger menu that runs across the top of the document Microsoft refers to as the “ribbon”. The ribbon has all the formatting tools you’ll need, as well as a few contextual commands that change depending on which tab you’re on.
For this article we’ll assume you know the basics, but if you want a refresher, Microsoft’s quick start guide for Word gets you through the basics.
How to Do the Most Common, Essential Tasks in Microsoft Word
Of course, everyone’s needs are a little different, but considering most people use Office in an office setting, we’re willing to bet you’ll need to do things like edit styles, compare two documents and prepare a table of contents. Let’s go ahead and cover some of those common tasks.
How to Apply and Edit Styles
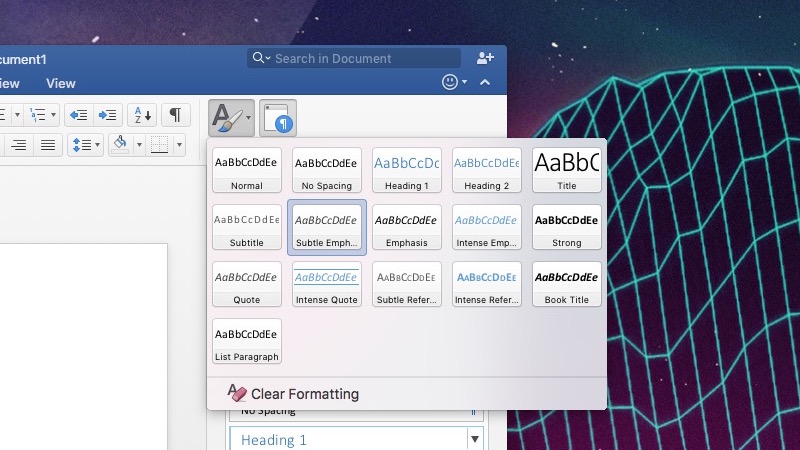
A style in Word is a preset formatting for your document. This is what the document looks like, so it includes the font, font size, paragraph style and so on. Creating or changing a style makes it possible to alter the look of a document all at once so you don’t need to go through and highlight individual sections and make specific changes. You can do things like set a universal heading style, or change what the default bulleted list looks like.
For example, if you’re working on a book, you might get a list of style guidelines from a publisher. Or if you’re working on weekly interoffice memos, a style is an easy to way to create a format guideline so every one you make looks the same way every time. Plus, you get the flexibility to change styles at any time, so if one department likes their memos one way, but your boss prefers a different style, you don’t have to change a bunch of formatting every time you open a new document.
To apply a style, make sure you’re on the Home tab, select a block of text in a document that you want to alter and then click the Style menu in the ribbon. For example, if you want to make a heading in the middle of a block of text, you’d select the text you want as a heading, then click Styles > Heading 1. It’s as easy as that.
Making your own specific styles is pretty easy too. This is useful when you’re writing something consistently, like a newsletter or a book, and want a specific set of rules you can easily apply to a document as a whole. For example, you might want to change the font size of the default heading option, or change how creating a list works. Here’s how to do it:
- From the Home tab, click on Styles Pane.
- Click New Style or select the style you’d like to edit.
- You’ll get a pop up window to edit a number of parameters here, including type, basis, and formatting. Click through the options you want to change.
If you’re confused about what each term means, don’t worry, it’s pretty straightforward. Paragraph styles determine the look of the text on a paragraph level. When you apply this style, it will change the whole paragraph. Character styles determine the look on a character level, so you can make one word stand out. Table styles alter the look of tables, like the header row or how the grid lines work. Finally, list styles alter the look of a list, such as bulleted lists or a number scheme.
How to Add a Table of Contents to the Beginning of a Document
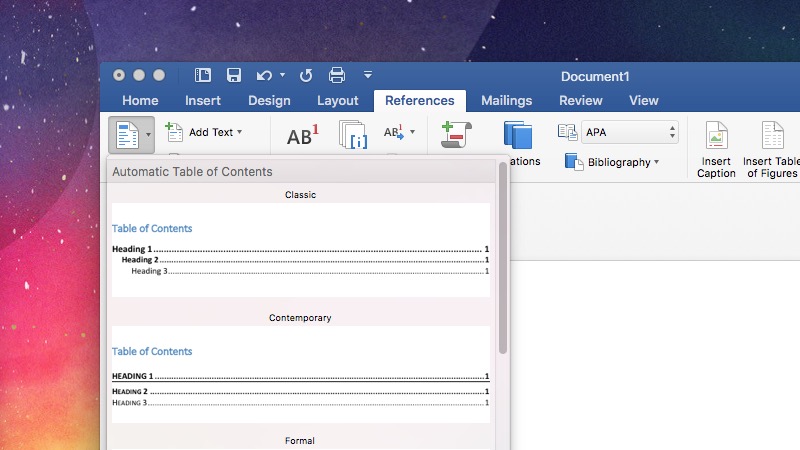
If you’re working with a big document, a table of contents adds quick navigation. Thankfully, creating a table of contents in Word is easy and it will update itself automatically as you add more to the document.
Word’s automatic table of contents generator takes each heading you add to a document, and then creates the table of contents based on that. If you plan on creating a table of contents, make sure you style each of your section titles with a heading.
- Click an empty paragraph where you want to insert the table of contents.
- Click the References tab.
- Click Table of Contents and then select the appearance you want to use.
That’s it. Word automatically updates that table of contents any time you add or alter a header.
How to Compare and Merge Two Documents
If you have two versions of a document, whether it’s because someone did edits in their own copy, a cloud backup failed or if you’re just trying to hash out what exactly changed between two versions of the same thing, you’ll need to use the compare and combine functions.
If you just want to see what changes exist between two documents, you can compare them. Here’s how to compare two documents:
- Open one of the two documents you want to compare.
- Click Tools > Track Changes > Compare Documents.
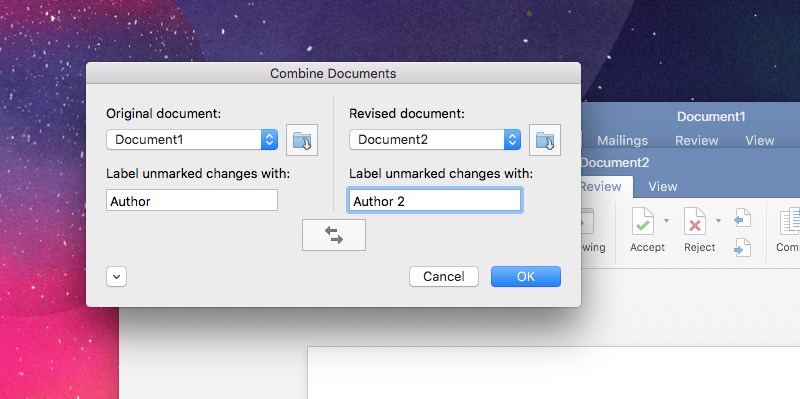
- Pick your original document and revised document files.
- Type in a name under “Label changes with” text field so you can tell the difference between the two documents. This way, Word will add a note telling you where each change comes from.
Combining a document works the same way, but the end result is a single document that merges the contents of both documents together so everything that’s the same is overwritten:
- Open one of the two documents you want to combine.
- Click Tools > Merge Documents.
- Pick your original document and revised document files.
When the documents are merged, the differences between the two are highlighted. From here, you can go in and pick what you want to keep in the final version.
How to Format a Document Properly with Tab Stops and Indents
If you’re the type who formats a document by pressing spacebar or tab a bunch of times, it’s time to learn how to do it the right way: Using indents and tab stops. The video above shows off how tabs and indents work so it’s easy to understand, but let’s just sum up what the two terms actually mean.
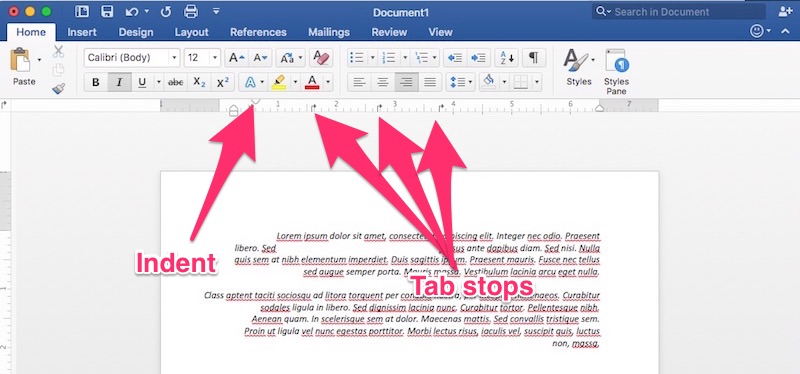
- Tab stops: A tab stop is the location a cursor stops after the tab key is pressed. In Word, it’s a way to easily align text. When you click the ruler in Word, a tab stop appears as a little curved arrow. When you tap the tab key, the cursor and text will jump to that arrow. If you add in multiple tab stops, you can make it so you can format text by simply tapping the tab key a couple of times to get it in place and perfectly lined up.
- Indents: As the name suggests, indents determine the distance of the paragraph from the left or right margin. On the ruler, you’ll see two triangles that adjust the indentation. You can click either triangle and move it to change the indentation. The top triangle adjusts the indentation of the first line of a paragraph. The bottom triangle adjusts the indentation for subsequent lines (AKA the hanging indent) in the paragraph. You can also click on the square below them to move both at the same time.
Learning how to use these indents and tab stops can make creating a document like a resume or academic paper a lot easier.
How to Add Citations and References
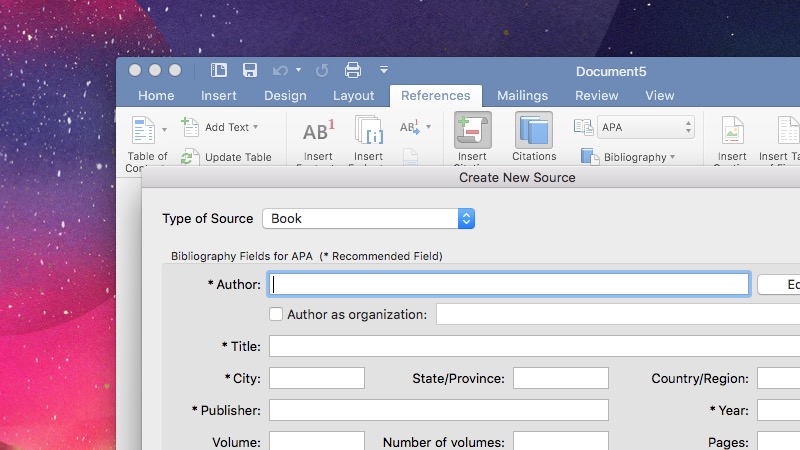
Academic papers are a beast to write, but Word makes creating bibliographies and citations super easy. Once you’ve created a new document and you’re writing that paper, you can add a citation with just a few clicks.
- Click the Reference tab.
- Click the Dropdown arrow next to Bibliography style and select the style you’re using for that paper.
- Click the end of a sentence or phrase where you want to add the citation.
- Click Insert Citation. In the Create New Source box, enter in all the info you need.
Once you enter a citation once, you can add additional citations from the same text by selecting a sentence, then clicking the Citations box and selecting the reference you want to insert. When you’re all done, click the Bibliography button and select either Bibliography or Works Cited to automatically generate the reference page for your paper.
The Best New Features in Word 2016
Word 2016 is a word processor — that means it doesn’t have to make giant, revolutionary leaps over its previous versions. However, Word 2016 does have a few improvements worth noting:
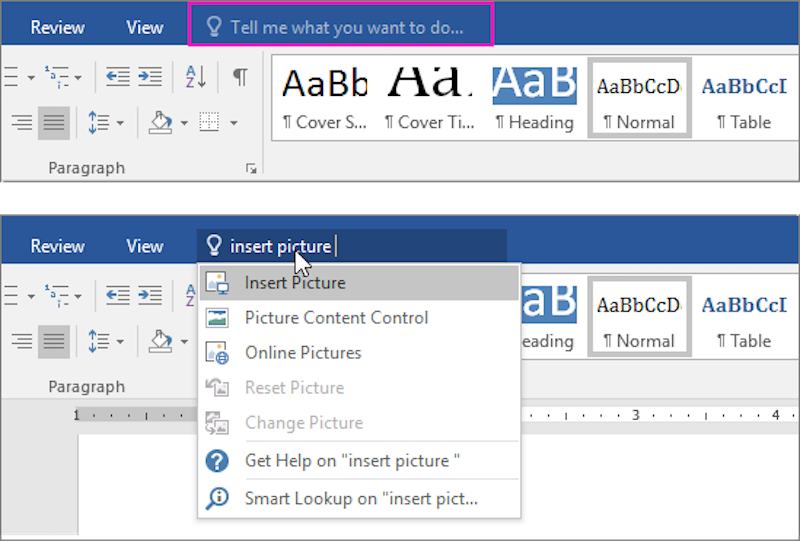
- You can search the ribbon: In Windows, above the ribbon, you’ll see a “Tell me what you want to do” box. Here, you can type in any question you have and Word will tell you how to do it. For example, you can ask it how to insert a picture, how to format text in a specific way or how to create lists. It’s basically a boring version of Clippy for the 21st century. For whatever reason, this isn’t included in the Mac version.
- You can see collaborators edits in real time like in Google Docs: You’ve been able to work on Word documents as a team for a while, but Word 2016 adds in live edits, so you’ll see other people’s notes and updates instantly.
- Smart lookup makes research a little easier: Word is now a little more connected to the web than it used to be. In Word 2016, you can right-click a word, then select “Smart Lookup” from the menu to look up a word’s definition, the related Wikipedia article and top search results from Bing.
Other than those minor improvements, if you’ve used older versions of Word you’ll be right at home in Word 2016 within minutes.
Work Faster in Word with These Keyboard Shortcuts
Microsoft has full lists of every keyboard shortcut in Word for Windows and Word for Mac that are worth bookmarking, but let’s run through some of the big ones you’re likely to use every day, and a few specific to Word that are really useful:
- CTRL+N/CTRL+O/CTRL+S: Create, Open, and Save a document.
- CTRL+X/CTRL+C/CTRL+V: Cut, Copy, Paste
- CTRL+B/CTRL+I: Bold, Italic
- CTRL+A: Select All
- CTRL+Z: Undo
- CTRL+K: Insert a hyperlink
- CTRL+P: Print a document
- CTRL+H: Open Find and Replace
- Shift+F3: Toggle Capitalisation options
- CTRL+SHIFT+C: Copies the formatting for selected text so you can apply it to another set of text with CTRL+Shift+V
- CTRL+Shift+N: Applies the normal style to the selected text
Beyond that, Word supports universal text editing keyboard shortcuts like Shift+CTRL+Up/Down arrows to select whole paragraphs. These can make navigating and highlighting text a lot easier, and we’ve got a list of all of them here. If you use Word heavily, get to know these shortcuts, they will make your life better.
Additional Reading for Power Users
Word’s a big program and we can’t cover everything here. Here are a few more guides to help you push the boundaries of what Word’s capable of.
- Six tips for better formatting: Formatting is a big deal in MS Word, and if you want to get better at skills like showing hidden characters and dealing with sections, this post should help.
- Select all text with the same formatting: This hidden little menu in the ribbon lets you select blocks of text based on its formatting.
- Everything you need to know about collaboration: Collaboration is a big part of Word. From tracking changes to learning how to use markup, this post covers everything you need to know about working on documents as a group.
- Create your own keyboard shortcuts: Word has a ton of keyboard shortcuts as it is, but if you want more, you can make your own.
Word might just look like a boring old text editor at a glance, but as you can see, it’s a lot more complex than most people give it credit for. Mastering it can take a long time, but once you have the basics and understand what’s possible in Word, you’ll be well on your way to being a Microsoft Word ninja.
Comments
One response to “How To Master Microsoft Office Word”
Tabs and indents should also be specified in the style settings for the paragraphs in question.