We’re all surrounded by screens, but few of us know how they really work. If you’re looking to teach your kids how displays work (or learn for yourself!) and you need a display for a Raspberry Pi, the Kano Screen Kit is a reasonably priced, portable, dedicated display that you build yourself.
What’s in the Box
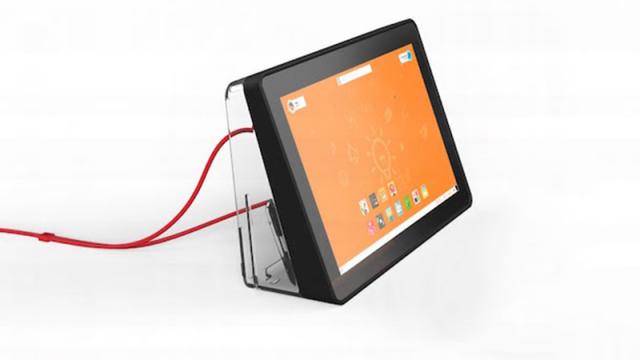
The Kano Screen Kit ($US149.99 [$206]) is a 10.1″, HDMI-compatible screen that’s made for the Raspberry Pi. As with other Kano products, the Screen Kit comes in a well designed little cardboard box that features everything you need alongside helpful guides.
The kit includes the 10.1″ LCD screen (with a 1280 x 800, 720p, 150 PPI display), a book that teaches you how to build the display and explains how it works, a driver board, a button board, HDMI cable, and a mini-USB Y-splitter for power. Beyond that, you’ll also get some stickers so kids can customise the display, a backing case to stand up the screen that also works as an enclosure for the Pi, and a little magnifying glass so kids can take a closer look at everything as you build it.
Building the Screen
The fun of the Kano Screen Kit comes from actually building the screen, so I’m not going to spoil any of that here. It’s definitely a pretty simple process and when I showed it to a couple of younger kids (and non-techy adults) over the holidays, everyone was able to piece it together without the manual. The manual does walk you through a lot of the hows and whys though, so it’s worth keeping around if you’re teaching kids how screens work in general. It was a fun little project, and building the kit will be a breeze for any kid who’s already comfortable playing around with a Raspberry Pi (or even if they’re not.)
Where It Excels
The Screen Kit is pretty fun to build. It’s also pretty sturdy. Where you might think the end result is a junky, misaligned screen, everything snaps together so perfectly that you can barely tell it’s a DIY kit. Kids will certainly feel more of a sense of pride and ownership after taking the time to build it themselves.
Even for adults, the Screen Kit has a lot of appeal. The case alone makes life for an organisation junkie much easier. You always have a relatively portable Raspberry Pi system at the ready without taking up space in your home entertainment system or next to your PC, and it’s all packed in neatly.
As you’d expect, the Screen Kit works best with the Kano Computer Kit ($US149.99 [$206]). The Screen Kit has a special place where the Computer Kit’s Raspberry Pi case snaps in (though you can easily just velcro on any case), and the Kano Kit keyboard ($US44.99 [$62]) slides into the back of the screen so it’s super portable. This compatibility is great and makes it feel like a cohesive, single unit, but the Kano stuff is not required by any means. Even the special Kano operating system (which is built to help kids learn a variety of coding skills and is set up to work with the Screen Kit out of the box) is free even if you don’t buy the Kano Computer Kit.
Where It Falls Short
Don’t expect the Kano Screen Kit to be the same quality screen as something like an iPad. That’s just not what it’s meant to be. However, as far as the (admittedly small) 10″ display market is concerned, the Kano Screen Kit holds its own against other displays, and is comparable to similar offerings from Adafruit (which don’t have the benefit of a case).
It’s also pretty clear that the Kano Screen Kit really wants to keep you in the Kano ecosystem. This is great if you own their stuff, but you’ll obviously have to awkwardly hack together other solutions if you don’t. No worries though, a few other keyboards will slide in to the back of the case as perfectly as Kano’s.
If you’re not using the Kano OS, you’ll also need to tweak your Raspberry Pi’s video settings to get the screen working. I found that using Adafruit’s configuration settings for their 10.1″ screen worked perfectly fine. Still, it’s not quite out-of-the-box support, so keep it in mind.
Availability of the Screen Kit is also a concern. The first batch sold out quickly and the second is available for preorder now, with shipping coming in March. Fortunately, Kano does have a pretty good track record of shipping on time.
The Bottom Line: A Solid Portable Screen that’s Great for All Ages
The Screen Kit is clearly built for kids, but it’s a solid display that teaches you a lot, regardless of how old you are. You can get similar screens from Adafruit for a slightly cheaper price, but I really like how the Kano Screen Kit is both a screen and a storage system. As a hobbyist with (way too many) Raspberry Pi’s sitting around, it’s really nice to have a little all-inclusive device that’s easy to boot up, test things out on, then store away when I’m done. The hardcore DIYer can design and 3D print a case and storage system too, but the Kano Screen Kit’s great for anyone who doesn’t want to go that far.
Comments
3 responses to “The Kano Screen Kit Is A Fun To Build, Compact Display For The Raspberry Pi”
For that price it hardly seems worth the endevour. I could get a much better monitor for that price.
agree, I can get a fully fledged windows tablet for that price.
I was so hoping it was going to be a touch screen.