Windows 10 brought a ton of new and awesome features. One of the best features is the new Xbox app. Even if you don’t have an Xbox, this app is useful for everyone. You can use it to record games, create clips from any app, and even stream console games.
Record Nearly Any App or Game with the Game Bar
Recording gameplay has become so popular, it’s built into nearly every console these days. Adding a game recorder to Windows 10 was the natural next step for Microsoft. Here’s the kicker, though: you can record more than just games. The Xbox app can record nearly any running app. While a few applications can exempt themselves, most have not. That means that the Xbox app is not only an awesome game recorder, it’s an awesome screen capture tool.
If you’ve logged into the Xbox app at any point, the Game DVR feature should be ready to go. If not, start the app and login. Once it’s running, follow these steps to record a game or app:
- Press Win+G to open the Game Bar.
- If you see a box asking if this app is a game, click the checkbox next to “Yes, this is a game.”
- Click the red circle to start recording.
- When you’re done, press Win+G again and click the red circle to end the recording.
You can also press Win+Alt+R to start and stop recording, as long you’ve already told the Xbox app that a particular application is a game. Once you’ve finished recording, you’ll get a notification in the Action Center (Win+A). You can click this notification to jump straight to the Game DVR section of the Xbox app and find your clips. Here you can trim the clips and jump to the folder where the files are contained.
It’s unclear exactly which apps can and cannot be recorded. The Game Bar won’t record Skype for Desktop, for example. However, the Xbox app can record itself. Regardless of whether an app is actually a game, you can try using the Game DVR to record clips of it.
Use “Record That” to Save the Last 30 Seconds (or More) of a Game
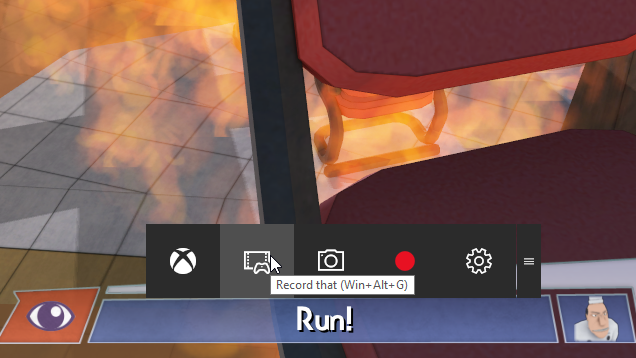
Unless you’re a YouTube star, chances are you’re not going to want to record everything you do on the off chance something interesting happens. However, there are times where you do something totally badass and no one was around to see it. Much like Xbox users can, Windows 10 users can now use the “Record that” feature to save the last 30 seconds (by default, you can raise the limit) of whatever they’re playing.
“Record that” works by constantly recording whatever you’re playing, but only keeping the last thirty seconds. At any point, you can open the Game Bar and click “Record that” (or press Win+Alt+G) to keep that video forever. This allows you to retroactively decide to start recording after something cool happens.
To set it up, follow these steps:
- In the Xbox app, click on Settings in the left-hand sidebar.
- Click the Game DVR tab.
- Enable the toggle under “Record that.”
- Optional: Next to “Record the last:” you can click the drop down to adjust the recording buffer from 15 seconds to 10 minutes.
- Open the game or app you want to record.
- Press Win+G to open the Game Bar.
- Click “Yes, this is a game” if it asks.
As with the last section, once you’ve turned on “Record that” and designated an application as a game, you don’t need to go through most of these steps. You can open the Game Bar to activate “Record that” or just press Win+Alt+G.
Stream Your Xbox Games to Your PC From Your Console
Technically, this feature does require an Xbox One, but it’s an awesome one, so we’re including it. With Windows 10, Microsoft is also making it possible to stream your Xbox One games to your PC. Your Xbox will do the leg work of running the games, then send the video and audio to your computer where you can play them.
This can be handy for a number of reasons. For starters, it allows you to play console exclusives on a PC. You can also keep playing games if someone else in your home is using your living room television.
To start streaming your games, you’ll need to set up both your Xbox and your PC. Here’s how to get started on the Xbox:
- Open Settings on your Xbox One.
- Select Preferences.
- Enable “Allow game streaming to other devices.”
- Under Smartglass Connections, enable either “From any SmartGlass device” or “Only from profiles signed in on this Xbox.”
Once your Xbox is set up, you’ll need to configure your PC. To do that, follow these steps:
- Make sure your PC and Xbox are connected to the same home network.
- Launch the Xbox app on your PC.
- In the left-side panel, click Connect.
- After the app scans for available Xboxes, choose yours from the list.
- Once it connects, select your Xbox.
- Choose “Stream.”
Once your Xbox and PC are connected, you can start launching games from your Xbox One. To do this, select My Games from the left-hand side of the Xbox app, choose the game you want to play and click “Play from console.”
While the game is playing, you can plug in a headset and create or join parties just like you would on your console. You’ll also have a new section under Settings to adjust streaming quality, if your game isn’t playing smoothly on your computer.
Comments
One response to “Windows 10’s Xbox App Is Awesome, Even If You Don’t Have An Xbox”
I’ve found the recording function to be a far lower strain on my system than others. Using OBS or Action, it sounds like the graphics card is trying to weld itself to the motherboard, not so with Xbox.