The big difference between good looking photos and video and bad ones comes down to how well things are lit. Whether you’re an amateur photographer building a home studio or a budding YouTube star, here are some simple tricks for casting the right light without spending a fortune on professional equipment.
Illustration: Sam Woolley
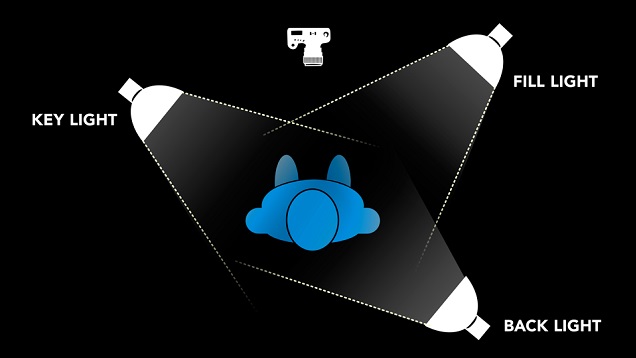
Learn the Basics of Three-Point Lighting
The three-point lighting system is the most important aspect of lighting subjects in cinematography and still photography. In the video above, YouTuber DiCasaFilm explains how three-point lighting works, and how it’s essential for drawing focus to the subjects in your shot. It’s called “three-point” lighting because there are three main lights used. To get that professional look to your photos and films, you need at least one of each of these:
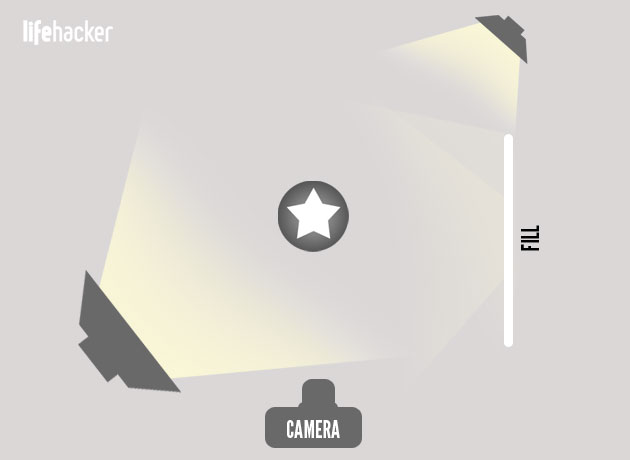
- Key Light: The strongest light directly hitting your subject (usually from above and in front of the subject), and the main source of light in the shot. In a scripted scene, this light source is usually from a source of light that would be in the room, like a window. For a simple photo shoot or video blog, however, an angle of 45 degrees from the subject’s face is a good starting place for key lighting.
- Fill Light: Hits the subject at any angles that the key light doesn’t in order to fill in some shadows on the subject. If you had the key light hitting your subject at an angle of 45 degrees to their left, for example, the fill light could come in at 45 degrees to their right to fill in some shadows and make the lighting look more even. Depending on how much shadow and definition you want on your subject, the fill light can be filtered, bounced, or placed further away in order to diffuse it.
- Backlight (Hair Light): Hits your subject from behind or above. Separates the subject from the background by making the edges of the subject’s body pop. Using a backlight (in combination with these other lights) can almost instantly make your photos and videos look more professional.
You’ll be surprised at how those three lights can dramatically increase the quality of your shots. If you need a certain type of shot, you can adapt the three-point system by adding or removing lights in order to achieve various effects, but you always start with this basic setup and work from there. For example, removing the fill light from the equation gives you a more dramatic looking shot with shadows taking over half of the subject. For another example, just using the hair light makes the subject look angelic or dream-like. No matter what kind of shot you want, the three point system is more than capable of handling it when you’re just starting out. It just depends on what you want your shots to look like.
The purpose of lighting is not only to make your subjects visible, but also to guide the focus of the audience. If you don’t light your subject well, there’s a chance you won’t get the audience’s focus where you want it. Of course, there’s no straight-up wrong way to light something because it always depends on what type of style you’re going for. The basic rules of the three-point lighting system are widely considered the standard, however. Just think of them as rules that are meant to be broken in creative ways.
Learn the Basics of Soft and Hard Lighting
Think of lighting a photo or video like painting a picture, and hard and soft light as two different paint brushes to use while painting the type of shot you want. Hard lighting creates stark shadows for a more moody or gritty appearance. Soft lighting is more forgiving and neutral in tone, with softer shadows that are better for emphasising beauty. In the video above, filmmaking accessory company Zacuto explains that it all comes down to the two main types of light:
- Hard Light: Created from a single point light source, with all of the the light’s rays striking the subject at the same angle. This creates sharp, distinct shadows and edges.
- Soft Light: Created from a broad light source, with the light’s rays striking the subject at multiple angles. This creates soft shadows and edges, with the light rolling off of the subject.
The kind of shot you want determines whether you want to use hard or soft light, but most of the time it’s a good idea to use soft light for your key and fill lights. Beauty shots, for example, benefits the most from using more soft light. This keeps your shadows from being too distinct and makes a for a more evenly lit shot. Hard light is effective for hair lights and backlights because you want to create sharp, distinct edges with those. Hard lighting also provides the contrast you’d find in natural lighting, so it’s best for scenarios where you want your lighting to look like it’s not coming from lights.
If you want very even, flat lighting (like a TV sitcom), you’ll want to use a lot of soft lighting coming from both your key and fill lights. If you want more of a film noir look, you’ll want to keep the stark shadows that hard lighting creates. Again, it all depends on what you want to achieve in your shot, so play around with your own three point setup to determine the right look for your project.
Buy (or Build) Your Lighting on the Cheap
Now that you understand the basic types of lights you need, you’ll want to get the most bang for your buck when buying them. A professional light kit can cost hundreds or thousands of dollars, but there are plenty of ways to make your own kit for a lot less.
In the video above, YouTuber Shanks FX explains how to build your own three point lighting kit with some high-powered LED torches. He uses these Kobalt Hypercoil Work Lights, but they aren’t being made anymore and the prices have gone up to almost $US45 per light. Fortunately, you can find some some LED torch alternatives for much cheaper. The UltraFire Mini XPE Q5 is only about $US4 on Amazon, and if you want a rechargeable version, the OxyLED MD20 can be picked up on Amazon for $US14. Both of those LED lights could be used in the same way, are more compact, and are even a little brighter. They don’t have the extendable, adjustable neck, but you don’t necessarily need that.
Once you have your LED lights you can use articulating clamps on lighting stands to hold and angle your torches, and use magnifying glasses to focus your lighting. You can even grab an extra LED torch to create an awesome ice light for more soft, even lighting. For a battery-free light wand, you can also make one out of white glow sticks and some PVC piping. If you have any extra camera tripods around, you could just as easily use those to save some cash too, instead of buying new lighting stands. This entire setup is highly portable, and you could fit your entire lighting kit into a duffle bag to travel with it anywhere.
Clamp lights, or those aluminium bowls with a light socket and squeeze clamp, are another effective option that won’t break the bank. You can buy aluminium clamp light sockets for anywhere from $US5 to $US15 each in any hardware store or online at Amazon, and get decent bulbs for them at reasonable prices as well. In a YouTube video, Curtis Judd suggests that you look for daylight white light bulbs with a high Colour Rendering Index (CRI), 90 or above. A high CRI means that the colours you capture in your photos or video will look more true to the normal eye in natural lighting. Light bulbs like this can be expensive (up to $US25 per bulb), but they’re still cheaper than professional bulbs. The Philips SlimStyle A19 LED light bulb, for example, has a CRI of at least 90, is dimmable, and emits soft white light for $US24 a bulb on Amazon. You can use clamp lights as key lights and fill lights with a little diffusing, and they’re especially useful as backlights. If you have something to clamp your lights on, you can put together an entire lighting kit for less than $US100.
Alternatively, halogen construction work lights can be a good choice if you don’t have any stands and need high intensity light for cheap. In most hardware stores, you can find a two-light work light stand for somewhere around $US35. They aren’t ideal for key lighting because they’re too bright and harsh, but, as YouTuber thefrugalfilmmaker suggests, you can use them as reflected light, softened enough to be used as fill lights. Before you use them, you probably want to remove the protective grill so you don’t end up casting any shadows. Also, remove the glass so the light doesn’t run as hot as it normally would (just be careful not to touch the bulb when it’s running). Halogen work lights aren’t the most portable option, however, so if you need to do more shooting on the go, you’ll want something more portable.
Last, but not least, it’s important to mention the cheapest light source of all: daylight. If you’re able to shoot your photos or videos during the day, and can set up near a window, daylight can be just as effective at lighting up a shot. In the video above, YouTuber Curtis Judd explains the benefits of shooting with daylight and how to get the most out of it. Window light is soft, natural, and illuminates colours in their truest form. With just a few reflectors, you can light an entire scene without the need for any additional lighting. You only have certain time frames in which you can shoot, for example, and the weather could change things on the fly. Still, it’s not a bad alternative to consider when you’re looking to save some money.
Soften Your Lighting with Diffusers and Reflectors
To create proper soft lighting and fix uneven lighting in your shots, you’ll need to make use of diffusers and reflectors. Diffusers are materials that light rays pass through to spread them out. Think of it like a light firing a single bullet of light and a diffuser turns that bullet into a shotgun spread of light rays. Reflectors let you bounce light from main sources to create secondary sources of light. A reflector could even be used as a fill lighting option, bouncing light from your key light to fill in shadows.
You can find combo reflector/diffusers for around $US20 online, but you can always build your own with stuff you probably have lying around the house. The video above, from the videomaker YouTube channel, suggests using a clear shower curtain to diffuse light. You can also make your own reflector with some cardboard and aluminium foil, or even a Pringles can. Additionally, any semi-reflective white surface can be effectively used for bouncing light. White poster board, whiteboards, and even walls and ceilings can be used to bounce off soft light.
If you want to create a key light that will always be diffused and only produce soft light, you can make a homemade softbox. A softbox is a light with a diffuser built around it, forcing all the light’s rays through some sort of material. If you know you’ll be in need of soft key lighting for most of your shots, soft box lights can make things a little easier for you. For around $US20, YouTuber MediaFi shows you how to build a softbox out of clamp lights and some shower caps. Instructables user jemduff also demonstrates how you can use a clear, plastic storage container as one. If you’re looking for an easier method, however, John DeMaio at Production Apprentice explains that you can never go wrong with a paper China ball lantern:
…you’ll probably want to stick with the white ones unless you have something specifically creative in mind. Best of all they’re extremely cheap! The paper provides a nice diffusion for the light and the sphere creates an omni pattern — something that will provide light in all directions. These are perfect to place between two actors that are talking to each other, or they just create a nice soft wrapping light source for your main talent.
You can usually find these for around $US10 apiece, so they’re easy to replace if they get damaged. You can also use black cloth to wrap around the lantern and control the direction of the light. Whenever you’re in need of a little extra fill lighting, China ball lanterns are the best way to go. As you go about your light diffusing and bouncing, always keep safety as your number one priority. Never try to diffuse lighting with tissue paper, paper towels, or other highly flammable materials. Lights get extremely hot, so if you know something isn’t rated to be up close and personal with that kind of heat, always keep your diffusing materials at a distance.
Make Your Own Sandbags to Stabilise Your Lighting Stands
No matter what kind of set you’re trying to light, safety is important. Light stands can get pretty top heavy, which makes them easy to knock over. Sandbags rest on the base of the light stands to counteract the weight from the lights. That way if you bump into them, they don’t topple over and start a fire. In the video above, YouTuber Digitaldreams321 shows you how to make a simple sandbag at home with some Ziploc-style bags and some duct tape.
Once they’re put together, fill them with some sand you can buy at the hardware store and you’re all set. They might not seem like they’re necessary, but sandbags are like having insurance on your lighting setup. If your lights can’t fall over, they can’t break and they can’t start fires.
Comments
One response to “How To Improve Your Photos And Videos With Affordable Lighting”
Great video, thanks for sharing..