
Scrivener is a name that gets tossed around a lot in writing circles, but it’s not immediately clear how it’s useful. Subsequently, I’ve avoided it for years. Then, on a whim recently, I checked it out, and now I can’t imagine writing anything without it. Here’s what I’ve learned in my time.
Pictures: Unsplash/Pixabay
Scrivener is an all-in-one writing studio. It’s essentially a word processor that comes with a place to store notes, research ideas, outlines and everything else you need for writing. It’s also pricey at $US45, but you get a 30-day free trial. At a glance, Scrivener sounds like “Evernote for longform writing”, which is exactly why I avoided it for years. I’ve always been a fan of piecemeal style productivity stuff. I don’t like to put all my eggs in one basket, because I like being able to replace different parts of the chain at a moment’s notice.
However, between writing for Lifehacker, the occasional Games on Delay post and what I write for fun, it all became too messy. I needed a place to organise all my writing, and Scrivener was the place to do it. Here’s how I use it.
Create Your Own Workflow

Scrivener does a lot of stuff, and it’s overwhelming at first. Thankfully, Scrivener has a robust tutorial section, so we get to skip the basics here. It’s useful to take a look through the tutorials to get used to how Scrivener works, because it uses a lot of icons and symbols that take some getting used to. That said, after messing around with it for about 15 minutes you’ll have a good grasp on how to use it.
Once you’re familiar with Scrivener’s basics, it’s time to start experimenting with a writing workflow that works for you. Here’s the workflow I’ve developed for myself:
- Create a new binder for each project: Scrivener works best when I organise ahead of time. So, when I start a new writing project, I create a new binder and organise inside of that. Inside that binder I make a draft for each block of text and a research section.
- Make an outline: Scrivener works a differently to most writing programs, because it allows you to separate out sections and outlines. So, instead of having all my text in one giant stream of pages, Scrivener breaks them out into smaller sections. These can get compiled together later, but the separation makes it easy to find (and rearrange) what I need quickly. I start with a draft, then create a new subsection inside that draft for each heading I want to outline.
- Label everything in the inspector: Once I have the outline loosely structured (I can move these sections around later by just dragging and dropping them), I open the section and click the “Inspector” view (the big “i” icon). Under the Synopsis section, I write out a quick thesis of what I want that section to accomplish. Then, I drop any links or notes I want to remember into the “Document Notes” section.
- Write: Finally, I move into full-screen mode and start to write the first section.
- Revise: Like most word processors, Scrivener has a comment and footnotes section. I tend to make use of this a lot when I revise, because I leave comments to myself on sentences I don’t like and paragraphs that don’t make sense. Sometimes, these things get fixed right away, other times they take a few days, weeks or months to work themselves out. Either way, it’s nice to have a comment with my original thoughts in there so I can remember to go back to it.
As you’d expect, I don’t go through this system every time. Sometimes, I just open up a document and start writing. For the most part, this is the system I use for everything from blog posts to fiction stories. Everyone’s individual workflow will be different, so it’s worth toying around with it a bit to find what works for you.
Organise All Your Research Notes In One Place
Scrivener is about all your content, not just your words. It’s most useful when you dump your notes, ideas and everything else into it. This doesn’t just mean scholarly articles, I dump everything into my research notes. That includes napkin doodles, Google images, mind maps and anything else I think I might want to come back to later. To do this, just add a new folder, name it “Research”, and start adding your notes.
That’s simple enough, but like any /”everything bucket” style of software, you have to label everything if you want to find it later. So, when you make new notes, open up the the “Inspector” view, and add labels to each piece of research. Typically, I keep things simple with labels like: sources, character art, concept art and plot lines. This makes it easy to find later so I can stop thinking about it now.
Use Statuses to Keep Track of What To Do Next
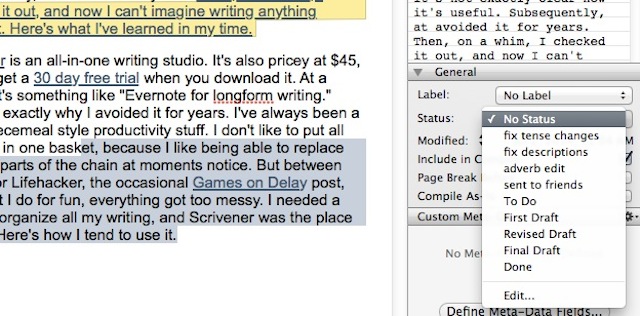
Also inside that “Inspector” view is a place to set a status for each of your written sections. I didn’t even realise this was available until I’d used Scrivener for a couple of months, but it’s helpful when you’re working with larger documents.
Basically, you can label sections of your draft as to-dos. Scrivener’s default labels are good as they are: to-do, first draft, revised draft, final draft and done. I’ve also added a few specific to me, including fix tense changes, fix descriptions, adverb edit, or sent to friends.
Once they’re labelled, you can sort by status labels and get a quick view of what you have to do. This makes it a lot easier to just sit down and start writing without worrying about where to start or what to do next.
Save Everything
When it comes to writing, I’m a serial deleter. I have no qualms with going through anything I write and deleting lines, paragraphs or entire sections. As you’d expect, sometimes this is a problem when I realise I need something later on. I deal with this in Scrivener in two ways:
- Make a “Deleted” folder in each document: Here, I’ll dump everything I delete just in case I need it at some point. This also happens to become a helpful brainstorming place when I’m trying to come up with new ideas, because I can take a look at a bunch of failed ideas in one spot.
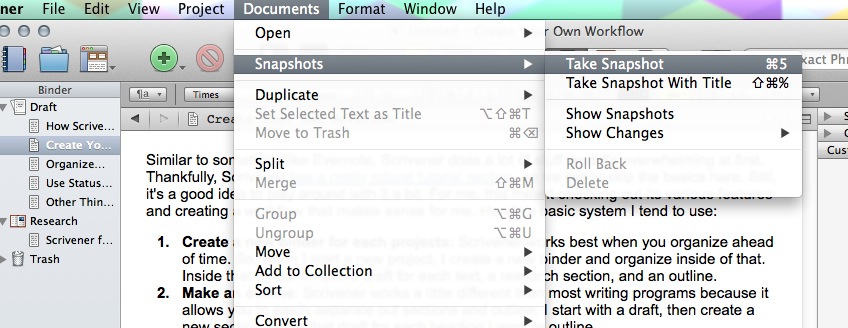
- Take a Snapshot before major edits: Scrivener has a pretty simple versioning system called Snapshots (Documents > Snapshots) that allows you take a snapshot of your document and compare back to that version after you make edits. This comes in handy if you decide to make major edits and they don’t end up working out.
Between these two methods, I manage to hold onto what I might need without clogging up the document or notes sections with needless trash.
Other Tips for Getting the Most Out Of Scrivener
Scrivener is a huge program that can do a lot. While I’ve played around with almost everything it offers, not all its features found a place in my workflow. That doesn’t mean they won’t work in yours. In fact, the Scrivener forum has a whole section for different use-cases. With that in mind, here are a few more general purpose tips for making Scrivener a bit more useful for you:
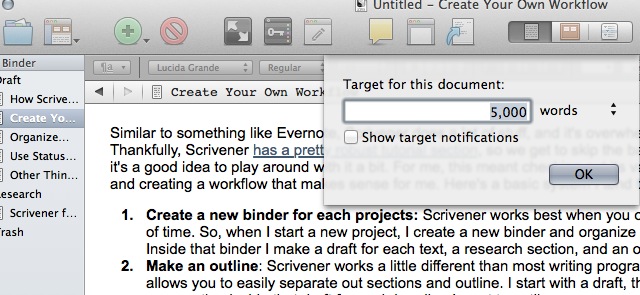
- Set word count targets: A lot of people recommend using the target word count system. When you create a section, hit the target symbol at the bottom of Scrivener, and put in your goal. This is great for things like papers, articles or book chapters that have set word counts.
- Export any way you want: Scrivener wouldn’t be useful if it couldn’t save in other formats. Thankfully, if you need to send a document to a friend or colleague, you can save Scrivener documents as Word documents, PDF, Kindle, iBooks and more.
- Plot out scripts: Scrivener isn’t exactly a replacement to a dedicated screenwriting tool, but it does make it pretty easy to draft a screenplay. All the writing organisation stuff that Scrivener does works in its screenwriting mode, but it also formats your script for you as well.
- Make custom layouts: Scrivener has a ton of menus and options. Thankfully, you can customise that stuff to your liking. You can shrink menus, move around sections and get rid of anything you don’t use by unchecking boxes in the “View’ menu. To save your settings for future documents, just click View > Layout > Manage Layouts.
If you’re a writer of any kind, Scrivener’s worth a look. It’s a bit overwhelming at first, but it’s intuitive once you get used to how it works and what it can do. Plus, even with all its features, it’s still a lot faster than Word when you’re working with larger documents.
Comments
2 responses to “How Scrivener Helped Me Organise All My Writing”
I actually prefer OneNote. It doesn’t have all the cushy publishing features, but most of the other functionality mentioned here can be replicated fairly well with the OneNote notebooks/pages/notes structure. Plus it’s cross-platform (including mobiles and tablets) whereas Scrivener is strictly Mac/PC.
+1
As I was reading through what Scrivner does, I kept thinking “heh, I use OneNote for that too”