If you’re sick of dealing with carrying around a massive library of music on your smartphone and you don’t want to pay for a service like Google Music, the Raspberry Pi can work as a music server. With a little work, you can make all your MP3s available to you regardless of where you are. Here’s how to set it up.
Music by Josh Woodward/Bad Weather California. Photos by Tarchyshnik Andrei, Donatas1205.
We’re assuming you have a basic understanding of the Raspberry Pi, but if not, you can start here to get everything in order.
What You’ll Need
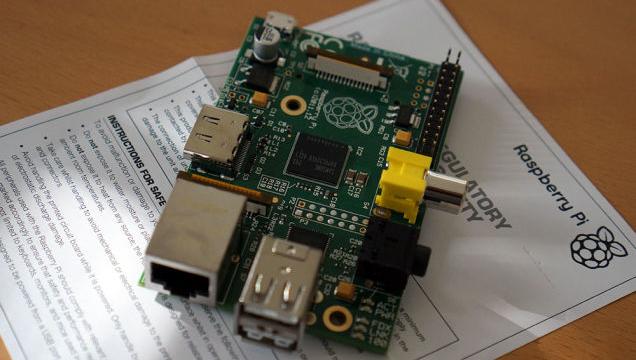
- Raspberry Pi: If you’re not sure where to buy one, check out our introduction to the Pi for more information.
- A 4GB SD card: You’ll need something to install the operating system onto. This page tells you which SD cards are compatible with the Pi.
- Ethernet cable or Wi-Fi adaptor: You’ll need the internet to set up and run your music streaming service.
- USB keyboard: You’ll just need it for the initial setup.
- iOS or Android device, or computer to stream to: The purpose of this service is to send your music from your Raspberry Pi to your remote devices, so obviously you’ll require some remote devices.
- A $US1/month subscription to Subsonic Premium: After testing a bunch of free options options for setting up a music server on the Raspberry Pi, Subsonic proved the easiest to use with the best support. While there is a monthly fee for streaming your music over the internet, Subsonic is free to check out for 30 days.
- A place to store your music: Your Raspberry Pi will feed your music to the outside, but you’ll still need to actually store those MP3s somewhere. This could be a NAS or an external hard drive.
What You’ll Get
When you’re done, you’ll have access to your entire music library from anywhere you have an internet connection, all through a tiny box in your house hooked up to your router. To do this we’ll install Subsonic on the Raspberry Pi. You can then access your library of music from apps on your smartphone or a computer. You can also share that library with friends and create playlists together. Essentially, it will be your own private little Spotify-like service (or, perhaps more accurately, Google Music).
Subsonic works on any computer, but it’s especially handy on the Raspberry Pi because you don’t need to worry about the cost of running your computer all the time, or about exposing your main computer to the internet. With the Raspberry Pi, you can set it up, tuck it away in a corner somewhere, and leave it on 24/7.
Step One: Set Up Raspbian
In order to use your Raspberry Pi as a private streaming music service, you’ll need the Raspbian operating system installed onto your SD card. Our guide here shows you exactly how to do that. Once that’s taken care of and you can boot to the command line, we’ll run an update. Type this into the console:
sudo apt-get update sudo apt-get upgrade
Sit back and wait for the update to run. It can take a little while to grab everything.
Step Two: Update Java
The software we’re going to use to stream music from the Raspberry Pi works significantly better with the newest version of Java installed. So, we’re going to install OpenJFX manually. To do this, head to the Java download page from your home computer, click the “Accept Licence Agreement” button, right-click the link underneath “Download,” and select “Copy Link Address”. Head back to the Raspberry Pi, and type this into console:
wget [link you just copied]
it should look something like
wget http://download.oracle.com/otn-pub/java/jdk/8-b132/jdk-8-linux-arm-vfp-hflt.tar.gz
Once it’s downloaded, make a directory for the installation:
mkdir -p /opt
Then unpack it:
sudo tar zxvf [file you downloaded] -C /opt
For example, it should read:
sudo tar zxvf jdk-8-linux-arm-vfp-hflt.tar.gz -C /opt
Now we need to make the new Java installation the default one:
sudo update-alternatives —install "/usr/bin/java" "java" "/opt/jdk1.8.0/bin/java" 1
then
sudo update-alternatives —set java /opt/jdk1.8.0/bin/java
Test to make sure the correct version of Java is installed with:
java -version
Finally, some programs, including Subsonic, need to know where to look for this new version of Java. So, we’ll need to edit some text files. Type this into a terminal:
sudo nano /etc/environment
and add in the line to the text file:
JAVA_HOME="/opt/java/jdk1.8.0
Save the file and head back to the command line. We’ll do the same with the bash console:
sudo nano ~/.bashrc
Add the lines:
export JAVA_HOME="/opt/jdk1.8.0"
export PATH=$PATH:$JAVA_HOME/bin
Save the file and then everything’s all set. Reboot the Pi and we’ll get the music server ready.
Step Three: Install Subsonic

Now it’s time to get Subsonic, the software that’s actually going to power the music streaming, installed. We’ll need to get the download link the same way we got the Java one. Head to theSubsonic download page from your home computer, click the Debian installer link, right-click the “Direct Link” and select “Copy Link Address”. Now, on the Raspberry Pi, type in:
wget [the URL you copied above] -O subsonic.deb
For example:
wget http://downloads.sourceforge.net/project/subsonic/subsonic/4.9/subsonic-4.9.deb
Once it downloads, type this in to install it:
sudo dpkg -i subsonic.deb
Now Subsonic is installed, but since we’re opening up the Pi to the internet, we need to take a few security precautions. This means creating a new user that doesn’t have root access. So, type in:
sudo adduser [new user name]
For example:
sudo adduser subsonic
Now we’ll edit Subsonic’s configuration with this new info. Type in:
sudo nano /etc/default/subsonic
Next, add the following line to end of the text file:
SUBSONIC_USER=[new username]
Then, restart Subsonic:
sudo service subsonic restart
Subsonic is now running on the Raspberry Pi as the user you just created so it doesn’t have root access. It’s also automatically set to run when you boot up the Pi in the future.
Step Four: Set A Static IP Address
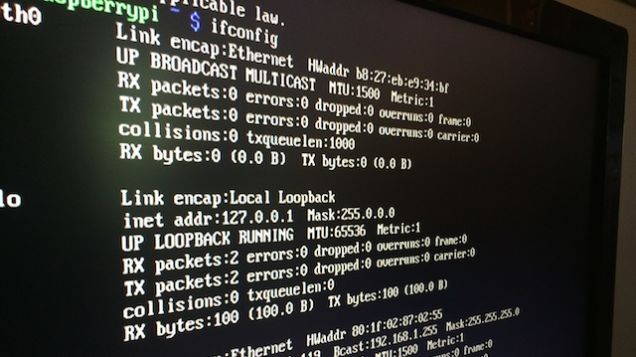
Now, we need to give the Raspberry Pi a static IP address so you can always access it by typing the same URL into your browser. First off, we need to get a picture of what your home network looks like. Type in:
ifconfig
This shows you where and how you’re connected to your router currently. Pay attention to the “inet addr” number, which should look something like 192.168.1.115. Write that number down. Now we need to get the default gateway number. Type in:
route -n
The default gateway is listed on the line the the “UG” flag. It’s usually your router’s address, for example: 192.168.1.1. Make a note of that. Next, edit the configuration file:
sudo nano /etc/network/interfaces
Here, you’ll see a line that reads something like:
iface eth0 inet dhcp
Replace it with:
iface eth0 inet static
address [the IP address you wrote down above]
netmask 255.255.255.0
gateway [the gateway you wrote down above]
That’s it. Now your Raspberry Pi has the same IP address every time so it’s easy to connect to. If you need more information, you can find a full guide to setting up a static IP address here. Optionally, you could set up much better and easier to use DHCP reservations.
Step Five: Configure Subsonic
Once you have Subsonic running on your Raspberry Pi, it’s time to access it from your home computer. From a browser, type in the IP address:
[ip address you just got]:4040
For example:
192.168.1.115:4040
That pulls up the Subsonic login page. Log in with the username admin and the password admin.
Firstly, follow the instructions to change your username and password. Next, we’ll point Subsonic to a music library.
Click Settings > Media Folders, and change the media folder to where you have your music stored on the Raspberry Pi. If you’re using an external hard drive or USB drive, follow one of these guides to set those up first. Now, you can access your music library from anywhere within your local Wi-Fi network. But that’s not enough. Let’s grant access to that library from anywhere:
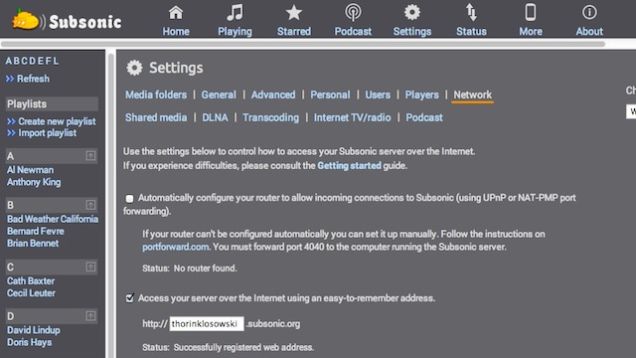
- Head into Settings > Network
- Check the box for “Automatically configure your router to allow incoming connections to Subsonic”
- Check the box for “Access your server over the Internet”
- Enter the URL address you’d like to access it from
- Click the Save button
Wait for Subsonic to reload. If everything works, your status should be listed as: “Successfully registered web address”. You can now access your music library from anywhere at the URL you created.
If the status shows anything else, it means your router doesn’t support automatic port forwarding so you need to set it up manually. This guide walks you through the basic steps, but setup and troubleshooting depends on your specific router.
Step Six: Configure Subsonic’s Mobile Apps
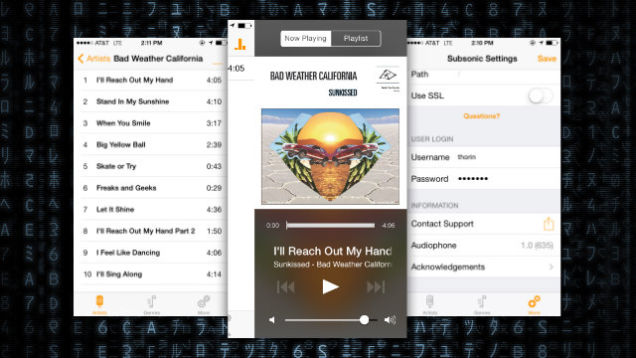
Subsonic is accessible from a lot of different apps on both desktop and mobile. After testing a few out, I liked Submariner on Mac and Audiophone on iOS the most. Setup depends on which app you use, but it’s usually pretty straightforward. You’ll just need the server address and port from step four, as well as your user login information. Once it’s set, you’ll be able to pull up your library from anywhere as long as the Raspberry Pi is on and the Subsonic server is running.
Comments
2 responses to “How To Turn A Raspberry Pi Into A Private Streaming Music Service”
Step 1: Use spotify’s free music playlist function and don’t waste your money and time for something that already exists in an easier way.
Its free until you start using basic functions like say skipping tracks. Spotify limits you to 6 skips per hour, and the same over and over ads are annoying. Using something like Subsonic turns out cheaper. Also music streaming services like Spotify screw over the Artists, so I say screw them!
But imagine the fun you have and the satisfaction you get when you make something as simple as this
Another alternative is – http://www.pimusicbox.com/
While you probably should pay per month if you wish to support this great developer, it seems that it is extremely easy to bypass licencing, and because the program is gpl, it is completely legal.
http://community.wd.com/t5/My-Book-Live/WIP-Installing-SubSonic-on-the-MBL/td-p/561927/page/5