
Yesterday, Steam released its In-Home Streaming feature to everyone. The feature allows you to install games on one PC and stream them via your home network to any other machine. Here’s how to get it set up (and fix some of the quirkier problems).
Step 1: Setup Your Streaming Server and Client

To use the In-Home Streaming feature, here’s what you’ll need:
- A host PC running Windows. Currently, streaming can only be done from a Windows PC. For the moment, this is probably for the best as more games are compatible with Windows than any other OS.
- A client computer. Any Windows, OS X and Linux PC running Steam can receive stream a game from your host machine.
- Beta client enrolment. Both machines need to have the Steam Beta client installed. If you do not already have the beta enabled, you can activate it in Steam by opening Settings. Click “Change” under “Beta participation” and choosing “Steam beta update” from the drop down. You’ll need to restart Steam afterwards. Do this for both the host and client computer.
- A sufficiently fast home network. It should go without saying that the two computers need to be networked together. A hardline is recommended, but if you’re using a wireless network, Steam recommends using either Wireless N or Wireless AC hardware.
Once you’ve got both computers connected to the network and running the beta client, here’s how to get the In-Home Streaming set up:
- Login to both computers from the same Steam account.
- Open your Library on the client computer to view games.
- Click the “Stream” button on individual game pages.
When connected to a network with another Steam-enabled host computer attached, games installed on any of the host machines will appear in the client Library. The normal “Play/Install” button will be replaced with a “Stream” button. You can, however, click the dropdown arrow next to the button to install the game locally if you’d prefer.
Assuming you don’t have any technical hurdles to overcome, the In-Home Streaming is relatively straightforward. In fact, if you’re already enrolled in the beta on both machines, you may not even notice that your computers can now stream between them. However, there are still a few oddities that can be cleaned up.
Step 2: Tweak Your Settings for Maximum Performance
While Steam does a pretty great job of making things effortless, there are still a few settings that are worth tweaking (or at least keeping in mind).
On the host machine: In the Settings menu (Steam > Settings), select In-Home Streaming on the left-hand side of the window. Under “Host options” click “Advanced Host Options” Here, you’ll be able to enable hardware encoding (which may be on by default) and “Prioritise network traffic”. The latter’s availability may depend on your network hardware, but if you’ve got a relatively recent router, enabling this option can help make your game streams a little less choppy.
On the client machine: Here’s where things get fun. In the same In-Home Streaming section of Settings, you have a simple radio button under “Client options” that allow you to choose between Fast, Balanced or Beautiful. They’re pretty self-explanatory and don’t require a lot of technical tweaking.
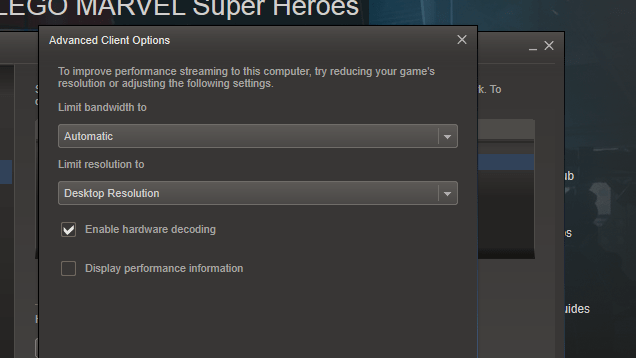
However, click the Advanced Client Options button and you can get some more fine-grained control. Your first option is “Limit bandwidth to”. This is set to Automatic by default. The manual options range from 3Mbit/s to 30Mbit/s, or Unlimited. If you have either a Wireless N or Wireless AC router, you can probably go as high as you need to without disrupting other network traffic. If you find your game is streaming at a slow rate, try manually turning up the bandwidth limit.
Alternatively, if your game is lagging and you don’t think bandwidth is the problem (say, you’re on a Wireless AC connection with no other users), you can try limiting the game resolution. In the second drop down box, you can choose 1080p, 720p or 480p as a hard limit for your host machine to stream. Obviously a lower resolution won’t look as good, but you can get a higher frame rate, which can mean the difference between victory and defeat in many games.
You can also select “Display performance information” in the client options dialog. This will add a small indicator in the lower left corner of your screen with the current streaming resolution and framerate.
In-Home Streaming has been in beta for several months and so far it seems like it’s paid off. The feature works relatively painlessly right out of the box with little setup. If you want to tweak your options though, you still have a few buttons and knobs to fiddle with.
Comments
6 responses to “How To Setup Steam In-Home Streaming And Fix Its Quirks”
Are you sure about the part about having to install the beta client? We were playing around with it last night and I don’t remember having to do that. Having the latest Steam client update seemed to be enough.
We were pretty impressed with it, though there were some hiccups. We had some issues with the screen resolution on Wolfenstein, and the frame rate wasn’t awesome on any of the games we tried (we were getting about 30-50 FPS on Darksiders 2, playing locally is usually 100+). Still, it’s a great concept and hopefully they’ll continue to work on improving it.
Ive also got some non-steam games to work, most notibly Titanfall.
To do this
1. Add titanfall.exe to your Steam library.
2. Configure Origin to exit automatically after closing an Origin game (Application Settings -> Advanced->Tick the box under “Automatic Exit”)
3. Close the Origin program completely. Do not merely minimize it.
This should allow steam to run Titanfall.
The only thing that is wrong with Steam IHS is that locks certain games to 30 fps for no reason.
Titanfall, for example, will run at 60fps for around 2 minutes then lock to 30fps.
Annoying, but hopefully something a patch would fix.
Other than that, its a pretty no nonsense streaming client 😀
For those using nVidia cards on their gaming PC, I found upgrading to the latest beta drivers made a significant improvement streaming some of my games (Tomb Raider and NBA2K13 as some examples).
Overall I really like the streaming process. I still have some streaming issues over my gig network but I think my gaming machine is probably due for an upgrade. But most games that I’ve tested so far have been great. Hopefully the streaming will improve with further updates over time.
Wonder how well it’ll work streaming to my Surface Pro 2. Be fun chilling on couch with a controller streaming from my main PC
I’m going to try this out on my Surface Pro (Original) after work as I was wondering the same. I got myself a Mini Display Port to HDMI adapter specifically for streaming video directly to the big TV in the lounge so this would be interesting to see with actual gaming.
What sort of hardware limits are there on the client-side rig? I’ve got a HTPC setup running an old Athlon II with onboard video, is this likely to be a sufficient decoder?