
Spreadsheets can seem like one of the most mystifying pieces of software you’ll encounter in your adult life. However, as scary as they can be, you can do an awful lot with just four simple skills.
For the purposes of this article, we’ll be focusing on Microsoft Excel, since this is the most widely-used spreadsheet software. However, nearly all of these skills and features are useful in LibreOffice and Google Drive. We’ll make notes when necessary to highlight the differences between the suites.
Input Data Easily With Forms
Entering data into a spreadsheet is the starting point for any analysis. While you can type the data you need in manually, forms allow you (or in some cases, others) to quickly enter information line-by-line without much of a fuss.
The Form button has been somewhat buried in Excel 2013, but you can get it back:
- Right-click anywhere on the ribbon interface, and select “Customize the Ribbon”.
- In the right-hand pane, choose a section of the Ribbon to add the Forms button to.
- On the left-hand side, choose “Commands Not in the Ribbon” from the drop down.
- In the box below, select “Form…” from the list and click “Add” to place it in the ribbon.
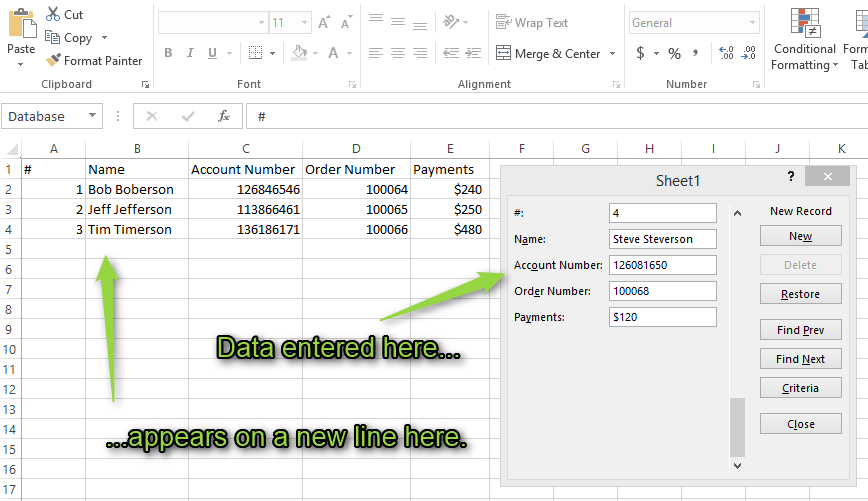
Now that you have the Form button in your ribbon, you can create a data entry form. Start by creating the headers and first row of entries. Once you have your initial set of data in, you can enter in additional rows with the form command. Simply place your cursor in the top-left corner of your data set and click the form button.
The dialog that will appear allows you to enter information on a per-line basis. Fill out the form, press enter and a new line will be created with all the new information.
Create Public-Facing Forms with Google Drive
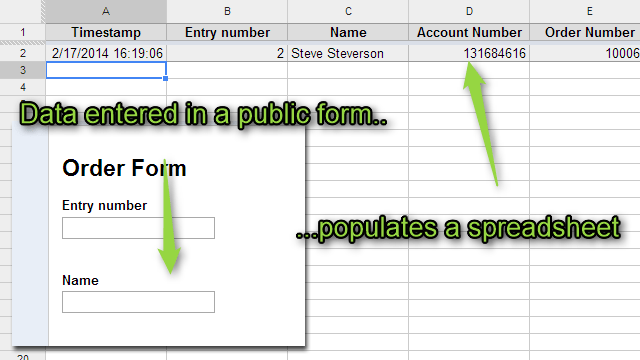
Google Drive doesn’t have quite the same functionality, but it does have its own forms worth noting. You can create a form either directly in Drive or from within a spreadsheet. You’ll create questions for users to answer and their responses will populate a sheet. To create a form:
- From within a spreadsheet, click Insert > Form.
- Enter a description at the top of the form.
-
Enter and modify each question:
- Enter a title in the “Question title” box.
- Choose the Question Type.
- Optional: Choose a form of data validation. You can use this to confirm that data entered adheres to a specific type, such as a number within a set range, or text in the form of an email address.
- Optional: Select “Required question”.
Once the form is completed, you can share it publicly or email it to a select group of respondents. All entries will be automatically placed into columns alongside a timestamp indicating when the data was submitted.
Perform Calculations with Functions and Formulas
So you’ve entered a bunch of data, but now you need to do something with it. Functions and formulas allow you to manipulate data in a spreadsheet. You can perform simple maths, like add up the numbers in a column, get an average, or even work with real-world things like dates or financial calculations.
The various spreadsheet programs all have their own set of functions, and while many of them are shared between the different suites, there are some differences, so be sure to check out the full list for Excel, LibreOffice and Google Drive.
With that in mind, here are a few examples of what you can do.
Perform Basic Maths
At their simplest, functions can perform basic maths using any data you’ve entered. For example, say you need to add the numbers in two cells together. For that, you’d use the SUM function:
=SUM(A1,B1)
This will add the contents of cells A1 and B1 together. For simple maths, you can also use typical shorthand maths operators like +, -, * and /. For instance, the following will perform the exact same maths as the example above:
=A1+B1
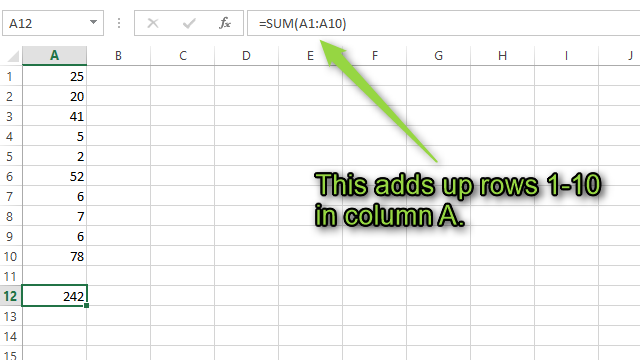
You can add up the values in as many cells as you want. You can do this with a colon, like so:
=SUM(A1:A10)
The above function will add together all of the numbers in column A between rows 1 and 10, accounting for negative values. You can find a list of all the maths functions Excel can perform here.
Make Statistical Calculations
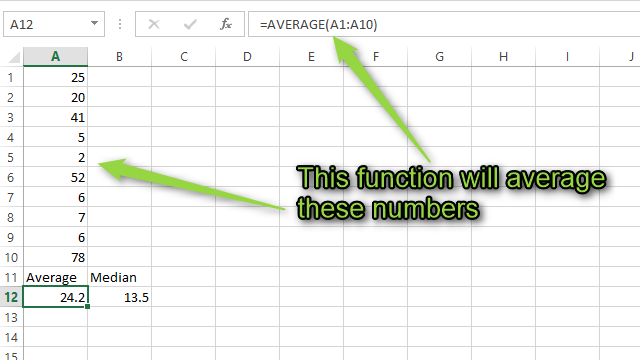
You can also perform statistical calculations on a set of data, including calculating averages medians. As an example:
=AVERAGE(A1:A10)
The above function will return the average of all cells between A1 and A10. The various functions include both basic and advanced statistics functions. While not all of them will be useful for the casual spreadsheet enthusiast (yes, we exist), simple functions like AVERAGE and MEDIAN can be really helpful in everyday work.
Format and Calculate Dates and Times
You can also use formulas to manipulate date and time formatted entries. As an example, you can calculate the number of days between two dates with the following function:
=DAYS([End_date],[Start_date])
Excel also includes a function to return the current date:
=TODAY()
This function will put today’s date in a cell. You can combine these two functions to create a formula to find out how many days are left until a certain date in the future like so:
=DAYS(TODAY(),[Target_date])
There are a number of other date and time functions you can look over here.
Combine Multiple Functions to Create Formulas
As you might have noticed in the last example, you can combine multiple functions to create what’s known as a formula. Formulas are, essentially, multiple functions put together in one cell. So, for example, if you wanted to add up the numbers in column A and round them to the nearest whole number, you would use the following formula:
=ROUND((SUM(A1:A10)),0)
The above formula is made up of two functions: SUM which is being used as an argument for ROUND. In this statement, cells A1 through A10 will be added together first and then the resulting number will be given to the ROUND function to be rounded to the nearest whole number. Formulas can be as simple or as complex as you’d like, though the more elaborate they get, the more intricate their syntax gets. You can read more about how formula syntax works here.
Functions can also be combined with logical functions to create conditional formulas. Building useful formulas is a topic so broad that it could generate its own entire set of articles. Fortunately, our friends at the How-To Geek has an in-depth set of articles on that very subject. You can find the first lesson here.
Sort Data with Filters and Pivot Tables
So you’ve entered your raw data, made any calculations you need to make, and now it’s time to actually interpret it. You have a few options for visualising your data, depending on how you need to use it.
Sort by Column
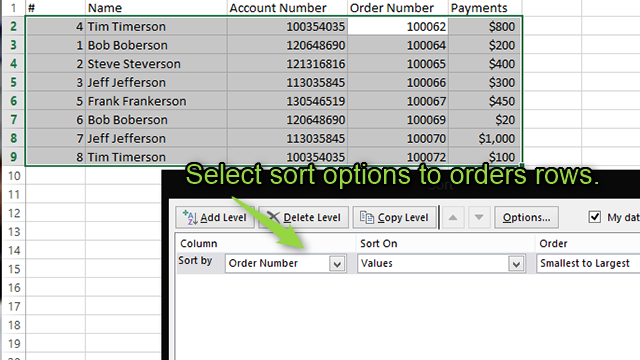
Sometimes, you may need to sort your data by one of the categories you’ve entered. Just like your iTunes music library, you can re-order your data by column. To do so:
- Press Ctrl-A to select everything in the sheet.
- Select the Data tab in the Ribbon.
- Click “Sort”
- Choose the Column you want to sort by and what criteria you want to sort with.
- Click OK.
See the above screenshot for example — we’ve reordered the entire data set by order number, from least to greatest.
Filter Out Duplicate Items
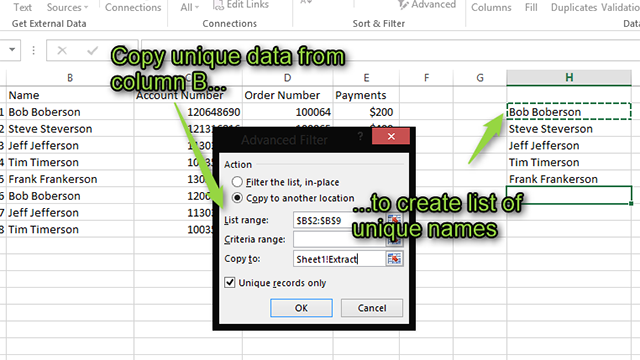
Other times, you may have some duplicate items within a category. In the example above, we have eight entries but only five names. To filter out those duplicates and see all the names we have (as opposed to all the orders), we can use the filtering options under the Data tab in the ribbon. To do so:
- Under Data, click “Advanced” in the Sort & Filter section.
- Select “Copy to another location” for a non-destructive way to pull out specific data (if you want to delete any rows in your spreadsheet that do not have unique data in this column, leave “filter the list, in place” selected.)
- Click the “List range” box and select the column you want to filter.
- Click the “Copy to” box and select the empty cell you want to copy your list of unique data to.
- Ensure “Unique data only” is selected.
- Click OK
This will create a new column that only contains unique data from that range, which is useful for separating out repeated entries.
Create Pivot Tables
When you have hundreds of lines of data, it’s nearly impossible to glean any information from it — you need a summary. Pivot tables let you take certain portions of your data and summarise it, so you only see what you want to see.
Take the example below. Say we wanted to see the total amount of money we got from Bob Boberson.
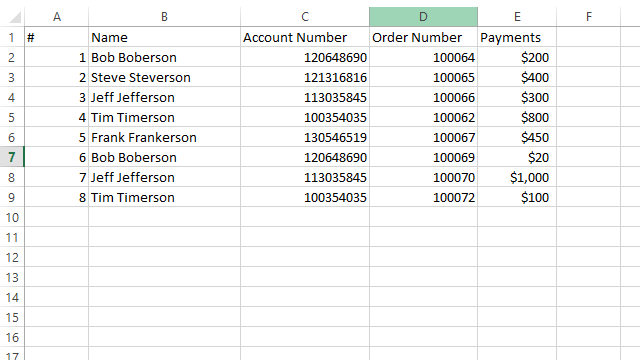
This data is easy enough to look at now, but with dozens or hundreds of transactions, it wouldn’t be. So, to see that summary, create a pivot table:
- Create a new sheet, named Sheet 2.
- Under the Insert tab, click Pivot Table.
- Click Sheet 1 and select all populated cells in the sheet.
- Click OK.
- In the right-hand pane, you will be able to drag columns into filtered, column, or rows. For this example, drag “Name” to the Filters section, “Order number” to the Rows section and “Payments” to the Values section.
- This will create a table of all the payments made on each order number. At the top of the pivot table, in the dropdown box, you can select a specific customer to view only their orders.
When we do so, we get this:
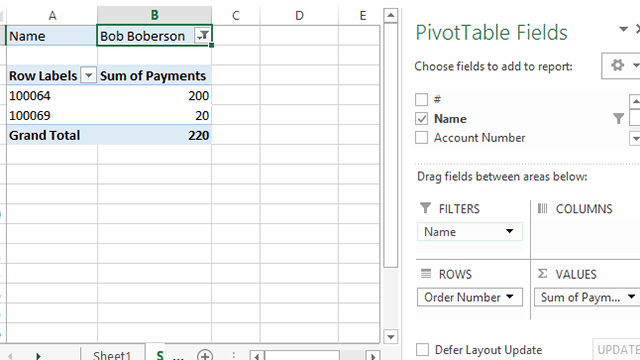
With a pivot table, we can easily see all the orders made by Bob Boberson as well as a sum of all the payments he made.
This is just one simple example of how you could use pivot tables — their usage is very broad, and you can use it to summarize just about anything. To create a pivot table in LibreOffice or Google Drive, Head to Data > Pivot Table.
Perform Repetitive Tasks with Macros and Scripts
Working with spreadsheets can get repetitive really quickly. To make some of those repetitive tasks simpler, you can use Excel to record things you do over and over into a macro. Then, any time you need to repeat those tasks, you can use a keyboard shortcut to “play back” the macro and it will do all the busywork for you. For example, say we wanted to change the font of a large group of cells to something very specific, like Arial 12 italicised:
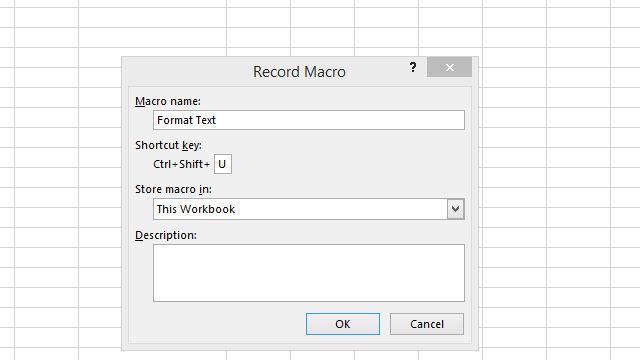
- Under the View tab, click the Macros drop down and select Record Macro.
- Give the macro a name.
- Optional: Assign the macro a keyboard shortcut.
- Click OK
- Click the Home tab.
- Select “Arial” from the font drop down.
- Select 12 from the size drop down.
- Click the italics button.
- Click the Stop button in the bottom-left corner of Excel.
From then on, you will be able to apply the Arial font in a 12pt size with italics by pressing one single keyboard shortcut (the one you assigned in step 3), or by selecting the macro from the View > Macro Library. Obviously, this is a rudimentary example, but you can use the macro feature to record any repetitious tasks. You can similarly record macros in LibreOffice.
In Excel, LibreOffice, and Google Drive, you can create more complex macros and scripts with a little bit of programming savvy (and in fact scripts are the only way to automate tasks in Google Drive using a proprietary scripting format). To get started learning about these, check out the resources below:
- Excel: Work with macros
- LibreOffice: Getting started with macros
- Google Drive: Overview of Google Apps Script
Further Resources
All of these skills are just the tip of the iceberg. Using spreadsheets is a discipline in itself and you can dive much, much deeper into each of these categories if you want. For convenience, here are some resources you can use to learn more about all of these skills and hone your craft:
Forms and Data Entry
Functions and Formulas
How-To Geek School:
- Why Do You Need Formulas and Functions?
- Defining and Creating a Formula
- Relative and Absolute Cell Reference, and Formatting
- Useful Functions You Should Get to Know
- Lookups, Charts, Statistics and Pivot Tables
Filtering and Pivot Tables
- Filtering data in Excel
- Filter data in a range or table (Excel)
- PivotTable reports 101 (Excel)
- Pivot Table (LibreOffice)
- Overview of pivot table reports (Google Drive)
Macros and Scripts
Comments
9 responses to “Excell Masterclass: Four Skills Everyone Should Know”
If “Sum” and “Average” formulas make you a spreadsheet ninja we need some new definition of expertise.
I just figured that I must be a Spreadsheet Demi-God cause not only do I use Sum and Average I also use VLookup!!!
I remember reading an anecdote about an IT manager back in the day who used to test potential hires on being able to write out a complex VLookup on paper and have it work.
Do yourself a favor and avoid vlookup – it can be very buggy if not done exactly right. I prefer sumifs, sumproduct or even index/match.
Sumproduct is without a doubt the sexiest Excel function. Ever.
Index/match is the only way to go. Vlookup will screw you when you least expect it.
Since it seems that “above average skills with MS Office” is a euphemism for “can type” in job ads, then “expertise” is a rather bedraggled concept.
I reviewed the resumes of some staff reporting to me, and found them wildly overblown in descriptions of their spreadsheet/wp skills. I think the best that could be said of them is “on a good day can locate icon for app and double-click it”.
Recording macros in Excel is a great way to get exposed to Visual Basic for Applications code, and in simple cases like the one above will be fine. It should be noted, however, that recording macros can produce unexpected results because the recording will capture all aspects of the user’s actions.
For example, if you record a macro to set the Page Layout to A4 Landscape, you might find it also records other information about margins, zooming, headers/footers etc which would also be applied the next time the macro is used. This may or may not be desirable, but it means that recorded macros in particular should be checked and tested before being used in production (just as with any other code).
Those skills don’t make you a ninja, they make you proficient.