If you want to squeeze every last ounce of processing power out of your new computer or ageing system, overclocking is a great — if slightly nerve-racking — option. Here are some simple guidelines for safely overclocking your processor.
Title image remixed from blazor85.
Simply put, overclocking your processor (or CPU) involves running your processor at a faster speed than was intended out of the box. While overclocking, at its core (no pun intended), can be quite simple, there’s a bit more to it than just tweaking one setting. The harder you push your processor, the more voltage you need to give it, because without enough power, the CPU can’t run fast enough. However, higher voltage also means higher temperatures, so you need to be careful not to overheat your CPU, which can lower its life, not to mention fry it completely if you aren’t careful.
Before You Start: Read This First!
We originally published this guide back in 2010, but overclocking has changed quite a bit since then. In fact, it changes with every new processor generation, so we’ve tried to make this guide more of an “introduction” to overclocking rather than a one-size-fits-all how-to. I wrote this guide from my experience, but I had a lot of help from sites like overclockers.com, overclock.net, and hexus.net, to name a few. The general steps — especially the stress-testing ones — should be similar between machines, but this should not be the only overclocking guide you read. I highly recommend you also look up some guides for your specific processor, and searching online for more information on subjects you don’t understand or that we don’t cover in depth. All that said, this guide should put the process into simple enough terms that those unfamiliar with overclocking can get a general feel of what it entails and how to get started overclocking their systems.
Lastly, remember that no two systems will overclock the same — even if they have the exact same hardware. Every unit of every processor is different, and my i7-4770K may not overclock as highly as your i7-4770K, and vice versa, even with all other things held constant. So while it’s useful to see what kinds of clock speeds other people are achieving, don’t expect that you’ll be able to do the same. You should go through the full process like everyone else, or you’re going to have a bad time.
Why Overclock?
There are any number of reasons you might want to overclock, but in general, you’ll get the most benefit if you’re using your computer for more CPU-intensive tasks, such as video encoding, 3D rendering, or (sometimes) gaming. (Note that overclocking your video card is probably more beneficial to gaming performance than overclocking your processor, though it depends on your system.) Of course, many overclockers simply enjoy the thrill of playing around with their systems and pushing it to the limit, so if that’s reason enough for you, then go for it. Know, however, that overclocking can be dangerous, and can shorten the life of or permanently damage some of your components if something goes wrong, so don’t start tweaking unless you’re prepared to face the potential consequences. And, as always, back up before you start messing with fire.
Note: I’m being particularly doomsday here to emphasise that things could go wrong. If done correctly, overclocking is generally a pretty safe endeavour (I’ve never damaged my gear), but if you’re not willing to risk damaging your processor, you may want to skip it.
Glossary
While this is not an exhaustive list, these are the settings we’ll be tweaking in this guide. The jargon related to your clock speed is as follows:
- The Base Clock affects your CPU frequency, RAM frequency and other things. We won’t be tweaking it in this guide, but we’ll be using it to calculate our final clock speed.
- Coupled with the base clock, your CPU multiplier decides your final CPU frequency. It works like this: if your base clock is, say, 100 MHz and your multiplier is 35, your CPU frequency will be 100 MHz x 35 = 3.5 GHz.
- CPU Vcore is the main voltage value we’ll be tweaking. As you increase your clock speed, you will likely have to raise your Vcore to supply your processor with enough power.
That’s it for today. There are a lot of other settings we could talk about, but this is a “beginner’s” guide after all, so we’re going to try and keep things as simple as possible.
What You’ll Need
- A Windows machine. This guide is for Windows, though if you have a Hackintosh or a Linux machine with a Windows partition, that should do fine — we’re just going to do our stability testing in Windows.
- An unlocked, “K” series Intel processor. This guide was written with Intel’s more recent processors in mind, particularly the “K” series processors designed for overclocking. They’ll have a K in their model name (e.g. i7-4770K). This includes processors from Sandy Bridge, Ivy Bridge and Haswell. If you have a first-gen Core i series processor, overclocking is a bit more complicated, but this guide should get you started. You can overclock other processors too (such as Intel’s low-powered Atom), but for this guide we’ll be focusing on these. AMD users can probably follow many of the steps, but you may have to look up some additional information on your processor’s settings first.
- An overclocking-friendly motherboard. Lots of motherboards should have overclocking settings built-in, but some motherboards have more settings than others, or are better suited for overclocking. If you’re building a computer with the intent to overclock, you should read up on your motherboard’s overclocking features before you buy.
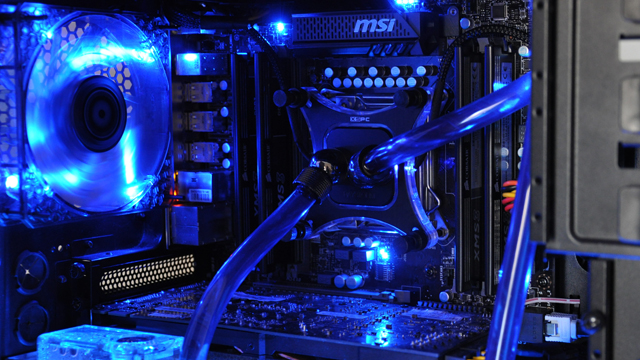
- A good CPU cooler. If you plan on overclocking more than just a little bit, you’ll want to get something other than the stock Intel heatsink and fan. A good air cooler will take you far, but for more extreme overclocking (and silence), you may want to look into water cooling if you have the time and money to put into it. Ask around, read at reviews, and think about your overclocking goals to decide what kind of cooling you want.
- CPU-Z. This is a handy little program that shows you the values of your clock speed, voltage, and so on once you’ve booted into Windows, so it’s a handy way to see whether your settings are working correctly.
- Prime95, LinX, and/or AIDA64. You’ll need one or all of these programs to stress test your CPU and ensure that it’s stable. They will push your chip to the max, so you can see if your computer crashes or gets too hot. There’s a lot of debate over which is the better stress tester, but we won’t get into that here — honestly, I believe in using some combination of the three, and will note how I use them in the guide.
- Previously mentionedRealTemp. This program will help you monitor your CPU temperature as you run your stress test, so you know if your CPU is getting too hot.
How To Overclock Your CPU
Here I will outline the basic steps to getting a stable overclock on your system. Keep in mind this is a very basic guide, and while it should net you a fairly solid overclock, it will not help you push your computer to the ultra-max. There are a lot of different settings we could play with, but for today we’re just going to explain how the basic process works.
This particular process is longer than what many guides suggest, but I’ve found that it’s much easier to get everything stable if you only change one thing at a time, rather than setting your clock speed and guessing which voltages you need to raise. This process is time-consuming, so find something to do while you test, because you’ll be doing a lot of restarting and waiting around.
Every motherboard’s BIOS is a bit different, so you may have to explore your own to familiarise yourself with the settings and where they are. For this guide, I used an MSI X79A-GD45 motherboard with an Ivy Bridge-E i7-4930K. The general principles should apply to anything Sandy Bridge and above, though every processor is a little different, so as I said earlier: definitely do some extra reading on your particular processor, its temperature and voltage limits, and any other idiosyncrasies it may have.
Step 1: Stress-Test Your Default Settings
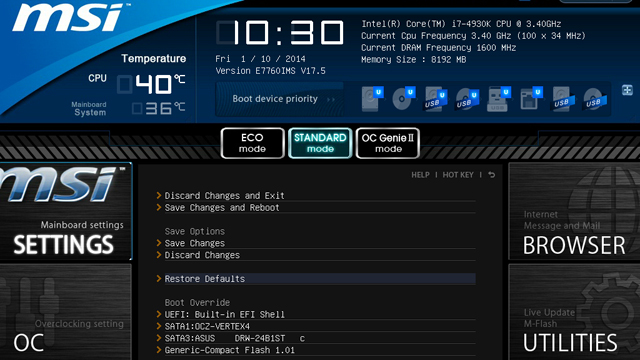
In general, the first thing you should do is head into your BIOS, set everything to default, and stress test it a bit to make sure it’s at least running correctly at stock speeds. To enter your BIOS:
- Reboot your computer, and as it starts up hold down the Delete key (or whatever key your computer tells you to press for “Setup” — sometimes it’s the F2 key or something else).
- Find the “Load Optimized Defaults” button (or something similarly named) and select it to restore your default settings. For me, this setting was under the “Save & Exit” menu in my motherboard’s main settings.
- Choose “Save Changes and Reboot” or your similarly named setting.
Once you’ve rebooted, start up AIDA64, and click the “Stability System Test” button (the one that looks like a computer monitor with a green graph on it). Check all the boxes in the upper left-hand corner and start the test. Let it run for a few hours on its own to ensure your system is stable as-is. When you’re done, click Stop, and move onto step two.
Step 2: Raise Your Multiplier
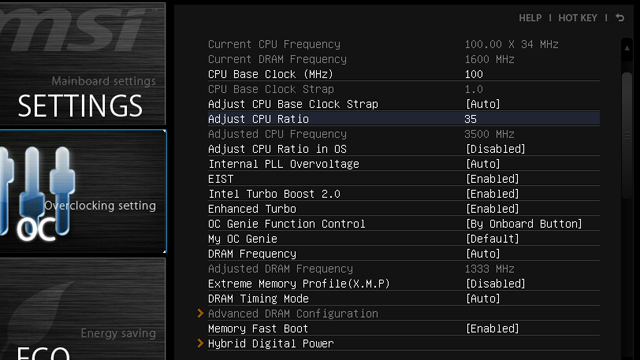
Now it’s time to start overclocking. You can Google around and see what kind of settings other people have gotten, but I still recommend starting at your base clock speed and gradually ramping up — it takes a little longer, but it’s much easier to do and ensures you get the best stable overclock by the end of the process.
So, boot back into your BIOS and head to its overclocking settings (they may be called “Overclocking Settings”, or they may be called the “CPU Tweaker” or something like that).
Find the setting called CPU Ratio, or something similar. Right now, it’s probably set to “Auto”. Highlight it and change it to one step above the default (either by pressing Enter or typing in a number, depending on your BIOS). If you aren’t sure what your default is, it’s usually listed at the top of that Overclocking Settings page. For example, my CPU comes stock with a multiplier of 34 for a 3.4 GHz clock speed, so I set mine to 35 for the first step.
Once you’ve done that, reboot your computer back into Windows and head to the next step.
Step 3: Stress-Test Your CPU
Now that you’ve overclocked your CPU (albeit a very tiny bit), it’s time to run a stress test and see if your current setup is stable.
Reboot into Windows. To stress test, you’ll want to start up three programs:
- CPU-Z, to see if all your settings have properly applied themselves (particularly the max multiplier in the bottom left-hand corner).
- Real Temp, to monitor your temperatures while you stress test. You’ll want to keep an especially close eye on these the more you raise your voltages.
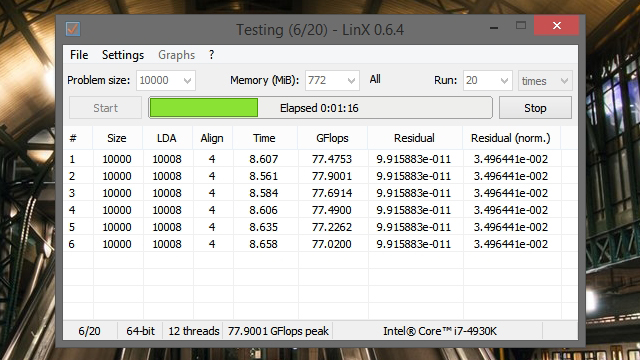
- Your stress testing program. In the early stages of stress testing, I like to use LinX, since it doesn’t take very long and gives you kind of a “quick and dirty” stress test. We’ll take a look at the other two a bit later.
Set LinX to run 20 times and click “Start”. Monitor your temperatures while it runs its stress tests — you should see them jump up and down.
Your test will finish in one of three ways:
- The test finishes successfully, within safe temperatures. If this happens, repeat step two and raise your multiplier another notch.
- The test reports an error halfway through, or your computer crashes to the Blue Screen of Death (BSOD). This means your voltage isn’t high enough. Proceed to step four.
- Your temperatures reach unsafe levels. My upper limit is usually about 85C, because that’s what I’m comfortable with. Your limit may be different depending on your processor’s limts (Google is your friend) and how conservative you want to be. Remember, the higher your temperatures and voltage, the more you may decrease your processor’s lifespan. When this happens, skip down to step six.
Step 4: Increase Your Voltage
If your stress test failed or BSOD’d on you, don’t worry! It probably means your processor just isn’t getting enough voltage to keep a stable clock speed. So if that happens, just raise the voltage.
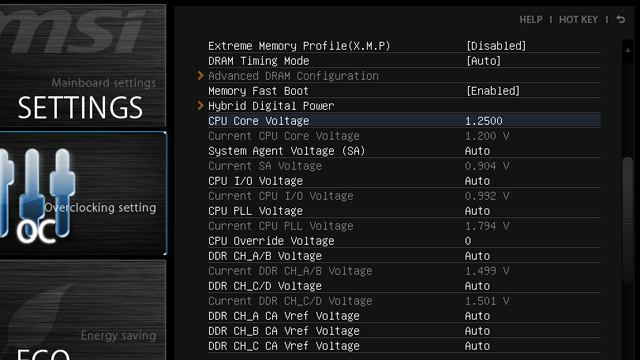
Head back into your BIOS’ overclocking settings, as we did in step two, and find your “CPU Core” or “Vcore” value. Raise it a little bit from its current value. I usually raise in increments of 0.05 (such as from 1.2000, my CPU’s default value, to 1.2500).
When you’ve finished, save your changes and reboot your computer. Then, repeat step three. Remember, the higher you raise your voltages, the higher your temperatures will get, so keep a close eye on them!
Step 5: Rinse and Repeat
Now, repeat this process (steps two through four, as governed in step three) until you reach your maximum safe temperature or your maximum safe voltage (again, Google your specific CPU for more information). When you reach this point, back your settings down to the last safe and stable value. I got my multiplier up to about 43 before my temperatures reached my limit, so 4.3 GHz was my final overclock.
Once you’ve done that, save your settings and reboot into Windows for some final stress testing.
Step 6: Perform Some Final Stress Tests
LinX is a good stress tester, but I prefer to run a number of suites to make sure my overclock is super-stable. People are always arguing over which stress testing suite is the “best”, and using a few of them negates the need for such arguments. So, to start, I recommend running Prime95 for a few hours.
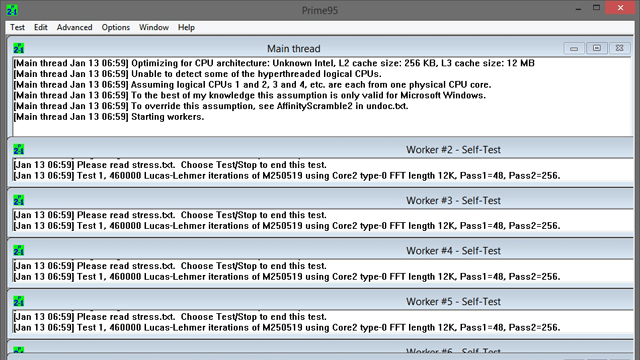
To use Prime95: Start up Prime95 and select “Just Stress Testing” if prompted. If the Torture Test window doesn’t automatically come up, go to Options > Torture Test and set it to do a Small FFT test. Hit OK and let it run for about six hours — I generally consider that a good amount of time. Some people like to let it run for 12 hours to be extra safe.
Prime95 is great for testing the maximum temperature of your overclock, and may even push it farther than LinX — so keep an eye on your temperatures. If they exceed your maximum safe value, you may want to back down your overclock another notch. You’ll rarely see temperatures this high in real life, so if they’re borderline you’re probably OK — but better safe than sorry, I always say.
When you’re done with Prime95, I’d also run AIDA64 for a while.
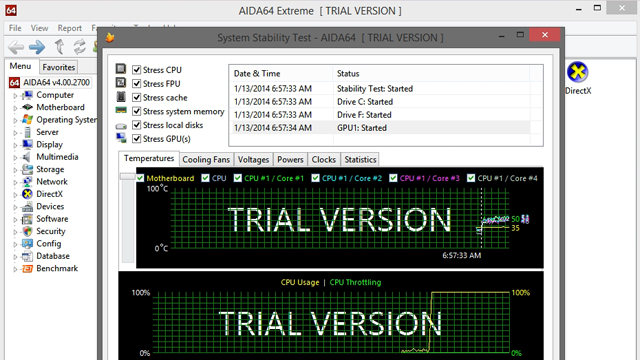
To use AIDA64: Start the program and click the “Stability System Test” button (the one that looks like a computer monitor with a green graph on it). Check all the boxes in the upper left-hand corner, then click the Start button to start the test. Like Prime95, run it for about six hours to ensure stability (or more if you want).
AIDA64 is special because it not only pushes your CPU up to 100 per cent, but it also tests other instruction sets and components of the CPU to ensure everything is very stable.
Lastly, it I like to test it in more practical situations as well, just to make sure — that is, if you’re a gamer, play a little Battlefield 4; if do a lot of video conversion, throw a Blu-Ray at Handbrake and see how it runs. If everything checks out, then congratulations! You have successfully overclocked your system.
Next Steps
As we said, this is a very basic introduction to overclocking for beginners. Beyond this, there’s a lot more you can do. If you’re happy with your overclock, then good! You don’t really need to go further, However, here are a few things we’d recommend checking out if you want to dig a little deeper:
- Enable power-saving features: Once you’ve overclocked, your processor will likely stay at that speed all the time, constantly drawing extra power from your computer. Luckily, your motherboard probably has some built-in power-saving features, like Intel’s C-states or Speedstep. Once you’re done overclocking, you can re-enable these, which will cause your CPU to “drop down” to slower speeds and smaller voltages when it’s idle. However: you may need to play around with the settings on your individual motherboard. For example, on my MSI motherboard, I had to use the per-core overclocking setting in “CPU Features” in order for this to work (see below) — just setting the multiplier in the main settings wouldn’t let me re-enable C-States. Other motherboards may require you to use something called “Adaptive Mode” for your voltages. Do some research on your specific board if you want to re-enable these power saving settings.
- Clock your RAM: When you first build your computer, your RAM doesn’t default to running at its rated speed. In fact, it’s probably running at a slower speed. If you want it to run faster (which doesn’t make a difference in most applications, but can in virtual machines or some more recent games), you can set your RAM speed and voltage in the BIOS according to its specs. You may want to run a Prime95 Blend test (instead of Small FFT) afterwards to ensure it’s stable, or perhaps a few runs of Memtest86.
- Enable per-core overclocking: most modern CPUs also allow for per-core overclocking, allowing you to get even higher clocks when your computer is only using one or two cores. This guide is a pretty good introduction to the subject.
- Lots, lots more: There’s a whole lot more to overclocking if you really want to push your CPU to the limit, but we won’t cover it here. If you want to take it even further, search around for more advanced guides on the web and you’ll find a lot to get you started beyond the basics.
There’s plenty more to overclocking, but this guide should be enough to keep any beginner busy for a while. Remember to do some outside reading; the sites mentioned at the beginning of this article have a lot of information contained within. The more you read, the easier the process is going to be (and the more effective your overclocking will be). Good luck!
Comments
One response to “A Beginner’s Introduction To Overclocking Your Intel Processor”
I remember my very first overclock on my 486 a DX66. It pretty much went like this;
“Oh I didn’t know CPU’s came with lights?”…”no wait”…”oh it burns it burns”. I learnt a lot that day.