Between constant password breaches and government agencies trying to look in on everything you do, your privacy has probably been on your mind lately. If you’re looking for a little personal privacy in your communications with friends and loved ones, or you just want to trust that the documents you email to your accountant aren’t being intercepted and read, you’ll need to encrypt those messages. Thankfully, it’s easy to do. Here’s how.
Why You Should Encrypt Your Email
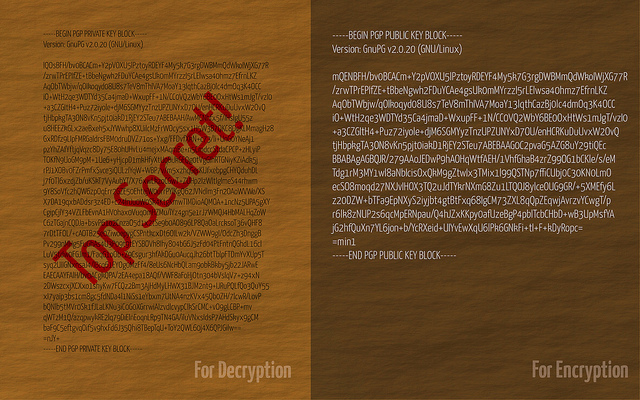
While government spying is on everyone’s mind right now, it’s really just the most recent security distraction to make headlines. Before everyone was angry at the NSA, we were angry at corporate snooping, employers reading personal emails, identity thieves and hackers. While encrypting your email may or may not protect you from a major government or someone with lots of time, it can definitely keep your data safe from people looking to hijack your accounts, reset passwords and then log in as you, steal financial data or comb through your contacts looking for useful information about you for spear-phishing attacks.
In this post, we’ll walk you through how to encrypt your email using desktop clients, including Thunderbird and Postbox, and how to encrypt almost any webmail provider you use, such as Gmail, Outlook, Google Apps and Yahoo. All you need is a few downloads and a little setup time. Of course, you’ll also need friends who also use PGP, since you’ll have to exchange public keys with them to make sure they can read your messages.
We’ve explainedseveral times why your privacy is important, and even if you’re not concerned with government spying, there are several good reasons to make sure you encrypt your sensitive communications.
We can hear you now. You may be wondering why you should bother. “Privacy is dead!” “They’re collecting all your data anyway.” “Using stuff like this makes you more likely to be targeted.” While big government agencies and companies looking to sell you advertising are the first things that come to mind when most people think of internet privacy, they’re by no means the only parties interested in your personal data, and you shouldn’t behave like they are. It’s the more mundane threats and issues that are likely to ruin your day.
Bank statements, contracts, confidentiality agreements or non-disclosure forms, job offers, financial records, medical histories, lab test results; these are all just a few types of information that should — and in many cases are legally required — to stay private. Beyond that, the argument that using security tools somehow invites scrutiny plays to people’s fears and encourages them to do nothing. It’s not the government or a big tech company that will take advantage of that fear and complacency either, it’s the common identity thief, a spear-phisher looking for something they can use or sell, or someone sniffing packets on public Wi-Fi for the sake of curiosity.
Getting Started: How PGP Encryption Works, and What You’ll Need
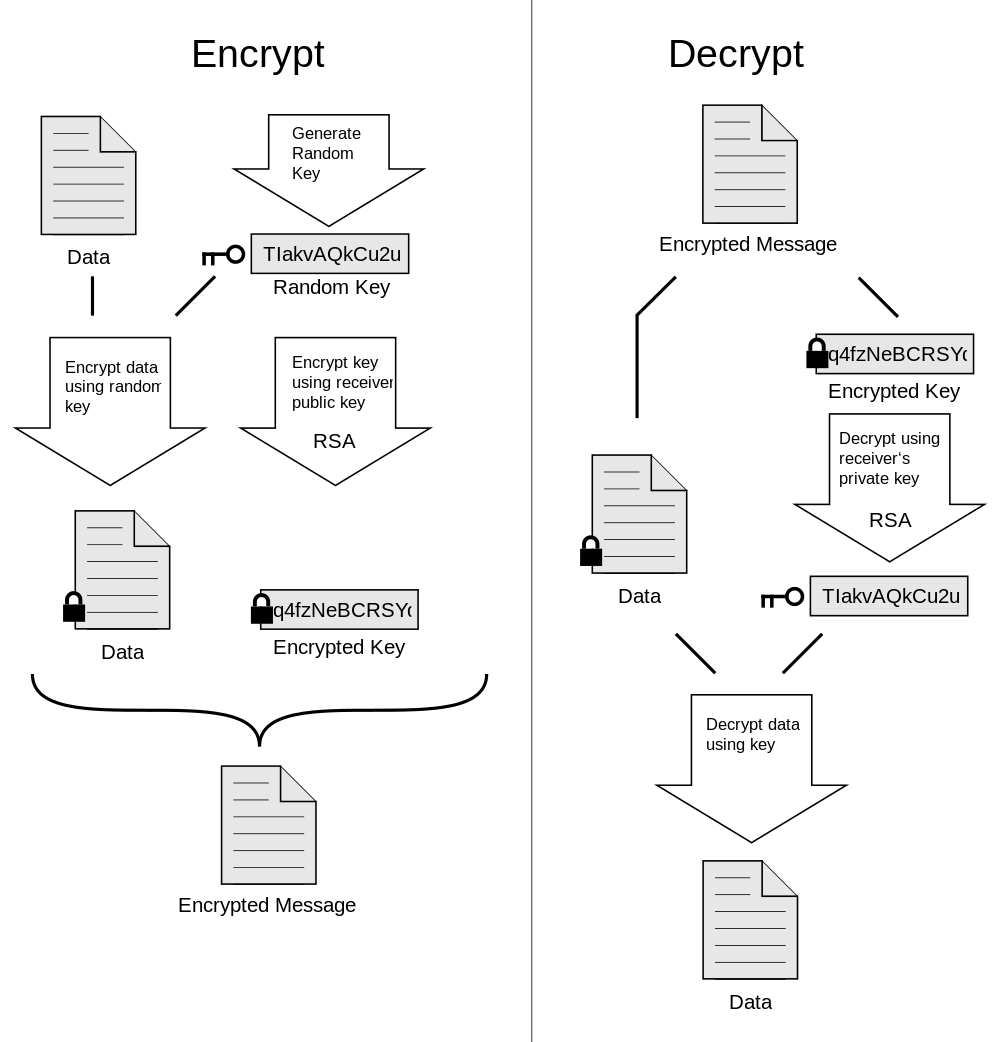
Encrypting your email may sound daunting, but it’s actually quite simple. We’re going to use something called PGP (Pretty Good Privacy, a name that’s actually a tribute to the long-running NPR radio program, A Prairie Home Companion, and not a reference to how good the privacy is) to encrypt our messages. It will make your messages look like garbled text to uninvited onlookers, like the coffee shop packet sniffer or library SSL cracker. It will also obscure credit card numbers, addresses, photos and anything else you prefer be private if you don’t already have a secure connection to your email provider.
So how does PGP work? Here’s an example:
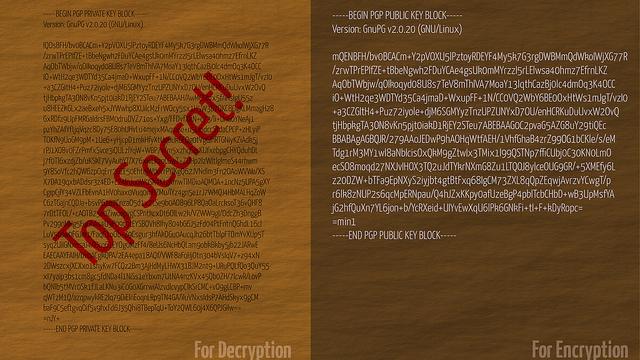
Sam wants to send Jane a secret email love letter that he doesn’t want Joe, Jane’s jealous downstairs neighbour who piggybacks her Wi-Fi, to see. Jane uses PGP, which means she has a PUBLIC key (which is basically a bunch of letters and numbers), which she’s published on her website for anyone who wants to send her encrypted email messages to use. Jane also has a PRIVATE key that no one else — including Joe the Jealous Wi-Fi Piggybacker — has.
So Sam looks up Jane’s public key. He composes his ardent profession of love, encrypts it with that public key, and sends Jane his message. In sending, copies of that message are made on Sam’s email server and Jane’s email server — but that message looks like a bunch of garbled nonsense. Joe the Jealous Wi-Fi Piggybacker shakes his fist in frustration when he sniffs Jane’s email for any hint of a chance between them. He can’t read Sam’s missive.
However, when Jane receives the message in Thunderbird, her private key decrypts it. When it does, she can read all about Sam’s true feelings in (pretty good) privacy.
Ready to get started? Here’s what you’ll need:
- GNU Privacy Guard (GnuPG), in the form of GPGTools (OS X) or Gpg4win (Windows)
- Thunderbird (Win/OS X/Linux) or Postbox (Win/OS X) for desktop email
- Enigmail, an OpenPGP add-on for Thunderbird and Postbox. You can get the Thunderbird add-on here, and the Postbox add-on here.
- Mailvelope for Chrome or Firefox, and a webmail account with Gmail, Outlook, Yahoo or GMX.
Like we said, you’ll need friends who also use PGP, and you’ll have to exchange public keys with them to make sure they can read your messages. Many people post their public keys to their personal websites or just send them as attachments to everyone they email, just so they have them. That’s the biggest drawback of using PGP encryption to secure your email. It’s only as good as the number of people using it, which is why it’s a good idea to set it up, even if you don’t encrypt everything you send.
Step 1: Install GnuPG and Enigmail to Generate Your Keys
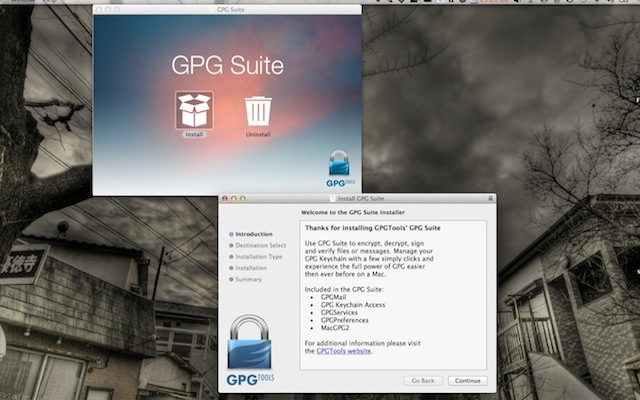
The first thing we have to do is install GNU Privacy Guard (akd GnuPG, aka GPG) and generate our public and private keypair. Remember, your public key is the one you’ll give out to people in order to exchange encrypted messages. Your private key is the one you keep close to pocket.
- Download the GPG installer for your operating system (we used GPGTools for OS X and Gpg4win in Windows) and install it. On the Mac, GPGTools will launch as soon as you finish the install. Go ahead and close it — it’s easier for us to generate our keypairs from inside Thunderbird or Postbox.
- Once you have GPG installed, it’s time to install the Enigmail extension for your desktop email client. Grab it here for Thunderbird, and here for Postbox. You may need to save the extension files to your desktop and then drag them into Thunderbird or Postbox to install them.
- Once installed, restart your mail program. You should see a new “OpenPGP” menu along with File, Edit, View and the rest. Click the OpenPGP menu and select “Key Management”.
- The OpenPGP Key Management window should appear. From here, click the “Generate” menu, and select “New Keypair”.
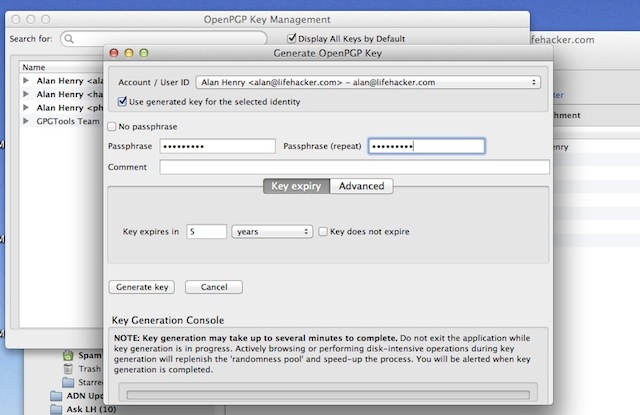
- The Generate OpenPGP Key window should appear. Select the email address you want to generate a keypair for from the drop-down menu. Type in a passphrase for your keypair — or essentially the password you’ll have to enter in order to encrypt or decrypt messages. Make sure it’s a good, strong password you’re not using somewhere else.
- Click “Generate Key”. It could take a few minutes, but to help build random data for the operation, jiggle the mouse a bit or just leave the window up while you do other things while the key generates. Every time I did it, it was a matter of seconds.
- You may be prompted to generate a revocation certificate at the end of the process. If you are, do it. That key can be used to invalidate your public key in case someone gets their hands on your private key, or if it’s ever compromised. Save it somewhere safe, preferably somewhere backed up regularly.
Once you’ve created your keypair, export it for safe keeping (also, we’ll need it again later). Here’s how:
- In Thunderbird or Postbox, click the OpenPGP menu and select “Key Management”.
- Right-click the keys you want to save and select “Export Keys to File”.
- You’ll get an alert asking if you want to include your secret key in the saved file. Click “Export Secret Keys” to include it.
- Select a safe place for your keys, and click Save.
This text file includes your public and private keys, so you need to keep it close to pocket until we’re finished here. When we are finished, you can either back it up somewhere safe, preferably somewhere your files are encrypted and regularly backed up. Alternatively, you can delete the file. You can always re-export your keys again later if you need them, and you’d never want to send someone both keys at once anyway.
If you have multiple email addresses, you don’t need to generate separate keys for each account. You can, of course, but your keys are separate from your email accounts and their providers. You can use the same public and private key for multiple addresses if you want to keep things simple.
Step 2: Configure Thunderbird or Postbox to Encrypt Your Messages
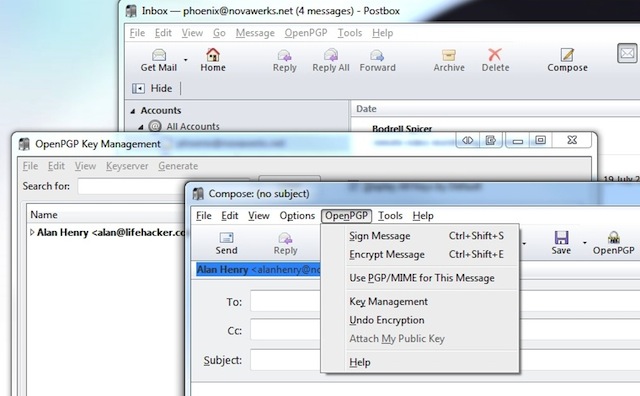
Now that we have our keys generated and configured, it’s time to put them to good use. Open a new message in Postbox or Thunderbird, and click the “OpenPGP” menu. You should see option to “Sign Message” and “Encrypt Message”. You can do either, but you should do both. In Thunderbird, you can also toggle signing and encryption using the key and pencil icons at the bottom right of the compose window.
Compose your message as normal and click send. When you do, you’ll be prompted for your passphrase. Type it in, and your email will turn into a garbled mess like the kind shown above. Whoever gets it will need your public key in order to decrypt and make sense of it.
If you have an attachment to send, as soon as you drag it into the message window you’ll get an alert asking if you’d like to just encrypt the message text and not the attachments (never do this), encrypt and sign each attachment separately and send the whole thing using inline PGP (this is the preferred method), or encrypt and sign the entire message (including attachments) and send it using PGP/MIME. We suggest using inline PGP because few mail clients truly support PGP/MIME. It’s easier on you, still gives you the security you want, and makes it easy for the person on the other end to make heads or tails of your message.
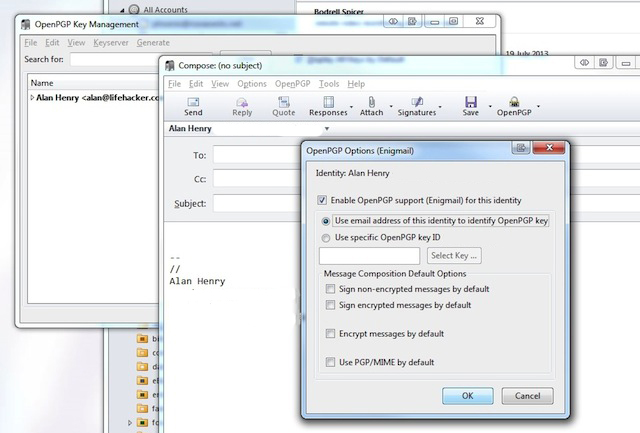
That’s all there is to it. If you’d like to use the same keypair for other email addresses in Postbox or Thunderbird, just click on the inbox for the address you want to set up, open a new message, and click the OpenPGP menu. You’ll get a warning that you haven’t configured OpenPGP for that account. Click Configure, then “Enable OpenPGP support for this identity”. From here, you can create a new keypair just for that address, or you can use a specific key you’ve already created.
Step 3: Configure Mailvelope for Your Webmail
Desktop email clients are great, and we think there are plenty of reasons to use them, but it’s no secret that many people use webmail instead. Free email providers like Gmail, Outlook, and Yahoo! Mail make it super easy to get your email anywhere you go. Traditionally that kind of convenience comes at the cost of security, but with Mailvelope, you can have both.
Mailvelope is available as an add-on for Firefox and Chrome, and you can grab it from the Chrome Web Store here or for Firefox from the project’s Github page. The Firefox version is experimental and a bit of a pain to install (instructions are at Github, and you need to know your way around Github to get it), but I found it works well. If you prefer another browser, like Opera, this hack will get it working on Opera as well.
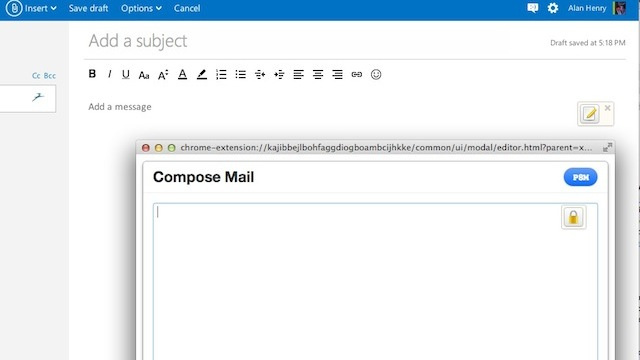
Once you have the add-on installed, here’s how to set it up:
- Open your browser’s extensions page and click to open Mailvelope’s options.
- Everything here should be blank. Note: If you don’t use a desktop client at all, you can generate your keys right here. Mailvelope supports generating keys with passphrases from the menu on the left, and exporting them for safe keeping from your key ring.
- Click “Import Keys” from the menu on the left.
- You’ll see an empty text window. Open up the text file that contains your public and private keypair in your favourite text editor (but it has to be a text editor!)
- Select all, and copy all of the text to your clipboard. Then paste everything into the text field in Mailvelope’s settings.
- Click submit. You should get two different alert boxes in green on the page that tell you both public and private keys were successfully imported to your key ring.
Your key should appear in the key ring now (and you can export it if you ever need to). One of the best things about Mailvelope is that you don’t have to set up each keypair for every address you use. Once you have a keypair added, you can use it at Gmail, Outlook, Yahoo or any other webmail client you add to the “Watch List” in Mailvelope’s preferences (like Google Apps for your domain, GMX-supported webmail services and so on). You can read more about Mailvelope’s supported services and features here.
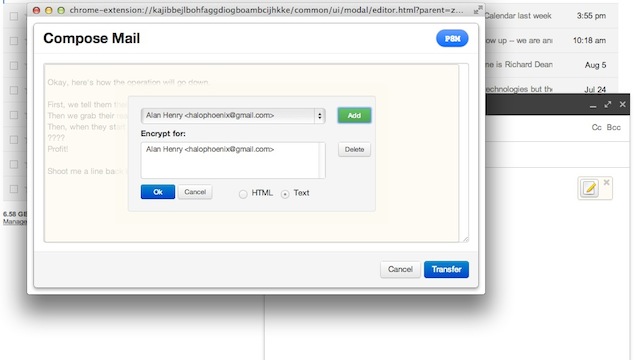
Now, the next time you fire up Gmail and click Compose, you should see a little notepad button hovering over your message compose area. Click it to bring up Mailvelope’s compose screen. Type whatever you want in that window, and then click the notepad button again. Select the keypair you want to use to encrypt the message, click Ok, and you’ll see the message in its garbled form. Click “Transfer” to drop it back in Gmail (which is the first time it’ll actually be live at Gmail — while you’re composing in Mailvelope, no drafts are stored and your text is local so Google sees nothing) and send it.
The only downside to Mailvelope is that your attachments aren’t encrypted along with your message, which is a bit of a bummer. Still, considering there are plenty of cloud services with a focus on privacy and security, we imagine you could upload your file there, grant access specifically to your recipient, and drop a URL in your message instead of a file. Then you can be safe in the knowledge that your email’s encrypted, the file is encrypted, and the only people who can access either are you and the intended recipient.
The best part of this particular setup is that you can encrypt your email using the same keypair using desktop email clients or webmail, whichever you prefer, and you can even use the same keys across mail providers. Since PGP is well known, well understood and often-used, you can also trust that your communications are reasonably secure and can stand up to scrutiny. It takes a little effort to set up, but once you’re all finished, you have the power to make sure all of your (or just your most sensitive) conversations are secure, encrypted, and safe.
Pictures: FutUndBeidl, Paul L Dineen, Mike Krüger, xaedes & jfreax & Acdx
Comments
5 responses to “How To Encrypt Your Email And Keep Your Conversations Private”
Nice article!
It is worth noting that the weakest link in the entire process is actually key exchange, which has traditionally been the challenge for asymmetric encryption. If you put your public key in a key directory, you have to trust that the key directory is not going to swap the public key for an ‘interception’ public key. Similarly, if you post it on your website, you have to trust that traffic from your website isn’t being intercepted.
These are (to varying degrees) extreme cases, but they are the weakest link in OpenPGP encryption. Exchanging keys (or key fingerprints in hardcopy) in person is the ‘safest’ way.
Three other important things:
1. No current e-mail encryption system – including OpenPGP – supports perfect forward secrecy. That is, if your key is cracked or stolen then all you messages can be decrypted with it, in contrast to protocols like SSL, OTR, and the like (which don’t apply to e-mail, so are not alternatives).
2. There are multiple types of encryption (e.g. RSA, DSA/ElGamal, various ECC). ECC is (believed to be) equally strong with a shorter key but doesn’t have very good support and so you can’t really use it at this stage.
3. You can be compelled by law to provide your encryption keys, and failing to do so carries a gaol term.
Up-voted for using gaol instead of jail.
Thanks for the article.
Please add instructions for what optional components to choose when installing Gpg4win, eg Kleopatra, GNU privacy assistant and GpgEx. It’s not obvious what is needed and what isn’t.
Although this can be used to encrypt the contents of email it (currently) requires too much effort/knowledge on the part of the average Joe, and in any case it is still not good enough: Traffic analysis can still be used to see who is emailing whom even if the contents is hidden.
Hopefully a distributed, secure protocol like Bitmessage will become popular and replace email in time.
And don’t forget to verify the PGP signature to ensure that the sender is legit. For instructions on how to do this, refer to XKCD: http://xkcd.com/1181/
Any options for iOS or Andriod?
For Android: K-9 Mail + APG (OpenPGP) and/or K-9 Mail + Djigzo (S/MIME)